background image

13

FEATURES OF THE CONSOLE 

The treadmill console offers a selection of features
designed to make your workouts more effective. 

While the manual mode of the console is selected, the
speed and incline of the treadmill can be changed with
the touch of a button. As you exercise, the displays will
provide continuous exercise feedback. You can even
measure your heart rate using the built-in pulse sensor.

The console also offers six speed workouts. Each
workout automatically controls the speed of the tread-
mill as it guides you through an effective workout. 

To use the manual mode of the console

, follow the

steps beginning on page 14.

To use a speed workout

,

see page 16. 

Note: To prevent damage to the walking platform,
always wear clean athletic shoes while using the
treadmill. During the first few minutes that the
treadmill is used, inspect the alignment of the walk-
ing belt, and center the walking belt if necessary
(see page 20).

HOW TO TURN ON THE POWER

IMPORTANT: If the treadmill has been exposed to
cold temperatures, allow it to warm to room tem-
perature before turning on the power. If you do not
do this, the console displays or other electrical
components may become damaged.

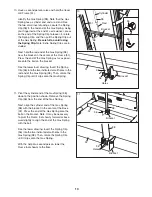
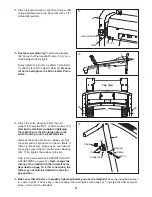
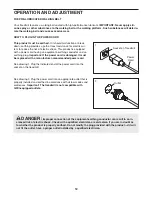
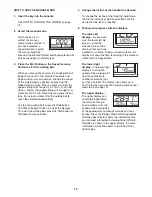
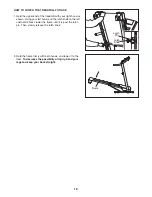
Plug in the power cord
(see page 12). Next, locate
the reset/off circuit breaker
on the treadmill frame near
the power cord. Switch the
circuit breaker to the reset
position. 

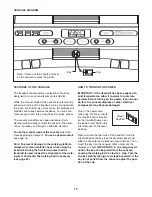
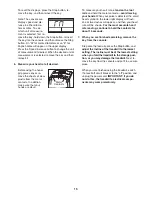
Next, stand on the foot rails of the treadmill. Find the
clip attached to the key (see the drawing above) and
slide the clip onto the waistband of your clothes. Then,
insert the key into the console. After a moment, the
displays will light. 

IMPORTANT: In an emergency sit-

uation, the key can be pulled from the console,
causing the walking belt to slow to a stop. Test the
clip by carefully taking a few steps backward; if the
key is not pulled from the console, adjust the posi-
tion of the clip.

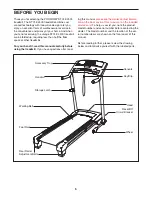
CONSOLE DIAGRAM

Reset

Position

Key

Clip

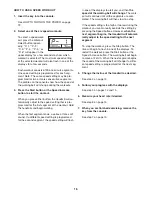
Note: If there are thin sheets of plastic
on the console, remove the plastic.

Содержание Style 4500

Страница 1: ...g this equipment Save this manual for future reference QUESTIONS If you have questions or if any parts are missing or damaged please see the dealer contact in formation on the back cover of this manua...

Страница 2: ...T PARTS Back Cover LIMITED WARRANTY Back Cover PROFORM is a registered trademark of ICON IP Inc 2 WARNING DECAL PLACEMENT The decals shown here have been applied in the locations shown If a decal is m...

Страница 3: ...cuit When replacing the fuse an ASTA approved BS1362 type should be fitted to the fuse carrier A 13 amp fuse should be used 12 If an extension cord is needed use only a 3 conductor 1mm2 14 gauge cord...

Страница 4: ...3 Never insert any object into any opening on the treadmill 24 DANGER Always unplug the power cord immediately after use before cleaning the treadmill and before performing the maintenance and adjustm...

Страница 5: ...the treadmill If you have questions after read ing this manual please see the dealer contact informa tion on the back cover of this manual or on the included service card To help us assist you note t...

Страница 6: ...the key number of the part from the PART LIST near the end of this manual The number after the parentheses is the quantity needed for assembly Note If a part is not in the parts bag check to see if it...

Страница 7: ...Large Hole Small Holes 3 Slide the two Wheel Housings 45 onto the Base 52 Attach each Wheel Housing with two M6 x 58mm Bolts 13 two M6 Washers 32 and two M6 Nuts 43 3 52 13 32 32 45 43 13 32 32 45 43...

Страница 8: ...th an M10 x 60mm Patch Bolt 1 an M10 Washer 14 and an M10 Star Washer 9 do not tighten the Bolt yet 5 54 1 1 11 23 14 54 14 9 23 11 Outer Side Inner Side 11 9 6 See the left inset drawing Identify the...

Страница 9: ...ll six Handrail Bolts before tightening them With the help of a second person carefully lower the Uprights 53 54 to the floor 9 8 8 8 5 5 5 8 5 91 54 53 39 9 7 Set the Console 91 face down on a soft s...

Страница 10: ...ve a second person raise and hold the tread mill Frame 51 Identify the Gas Spring 98 Note that the Gas Spring has a cylinder end and a rod end See the two small inset drawings Locate the Spring Clip 9...

Страница 11: ...M4 2 x 19mm Screws 10 start both Latch Screws before tightening them Make sure that the large hole in the Latch Housing is on the indicated side Remove the knob from the pin Make sure that the collar...

Страница 12: ...g Important If the power cord is damaged it must be replaced with a manufacturer recommended power cord See drawing 1 Plug the indicated end of the power cord into the socket on the treadmill See draw...

Страница 13: ...nd center the walking belt if necessary see page 20 HOW TO TURN ON THE POWER IMPORTANT If the treadmill has been exposed to cold temperatures allow it to warm to room tem perature before turning on th...

Страница 14: ...elt press the Start button or the Speed increase button 4 Change the incline of the treadmill as desired To change the incline of the treadmill hold down the Incline increase or decrease button until...

Страница 15: ...ean To measure your heart rate stand on the foot rails and hold the metal contacts avoid moving your hands When your pulse is detected the small heart symbol in the lower right display will flash one...

Страница 16: ...ries of tones will sound If a different speed setting is programmed for the second segment the speed setting will flash in one of the displays to alert you and then the speed of the walking belt will...

Страница 17: ...is past the latch pin Then slowly release the latch knob make sure that the frame is held securely by the latch pin To protect the floor or carpet from damage place a mat under the treadmill Keep the...

Страница 18: ...left hand pull the latch knob to the left and hold it Next lower the frame until it is past the latch pin Then slowly release the latch knob 2 Hold the frame firmly with both hands and lower it to th...

Страница 19: ...e SOLUTION a Check the reset off circuit breaker see the drawing above If the circuit breaker has tripped wait for five minutes and then press the switch back in b Make sure that the power cord is plu...

Страница 20: ...elt is off center or slips when walked on SOLUTION a If the walking belt has shifted to the left first re move the key and UNPLUG THE POWER CORD Using the hex key turn the left rear roller bolt clock...

Страница 21: ...your goal is to strengthen your cardiovascular system you must perform aerobic exer cise which is activity that requires large amounts of oxygen for prolonged periods of time For aerobic ex ercise adj...

Страница 22: ...Star Washer 43 4 M6 Nut 44 6 M8 Nut 45 2 Wheel Housing 46 1 M8 Jam Nut 47 3 Hood Clip 48 1 Latch Housing 49 2 Grommet 50 2 Isolator Fastener 51 1 Frame 52 1 Base 53 1 Left Upright 54 1 Right Upright...

Страница 23: ...tor 107 2 Motor Bushing 108 4 M10 Lock Nut 109 2 M4 x 10mm Screw 110 2 M4 x 12mm Screw 111 3 M4 Nut 112 1 M4 x 10mm Ground Screw 113 2 M4 Washer 114 1 M4 Star Washer 115 1 Ground Wire w Decal 116 1 Ou...

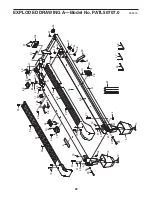
Страница 24: ...0 R0907A 93 17 81 86 51 76 67 28 62 89 3 83 93 6 31 46 25 25 25 25 25 75 75 56 25 71 68 28 18 61 19 44 27 29 55 36 21 42 21 29 60 36 19 42 27 44 19 19 78 50 78 64 4 10 50 41 41 41 41 10 94 97 10 10 74...

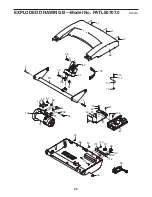
Страница 25: ...LODED DRAWING B Model No PATL50707 0 R0907A 34 38 44 79 34 30 59 38 107 106 115 112 114 111 113 110 111 116 110 37 113 66 90 20 20 20 99 65 47 47 47 57 21 21 42 42 21 109 87 2 23 2 72 58 92 82 40 49 1...

Страница 26: ...53 14 1 9 1 11 14 9 39 85 26 63 10 63 26 26 63 33 77 22 88 77 24 5 9 2 9 39 70 35 108 63 26 69 69 43 45 32 43 13 16 2 8 5 8 5 2 77 10 10 10 77 63 26 10 10 10 10 35 108 70 69 69 63 26 45 32 43 43 32 1...

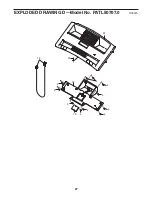
Страница 27: ...27 EXPLODED DRAWING D Model No PATL50707 0 R0907A 15 91 73 4 12 4 4 4 4 4 4 4 4 4 21...

Страница 28: ...thorized by the Dealer This war ranty does not extend to any product or damage to a product caused by or attributable to freight dam age abuse misuse improper or abnormal usage or repairs not provided...

Отзывы: