background image

10

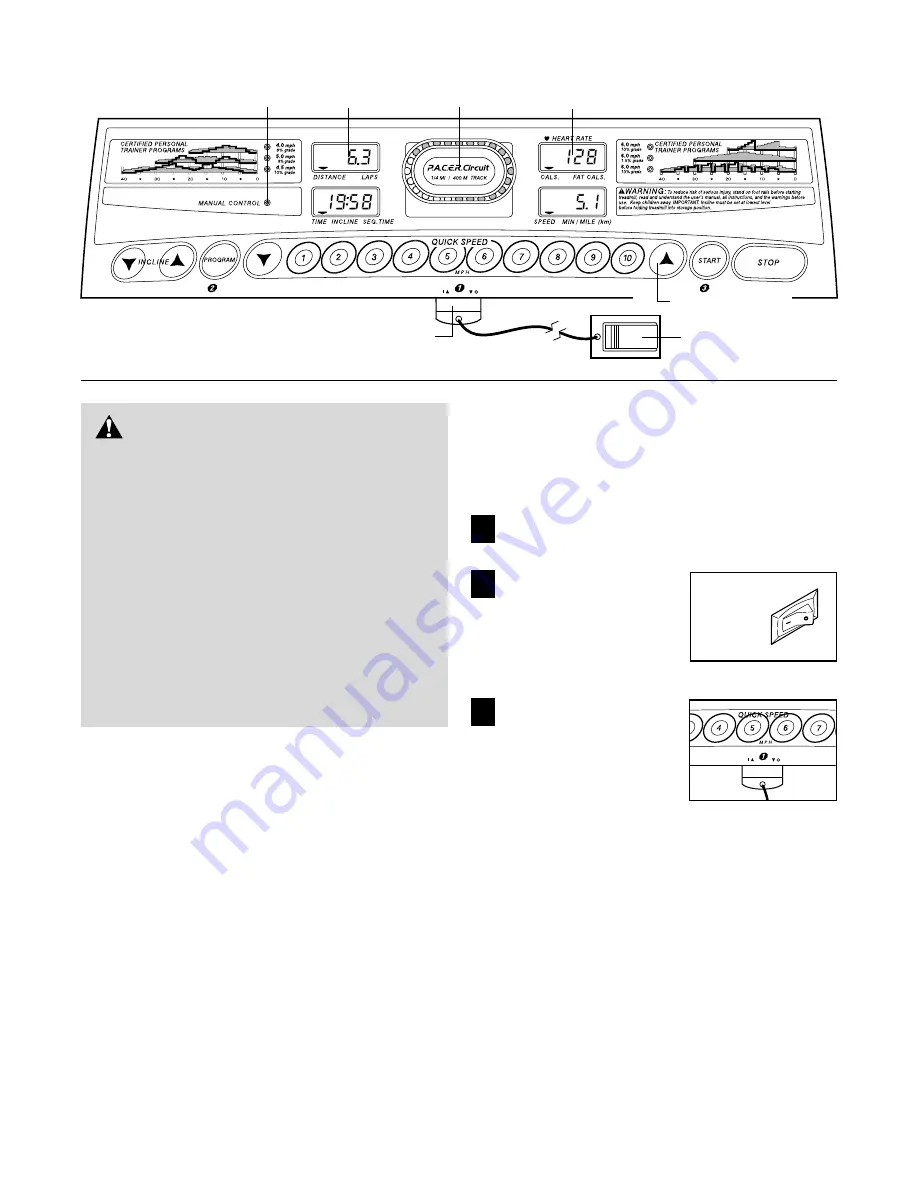
CONSOLE DIAGRAM

Clip

Key

Displays

Displays

Manual/Program Indicators

Speed Buttons

LED Track

Note: If there is a thin sheet of clear plastic 
on the face of the console, remove it.

FEATURES OF THE CONSOLE 

The treadmill console offers an impressive array of 
features to help you get the most from your exercise.
When the console is in the manual mode, the speed
and incline of the treadmill can be controlled with a
touch of a button. As you exercise, the LED track and
the four displays will provide continuous exercise feed-
back. You can even measure your heart rate using the
built-in pulse sensor. 

Six certified personal trainer programs are also offered.
Each program automatically controls the speed and in-
cline of the treadmill as it guides you through an effec-
tive workout. 

To use the manual mode of the console, follow the
steps beginning on page 11. To use a personal trainer
program, 
see page 13. 

HOW TO TURN ON THE POWER

Plug in the power cord (see HOW TO PLUG IN
THE POWER CORD on page 9).  

Locate the on/off
switch on the front of
the treadmill near the
power cord. Make sure
that the on/off switch is
in the on position. 

Stand on the foot rails of
the treadmill. Find the
clip attached to the key
and slide the clip onto
the waistband of your
clothes. Next, insert the
key into the console.
After a moment, the displays and various indica-
tors on the console will light. Test the clip by
carefully taking a few steps backward until the
key is pulled from the console. If the key is not
pulled from the console, adjust the position of
the clip as needed.

3

2

1

CAUTION:

Before operating the

console, read the following precautions.

• Do not stand on the walking belt when turn-

ing on the power. 

• Always wear the clip (see the drawing above)

while operating the treadmill. 

• Adjust the speed in small increments in order

to avoid sudden jumps in speed.

• To reduce the possibility of electric shock, keep

the console dry. Avoid spilling liquids on the
console and place only a sealed water bottle
in the water bottle holder.

On

Position

Содержание CR 610

Страница 1: ...ce Model No PCTL55810 Serial No QUESTIONS As a manufacturer we are com mitted to providing complete customer satisfaction If you have questions or if there are missing parts please call 1 888 936 4266...

Страница 2: ...TMENT 9 HOW TO FOLD AND MOVE THE TREADMILL 15 TROUBLESHOOTING 17 CONDITIONING GUIDELINES 19 PART LIST 21 ORDERING REPLACEMENT PARTS 23 LIMITED WARRANTY Back Cover Note An EXPLODED DRAWING is attached...

Страница 3: ...to use a properly functioning surge suppressor could result in damage to the con trol system of the treadmill If the control sys tem is damaged the walking belt may change speed or stop unexpectedly w...

Страница 4: ...Do not use this treadmill in any commer cial rental or institutional setting WARNING Before beginning this or any exercise program consult your physician This is especially important for persons over...

Страница 5: ...888 936 4266 Monday through Friday 8h00 until 18h30 eastern time excluding holidays To help us assist you please note the product model number and serial number before calling The model number of the...

Страница 6: ...nsion Legs 103 into the treadmill as shown Make sure that the Extension Leg is turned so the Thick Base Pad 97 is on the bottom Next tip the treadmill to the other side and insert the other Extension...

Страница 7: ...ost If necessary tap the Handrail Extension with a rubber mallet to fully insert it Next attach the Handrail Extension by tightening three Small Screws 76 into the indicated holes Note If there is onl...

Страница 8: ...the two Screws 101 the Latch Assembly 9 and the Latch Spacer Reattach the Latch Assembly with the two Screws Make sure that the latch pin engages the Catch 56 9 101 Latch Pin 6 7 Make sure that all p...

Страница 9: ...reduce the risk of elec tric shock This product is equipped with a cord having an equipment grounding conductor and a grounding plug Plug the power cord into a surge suppressor and plug the surge sup...

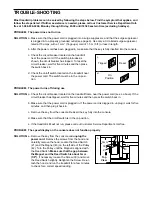
Страница 10: ...TURN ON THE POWER Plug in the power cord see HOW TO PLUG IN THE POWER CORD on page 9 Locate the on off switch on the front of the treadmill near the power cord Make sure that the on off switch is in...

Страница 11: ...ncline rapidly Note After the buttons are pressed it will take a moment for the treadmill to reach the se lected incline setting Follow your progress with the LED track and the four displays The LED T...

Страница 12: ...r a few seconds your heart rate will be shown Hold your thumbs on the sensor for another 15 seconds for the most accu rate reading If the displayed heart rate appears to be too high or too low or if y...

Страница 13: ...program a series of tones will sound and the treadmill will automatically adjust to the speed and incline settings for the second seg ment The program will con tinue in this way until the TIME INCLINE...

Страница 14: ...ATE display should be blank If a d appears in the display the console is in the demo mode This mode is intended to be used only when a tread mill is displayed in a store When the console is in the dem...

Страница 15: ...ith the hole in the catch Insert the latch pin into the catch Make sure that the latch pin is fully inserted into the catch To protect the floor or carpet from damage place a mat under the treadmill K...

Страница 16: ...he left and hold it Pivot the treadmill down until the frame is past the pin Slowly release the latch knob 2 Hold the treadmill firmly with both hands and lower the treadmill to the floor Do not drop...

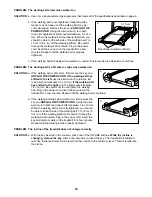
Страница 17: ...ROBLEM The power turns off during use SOLUTION a Check the circuit breaker located on the treadmill frame near the power cord see c above If the circuit breaker has tripped wait for five minutes and t...

Страница 18: ...len wrench to turn the left rear roller bolt clockwise 1 2 of a turn if the walking belt has shifted to the right turn the bolt counterclockwise 1 2 of a turn Be careful not to overtighten the walking...

Страница 19: ...cardiovascular sys tem your exercise must be aerobic Aerobic exercise is activity that requires large amounts of oxygen for prolonged periods of time This increases the demand on the heart to pump blo...

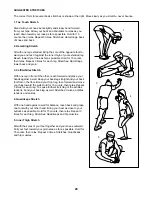
Страница 20: ...illes Stretch With one leg in front of the other reach forward and place your hands against a wall Keep your back leg straight and your back foot flat on the floor Bend your front leg lean forward and...

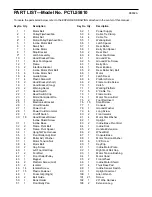
Страница 21: ...t Foot Rail Cap 41 2 Foot Rail 42 1 Front Roller Pulley 43 1 Magnet 44 2 Platform Screw mid 45 2 Isolator 46 14 Isolator Screw 47 15 Plastic Fastener 48 1 Foam Grip Right 49 2 Belt Guide 50 1 Book Hol...

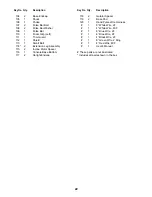
Страница 22: ...y 115 2 Incline Motor Spacer 116 1 Console Base Bottom 117 2 Upright Endcap 118 2 Isolator Spacer 119 2 Base Pad 120 1 Hand Pulse Wire Harness 1 8 White Wire 2F 1 4 White Wire M F 1 8 Blue Wire 2F 1 4...

Страница 23: ...lowing information The MODEL NUMBER OF THE PRODUCT PCTL55810 The NAME OF THE PRODUCT PROFORM CR 610 treadmill The SERIAL NUMBER OF THE PRODUCT see the front cover of this manual The KEY NUMBER AND DES...

Страница 24: ...its scope and duration to the terms set forth herein Some provinces do not allow limitations on how long an implied warranty lasts Accordingly the above limitation may not apply to you This warranty g...

Страница 25: ...2 32 68 44 41 71 55 68 44 101 101 47 47 47 62 53 54 59 60 62 61 64 65 60 59 47 63 57 67 51 66 36 65 36 68 68 12 75 75 37 74 81 23 93 88 16 16 11 25 58 101 62 30 16 49 47 13 13 8 10 118 118 115 EXPLODE...

Страница 26: ...50 89 46 46 46 103 30 97 101 96 97 101 83 83 82 101 16 101 94 101 91 99 62 72 105 16 34 20 108 107 85 76 90 76 79 79 101 119 101 119 95 103 95 114 114 104 104 97 101 97 101 9 78 48 85 111 76 76 108 20...

Отзывы: