background image

12

These guidelines will help you to plan your exercise

program. For detailed exercise information, obtain a

reputable book or consult your physician. Remember,

proper nutrition and adequate rest are essential for

successful results.

EXERCISE INTENSITY

Whether your goal is to burn fat or to strengthen your

cardiovascular system, exercising at the proper inten-

sity is the key to achieving results. You can use your

heart rate as a guide to find the proper intensity level.

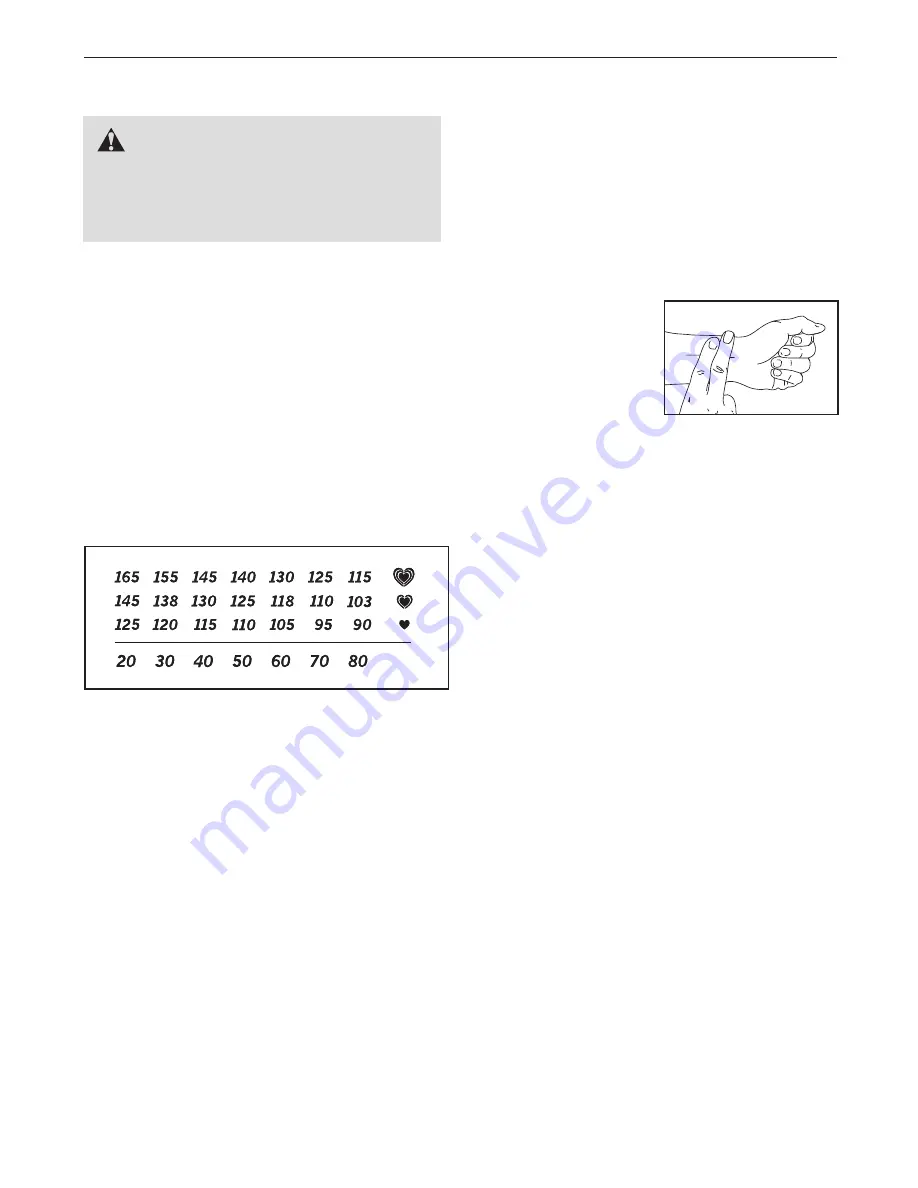
The chart below shows recommended heart rates for

fat burning and aerobic exercise.

To find the proper intensity level, find your age at the

bottom of the chart (ages are rounded off to the near-

est ten years). The three numbers listed above your

age define your “training zone.” The lowest number is

the heart rate for fat burning, the middle number is the

heart rate for maximum fat burning, and the highest

number is the heart rate for aerobic exercise.

Burning Fat

—To burn fat effectively, you must exer-

cise at a low intensity level for a sustained period of

time. During the first few minutes of exercise, your

body uses

carbohydrate calories

for energy. Only after

the first few minutes of exercise does your body begin

to use stored

fat calories

for energy. If your goal is to

burn fat, adjust the intensity of your exercise until your

heart rate is near the lowest number in your training

zone. For maximum fat burning, exercise with your

heart rate near the middle number in your training

zone.

Aerobic Exercise

—If your goal is to strengthen your

cardiovascular system, you must perform aerobic

exercise, which is activity that requires large amounts

of oxygen for prolonged periods of time. For aerobic

exercise, adjust the intensity of your exercise until

your heart rate is near the highest number in your

training zone.

HOW TO MEASURE YOUR HEART RATE

To measure your heart

rate, exercise for at

least four minutes.

Then, stop exercising

and place two fingers on

your wrist as shown.

Take a six-second heart-

beat count, and multiply

the result by 10 to find your heart rate. For example, if

your six-second heartbeat count is 14, your heart rate

is 140 beats per minute.

WORKOUT GUIDELINES

Warming Up

—Start with 5 to 10 minutes of stretching

and light exercise. A warm-up increases your body

temperature, heart rate, and circulation in preparation

for exercise.

Training Zone Exercise

—Exercise for 20 to 30 min-

utes with your heart rate in your training zone. (During

the first few weeks of your exercise program, do not

keep your heart rate in your training zone for longer

than 20 minutes.) Breathe regularly and deeply as you

exercise–never hold your breath.

Cooling Down

—Finish with 5 to 10 minutes of

stretching. Stretching increases the flexibility of your

muscles and helps to prevent post-exercise problems.

EXERCISE FREQUENCY

To maintain or improve your condition, complete three

workouts each week, with at least one day of rest

between workouts. After a few months of regular exer-

cise, you may complete up to five workouts each

week, if desired. Remember, the key to success is to

make exercise a regular and enjoyable part of your

everyday life.

EXERCISE GUIDELINES

WARNING:

Before beginning

this or any exercise program, consult your

physician. This is especially important for

persons over age 35 or persons with pre-

existing health problems.

Содержание ab glider

Страница 1: ...lease contact Customer Care IMPORTANT Please register this product see the limited warranty on the back cover of this manual before contacting Customer Care CALL TOLL FREE 1 888 533 1333 Mon Fri 6 a m...

Страница 2: ...5 ORDERING REPLACEMENT PARTS Back Cover LIMITED WARRANTY Back Cover WARNING DECAL PLACEMENT PROFORM is a registered trademark of ICON IP Inc This drawing shows the location s of the warning decal s If...

Страница 3: ...nd dust Place the abdominal exerciser on a level surface with carpet or a non slip mat beneath it 6 Make sure that there is enough clearance around the abdominal exerciser to mount dismount and use th...

Страница 4: ...our overall fitness For your benefit read this manual carefully before using the abdominal exerciser If you have ques tions after reading this manual please see the front cover of this manual To help...

Страница 5: ...small parts needed for assembly The number in parentheses below each drawing is the key number of the part from the PART LIST near the end of this manual The number following the key number is the qua...

Страница 6: ...he other Base not shown and the other Frame Foot not shown in the same way 2 Insert the Upright 4 into the Frame 1 Attach the Upright 4 with three M8 x 15mm Button Screws 29 and three M8 Washers 34 Do...

Страница 7: ...ecure the Handlebar 5 with the Handlebar Knob 37 4 3 43 1 41 29 4 Using a small plastic bag to keep your hand clean apply a small amount of the included grease to both sides of a Pivot Washer 43 and t...

Страница 8: ...e Pivot Frame 3 7 Move the Roller Carriage 6 to the position shown and align the indicated hole in the Roller Carriage with the corresponding hole not shown in the Pivot Frame 3 Insert the Pin 27 into...

Страница 9: ...hold the Handlebar 5 firmly with both hands Place one knee on the Knee Pad 7 halfway between the front of the Knee Pad and the back of the Knee Pad Then place your other knee on the Knee Pad Always ho...

Страница 10: ...ide to side but the knee pad will move forward and back ward To exercise use your core muscles to move the knee pad forward and backward With the pivot frame unlocked and the knee pad locked the pivot...

Страница 11: ...ole Then reattach the battery door HOW TO USE THE CONSOLE Note Make sure that a battery is installed see HOW TO INSTALL A BATTERY at the left If there is a sheet of plastic on the display remove the p...

Страница 12: ...rm aerobic exercise which is activity that requires large amounts of oxygen for prolonged periods of time For aerobic exercise adjust the intensity of your exercise until your heart rate is near the h...

Страница 13: ...lles Stretch With one leg in front of the other reach forward and place your hands against a wall Keep your back leg straight and your back foot flat on the floor Bend your front leg lean forward and...

Страница 14: ...Grip 18 2 Reed Switch 19 2 Upper Roller 20 2 Lower Roller 21 2 Roller Carriage Cap 22 1 Long Magnet Bracket 23 1 Short Magnet Bracket 24 3 Console Screw 25 4 Roller Spacer 26 1 M4 x 12mm Screw 27 1 P...

Страница 15: ...25 25 25 27 28 29 26 29 29 29 29 31 31 10 31 31 31 32 32 32 32 31 31 31 50 31 31 33 38 30 36 36 36 36 35 35 20 44 44 38 40 40 41 29 8 44 44 43 37 28 31 39 39 45 34 34 34 34 34 24 24 36 36 20 45 34 47...

Страница 16: ...mage to a product caused by or attributable to freight damage abuse misuse improper or abnormal usage or repairs not provided by an ICON authorized service center to products used for commercial or re...

Отзывы: