background image

7

9

Before using the console, make sure that the power
cord is properly plugged in.
(See HOW TO PLUG IN
THE POWER CORD on
page 7.) In addition, make
sure that the on/off switch,
located near the power
cord, is in the on position. 

When you are ready to begin exercising, step onto the
foot rails of the treadmill. Find the clip attached to the
key and slide the clip onto the waistband of your clothing.

Follow the steps below to operate the console.

Insert the key into the console.

A moment after the key is
inserted, the four displays
and the manual indicator
will light. In addition, a
number will appear in the
CD display for five sec-
onds. This number indicates the current volume set-
ting of the CD player.

Select the manual mode.

When the key is inserted,
the manual mode will au-
tomatically be selected.
If you have selected the
CD program mode,
press the SELECT
MODE button to select the manual mode.

Press the SPEED 

button to start the walking

belt.

A moment after the but-
ton is pressed, the walk-
ing belt will begin to
move at 1.0 mph. Hold
the handrails and begin
walking. 

As you exercise, change the speed of the walking
belt as desired by pressing the SPEED buttons.
Each time one of the buttons is pressed, the
speed will change by 0.1 mph. If the buttons are
held down, the speed will change in increments of
0.5 mph. The speed range is 0.5 mph to 10.0 mph.

To stop the walking belt, press the STOP button.
The four displays will pause and the TIME/PACE
display will begin to flash. To restart the walking
belt, press the SPEED 

button. To stop the walk-

ing belt and reset the displays, press the STOP
button, remove the key, and then reinsert the key.

Adjust the incline as desired.

To vary the intensity of
your exercise, change
the incline of the tread-
mill as desired by press-
ing the INCLINE buttons.
Each time one of the
buttons is pressed, the
incline will change by 0.5%. The incline range is
1.5% to 10%. Note: When one of the INCLINE but-
tons is pressed, the INCLINE/DISTANCE 
display will show the incline setting for seven 
seconds. After the buttons are pressed, it may
take a moment for the treadmill to reach the se-
lected incline setting.  

Follow your progress with the four displays.

TIME/PACE display

Ñ

This display shows the
elapsed time and your
current pace (pace is
measured in 

minutes per

mile

). Every seven sec-

onds, the display will change from one number to
the other. The PACE indicator will light when your
pace is shown. 

SPEED display

ÑThis

display shows the speed
of the walking belt, in
miles per hour or kilome-
ters per hour. (See HOW
TO SELECT MILES OR
KILOMETERS on page 12.) 

CALORIES/FAT CALO-
RIES display

ÑThis dis-

play shows the numbers
of calories and fat calo-
ries you have burned
(see FAT BURNING on
page 16 for an explanation of fat calories). Every
seven seconds, the display will change from one
number to the other. The FAT CALS indicator will
light when the number of fat calories is shown.

5

4

3

2

1

HOW TO USE THE MANUAL MODE

On

Position

Содержание 831.298300

Страница 1: ...nual before using this equipment Save this manual for future reference Serial Number Decal Model No 831 298300 Serial No Find the serial number in the location shown below Write the serial number in the space above for reference SEARS ROEBUCK AND CO HOFFMAN ESTATES IL 60179 ...

Страница 2: ...ERATION AND ADJUSTMENT 7 HOW TO FOLD AND MOVE THE TREADMILL 13 MAINTENANCE AND TROUBLE SHOOTING 14 CONDITIONING GUIDELINES 16 PART LIST 18 ORDERING REPLACEMENT PARTS Back Cover FULL 90 DAY WARRANTY Back Cover Note An EXPLODED DRAWING is attached in the center of this manual 2 ...

Страница 3: ...ppressed voltage rating of 400 volts or less and a minimum surge dis sipation of 450 joules The surge suppressor must be electrically rated for 120 volts AC and 15 amps 12 Keep the power cord and the surge suppres sor away from heated surfaces 13 Never move the walking belt while the power is turned off Do not operate the treadmill if the power cord or plug is damaged or if the treadmill is not wo...

Страница 4: ...ill and before performing the main tenance and adjustment procedures de scribed in this manual Never remove the motor hood unless instructed to do so by an authorized service representative Servicing other than the procedures in this manual should be performed by an authorized service representative only 27 This treadmill is intended for in home use only Do not use this treadmill in any commer cia...

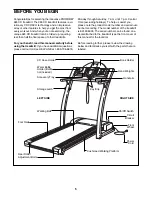
Страница 5: ...Saturday 7 a m until 7 p m Central Time excluding holidays To help us assist you please note the product model number and serial num ber before calling The model number of the treadmill is 831 298300 The serial number can be found on a decal attached to the treadmill see the front cover of this manual for the location Before reading further please review the drawing below and familiarize yourself ...

Страница 6: ...ock Pin 97 Make sure that the Lock Pin Collar 95 and the Spring 94 are on the Lock Pin Insert the Lock Pin into the left Upright 15 and tighten the Lock Knob onto it 3 Observe the two Rear Feet 120 at the rear of the tread mill see figure 1 above If there is a space between one of the Feet and the floor the included spacer will need to be attached Hold the treadmill firmly with both hands and rais...

Страница 7: ...ductor and a grounding plug Plug the power cord into a surge suppressor and plug the surge suppressor into an appropriate outlet that is properly installed and grounded in accordance with all local codes and ordinances This product is for use on a nominal 120 volt circuit and has a grounding plug that looks like the plug illus trated in drawing 1 below A temporary adapter that looks like the adapt...

Страница 8: ...the speed and incline of the treadmill can be changed with a touch of a button As you exercise four displays will provide continuous exercise feedback The console also features revolutionary PROFORM CD COACH technology This breakthrough technology allows the console to play specially designed CD s that interactively adjust the speed and incline of the treadmill while a personal trainer coaches you...

Страница 9: ...g belt press the STOP button The four displays will pause and the TIME PACE display will begin to flash To restart the walking belt press the SPEED button To stop the walk ing belt and reset the displays press the STOP button remove the key and then reinsert the key Adjust the incline as desired To vary the intensity of your exercise change the incline of the tread mill as desired by press ing the...

Страница 10: ...D workout program Put on the headphones Plug the included headphones fully into the jack on the con sole Next put on the headphones CAUTION Use only the included head phones with the console Do not plug in or unplug the headphones while the key is in the console If the headphones become unplugged during exercise stop the treadmill and remove the key before plugging the headphones back in To keep t...

Страница 11: ...Ó is heard the speed and incline will change back to the programmed settings To pause the program press the pause button The four displays will pause the TIME PACE display will begin to flash and the letters ÒPAÓ will appear in the CD display To restart the program press the play button When the next chirp is heard the walking belt will begin to move To stop the program before it is completed pres...

Страница 12: ...ng belt has moved When you are finished viewing the unit of measure ment total time and total distance remove the key from the console A variety of exciting CD s is available for purchase Each CD set includes two new 30 minute workout programs To purchase additional CDÕs refer to the card accom panying this treadmill If you want to use CD workout pro grams or listen to music CDÕs without headphone...

Страница 13: ... storage position in temperatures above 85 Fahrenheit HOW TO MOVE THE TREADMILL Before moving the treadmill convert the treadmill to the storage position as described above Make sure that the latch pin is fully inserted into the catch 1 Hold the treadmill as shown and place one foot against a wheel Do not hold or push on the book holder or the book holder may be damaged 2 Tilt the treadmill back u...

Страница 14: ...tch located on the treadmill near the power cord The switch must be in the on position 2 SYMPTOM THE POWER TURNS OFF DURING USE a Check the circuit breaker located on the treadmill frame near the power cord see 1 c above If the circuit breaker has tripped wait for five minutes and then press the switch back in b Make sure that the power cord is plugged in c Remove the key from the console Reinsert...

Страница 15: ...ise and the right bolt coun terclockwise 1 4 of a turn each Be careful not to overtighten the walking belt Plug in the power cord insert the key and run the treadmill for a few minutes Repeat until the walking belt is cen tered b If the walking belt has shifted to the right first remove the key and UNPLUG THE POWER CORD Using the allen wrench turn the left rear roller adjustment bolt counterclockw...

Страница 16: ...r the middle number in your training zone Aerobic Exercise If your goal is to strengthen your cardiovascular system your exercise must be Òaerobic Ó Aerobic exercise is activity that requires large amounts of oxygen for pro longed periods of time This increases the demand on the heart to pump blood to the muscles and on the lungs to oxygenate the blood For aerobic exercise adjust the speed and inc...

Страница 17: ...le of the opposite foot toward you and rest it against the inner thigh of your extended leg Reach toward your toes as far as possible Hold for 15 counts then relax Repeat 3 times for both legs Stretches Hamstrings lower back and groin 3 Calf Achilles Stretch With one leg in front of the other reach forward and place your hands against a wall Keep your back leg straight and your back foot flat on t...

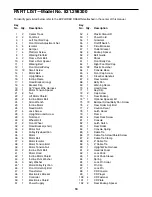
Страница 18: ...tronics Bracket 49 1 Controller 50 1 Electronics Shield 51 1 Power Supply 52 4 Plastic Stand off 53 1 Power Cord 54 1 Grommet 55 1 On Off Switch 56 1 Circuit Breaker 57 1 Outlet Bracket 58 2 Endcap Spacer 59 2 Belt Guide 60 1 Shock 61 1 Front Belly Pan 62 1 Right Foot Rail Cap 63 22 Plastic Fastener 64 1 Console Base 65 4 Front Cap Screw 66 1 Crossbar Handrail 67 2 Rear Isolator 68 1 Belly Pan 69 ...

Страница 19: ...e Harness 128 1 60Ó Optic Incline Wire 129 1 Rhythm Mix CD 130 8 Isolator Screw 131 1 Motor Isolator 132 1 Filter 133 1 90Ó Wire Harness 134 1 4Ó Wire Harness 135 2 Crossbar Washer 136 2 Crossbar Plastic Washer 137 1 Console Plate 138 4 Console Plate Screw 139 6 3 4Ó Console Screw 140 2 Motor Tension Bushing 1 14Ó White Wire 2 F 1 4Ó White Wire M F 1 6Ó White Wire 2 F M 1 8Ó Blue Wire 2 F 1 6Ó Blu...

Страница 20: ...33 14 33 45 34 72 3 62 10 43 42 9 5 7 130 7 5 130 1 8 11 7 7 5 86 130 63 63 5 130 63 63 120 75 122 121 73 67 76 75 120 63 68 118 83 78 118 67 86 86 61 21 114 116 114 112 113 35 44 76 44 80 80 86 79 52 51 1 2 39 38 4 37 86 86 50 18 18 18 53 128 131 13 13 132 13 47 20 20 20 102 44 140 EXPLODED DRAWINGÑModel No 831 298300 R0599A ...

Страница 21: ...60 86 85 87 89 75 42 71 88 30 21 31 6 75 90 106 31 70 106 105 28 6 75 105 6 75 86 22 105 105 15 117 90 98 109 74 119 126 125 127 129 84 19 134 27 27 133 124 136 124 138 138 136 66 135 135 137 92 93 94 95 96 97 77 77 63 91 91 Kirk Niebe rgall EXPLODED DRAWINGÑModel No 831 298300 R0599A ...

Страница 22: ...nter of this manual Model No 831 298300 QUESTIONS If you find that you need help assembling or operating the PROFORM 985 CD treadmill treadmill a part is missing or you need to schedule repair service call our toll free HELPLINE 1 800 736 6879 MondayÐSaturday 7 amÐ7 pm Central Time excluding holidays REPLACEMENT PARTS If parts become worn and need to be replaced call the following toll free number...

Отзывы: