background image

6 of 17 


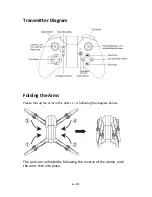
Transmitter Diagram 


Folding the Arms 

Please fold up the arms in the order 1 – 4 following the diagram below. 


The arms are unfolded by following the reverse of the above, until 
the arms click into place. 


Содержание Maverick PFBD95

Страница 1: ...Maverick User Manual Model PFBD95 Thank you for choosing ProFlight Please read this user manual before using this drone and keep it safe for future reference ...

Страница 2: ...itter Diagram 6 Folding the Arms 6 Fitting Propeller Guards 7 Propeller Installation 7 Preparing for First Flight 8 Binding of Radio Transmitter and Receiver 8 Flight Instructions 9 Flight Adjustment 10 Aircraft Functions Features 11 Camera 13 App 14 Troubleshooting Guide 16 Support 17 ...

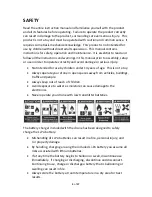
Страница 3: ...e by children under 14 years of age This is not a toy Always operate your drone in open spaces away from vehicles buildings traffic and people Always keep out of reach of children Avoid exposure to water as moisture can cause damage to the electronics Never operate your drone with low transmitter batteries The battery charger included with the drone has been designed to safely charge the Li Po bat...

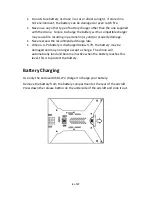
Страница 4: ...y and or property damage Never exceed the recommended charge rate When a Li Po battery is discharged below 3 7V the battery may be damaged and may no longer accept a charge The drone will automatically land and become inactive when the battery reaches this level this is to protect the battery Battery Charging Use only the enclosed USB Li Po charger to charge your battery Remove the battery from th...

Страница 5: ... will illuminate RED When the battery is fully charged the LED will go out Charging should take around 60 70 minutes DO NOT leave the battery unattended whilst charging Installing the Controller Batteries Unscrew the battery cover and insert 3 x AA Batteries making sure the correct polarity is followed before reattaching the battery cover ...

Страница 6: ...of 17 Transmitter Diagram Folding the Arms Please fold up the arms in the order 1 4 following the diagram below The arms are unfolded by following the reverse of the above until the arms click into place ...

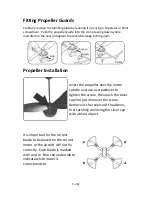
Страница 7: ...er Installation Insert the propeller over the motor spindle and use a screwdriver to tighten the screw then push the silver cap into position over the screw Removal is the reverse of the above first carefully removing the silver cap with a blunt object It is important for the correct blade to be placed on the correct motor or the aircraft will not fly correctly Each blade is marked with an A or B ...

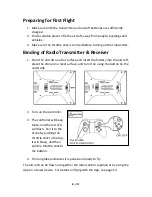
Страница 8: ...urface and insert the battery into the aircraft place the drone on a level surface and turn it on using the button on the underside 2 Turn on the controller 3 The controller will beep twice and the red LED will flash Pair it to the drone by pushing the throttle stick to the top it will bleep and then pull the throttle stick to the bottom 4 The long bleep indicates it is paired and ready to fly The...

Страница 9: ...e off and land by pressing the take off land button click once to take off and once to land Once the aircraft is airborne it will hold a steady hover you are now in control of the aircraft and can use the left and right sticks to control it Note Should the aircraft be left for a while with no control inputs it will go to sleep simply press and hold the take off land button to reactivate the aircra...

Страница 10: ...rim buttons Select the trim key opposite the direction of drift Trimming is always needed before your first flight Auto Trim To recover the drone back to the original factory settings for trim Press and hold the two levers in the direction shown on the diagram for a few seconds The lights on the drone will start to flash to confirm this has completed ...

Страница 11: ... full control of the aircraft at any time by moving the control sticks The aircraft will not return to where it started it will simply move in the direction it was orientated when turned on Headless Flight The aircraft can be made to fly in Headless Flight by pressing the headless flight button This will make the aircraft fly without a front or rear It will fly in the orientation of the pilot If y...

Страница 12: ...oller it will make a bleep then press the right lever in the direction you want the drone to flip Speed Control The drone has 3 speed settings It will initially be set at 25 By pressing the speed button the speed of the drone can be adjusted The controller will bleep to indicate the speed it is set at after the button has been pressed 25 1 Bleep 50 2 Bleeps 100 3 Bleeps ...

Страница 13: ...n and will repeatedly flash when recording a video There are two buttons on the controller The photo button will save a snapshot directly to your smart devices gallery and the video button will start recording a video Pressing the video button again will stop the video Please Note The video button MUST be pressed to stop the recording of the video before the drone is landed and drone turned off ot...

Страница 14: ...turn on the aircraft and go to settings on your mobile device Open the WiFi settings and search for a device starting with WiFiUFO Select it and wait for it to connect Open the XSW UFO App and click Play This will lead you to the control screen and show the view of the camera You can either use the on screen controls or the controller to control all aspects of the aircraft ...

Страница 15: ...f Landing controls 16 Pitch Trim 7 Use phones gyroscope for control 17 Yaw Trim 8 Toggle On Screen Controls 18 Emergency Stop Cut power to motors 9 Maintain altitude and control using left lever 19 Roll Trim 10 Settings Note Do not turn on the supplied remote control if you want to control the aircraft using the App If you want to fly using the controller the App can only be used for live view and...

Страница 16: ...uctions on page 14 2 Reconnect using the instructions on page 14 3 Aircraft can not fly on App when main controller is turned on Turn off controller reset aircraft app and WiFi to reconnect to App 5 Camera not working in App 1 Aircraft not connected to App 1 Reconnect using the instructions on page 14 Disposal Do not dispose this product as unsorted municipal waste Collection of such waste must be...

Страница 17: ...f you have been through the troubleshooting and the unit is failing to operate our service line can be contacted on 0871 971 3141 Office hours 9AM 5PM Monday to Friday www prolightuk co uk Unit 2 The Nursery Berristow Lane South Normanton Derbyshire DE55 2FX ...

Отзывы: