background image

2

1

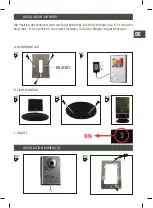
BRACKET

A. WALL INSTALLATION

B. TABLE INSTALLATION

1

2

INSTALLATION MONITOR

INSTALLATION CAMERA

1

2

3

The position of the monitor is determined as follows: the height is approximately 170 cm, 

and is max. 150 cm from the plug socket into which the adapter will be plugged.  The mo-

nitor can be table mounted. The monitor can be powered with a USB cable. 

UK

Содержание PAC120

Страница 1: ...Design videofoon Vid ophone design Design Video T rsprechanlage Design video doorphone NL FR DE UK www profile eu WIRELESS Ref 200689002 Art PAC120...

Страница 2: ...tot 1m Beeldhoek 92 CMOS camera Antiroest Installatiehoogte 1 70m Gebruikstemperatuur 10 C 50 C Totale afmetingen 142 L x 98 W x 38 D mm KENMERKEN U heeft een stopcontact nodig dat max 1 5m van de mon...

Страница 3: ...SCHEMA 1 2 2 5 7 8 12 15V 12 15V 1 2 3 4 5 6 7 8 MATCHING 200689002_PAC120_IM januari 2016 NL...

Страница 4: ...LLING LICHTSTERKTE VOLUME USB POORT MONITOR TOETS MENU EXIT TOETS DEURSLOT NAVIGATIE BOVEN ONDER TOETS CONVERSATIETOETS BEVESTIGEN LUIDSPREKER BELVOLUME NAVIGATIE LINKS RECHTS TOETS FOTO TOETS VIDEO R...

Страница 5: ...ST 1 1 2 3 De positie voor de monitor wordt als volgt bepaald de hoogte bedraagt ongeveer 170 cm en is max 150 cm verwijderd van een stopcontact waar de adapter zal ingeplugd worden U kunt er ook voor...

Страница 6: ...kleuren bij het aansluiten van zowel de monitor als deurpost overeenstem men Zoniet kunt u de videofoon direct stuk maken en valt deze buiten garantie Indien er een deurslot aangesloten wordt dient d...

Страница 7: ...coon bestandsbeheer en duw dan op de bevestigingstoets E Hierna kunt u kiezen tussen het bekijken beheren van uw foto s of video s door middel van de links rechtstoets D Bevestig met de bevestigingsto...

Страница 8: ...e menu Opgelet in dit menu kan u enkel het volume van de buitenpost regelen Andere variabe len kunnen via de toetsen aan de zijkant van de buitenpost geregeld worden 4 SYSTEEMINSTELLINGEN Kies vanuit...

Страница 9: ...gens via de bevestigingstoets E en druk ten slotte op de exittoets B om terug naar het vorige menu te gaan D INSTELLINGEN VOOR SPREEKTIJD Selecteer het icoon instellingen bij voor spreek tijd en selec...

Страница 10: ...regelmatig te formatteren H OVERSCHRIJVEN GEHEUGEN Selecteer het icoon overschrijven geheugen en u krijgt twee keuzes Nee als u nee selecteert zullen er geen foto s of filmopnames meer worden opgesla...

Страница 11: ...melding pairing Tijdens het verbinding maken druk met het meegeleverde pincet op beide ijzeren plaatjes achteraan de gekozen buitenpost Wanneer er OK verschijnt is de gekozen buitenpost verbonden Druk...

Страница 12: ...conden lang op de monitortoets A drukt wordt een opname gestart Als u de monitortoets A nog eens 3 seconden indrukt wordt de opname gestopt LET OP wanneer u in uw instellingen heeft geselecteerd dat u...

Страница 13: ...et toestel niet correct volgens de voorgeschreven installatie instructies werd ge nstalleerd noch voor schade ten gevolge van onvoorziene omstan digheden zoals natuurrampen blikseminslag Alle daaruit...

Страница 14: ...ion nocturne jusqu 1 m Angle d image de 92 Cam ra CMOS Traitement antirouille Hauteur d installation 1 70 m Temp rature d utilisation 10 C 50 C Dimensions totales 142 L x 98 l x 38 H mm CARACT RISTIQU...

Страница 15: ...SCHEMA 1 2 2 5 7 8 12 15V 12 15V 1 2 3 4 5 6 7 8 MATCHING 200689002_PAC120_IM januari 2016 FR...

Страница 16: ...MI RE VOLUME PORT USB TOUCHE MONITEUR TOUCHE MENU SORTIE TOUCHE D VERROUILLAGE NAVIGATION HAUT BAS TOUCHE CONVERSATION CONFIRMATION HAUT PARLEUR TOUCHE VOLUME DE SONNERIE NAVIGATION GAUCHE DROITE TOUC...

Страница 17: ...moniteur est d termin e comme suit sa hauteur s l ve plus ou moins 170 cm et il est situ une distance maximale de 150 cm de la prise de courant laquelle l adaptateur sera branch Vouz pouvez utiliser l...

Страница 18: ...ons de nouveau sur le fait que les c bles d alimentation ne peuvent pas tre prolong s ou sectionn s une telle mani pulation conduit un mauvais fonctionnement de l appareil et rend la garantie caduque...

Страница 19: ...on de fichiers et appuyez ensuite sur la touche de confirmation E Vous pourrez ensuite choisir d afficher ou de g rer vos photos ou vid os l aide de la touche gauche droite D Confirmez avec la touche...

Страница 20: ...et uniquement de r gler le volume du poste ext rieur D autres variables peuvent tre param tr es gr ce aux touches se trouvant sur le c t du poste ext rieur 4 PARAM TRAGE DU SYST ME Depuis l cran d acc...

Страница 21: ...de confirmation E et appuyez enfin sur la touche sortie B pour revenir au menu pr c dent D PARAM TRES DU PARLOPHONE S lectionnez l ic ne R glage de la dur e de parole et utilisez la touche haut bas C...

Страница 22: ...de formater votre m moire assez r guli rement H R CRITURE DE LA M MOIRE S lectionnez l ic ne R criture de la m moire et choisissez parmi les deux op tions Non aucune photo ou vid o ne sera enregis tr...

Страница 23: ...message Pairing Pendant la connexion et gr ce la pince four nie appuyez sur les deux plaques m talliques situ es l arri re du poste ext rieur Lorsque le message OK appara t cela signifie que le poste...

Страница 24: ...la touche photo D Si vous appuyez durant 3 secondes sur la touche moniteur A un enregistrement vid o se d clenche Si vous appuyez une seconde fois sur la touche moniteur A l enregistrement s arr te AT...

Страница 25: ...allation de l appareil non conforme aux instructions d installation ni des d g ts provoqu s par des circonstances impr visibles comme les catastrophes naturelles la foudre Tous les co ts aff rents son...

Страница 26: ...mgekehrt MONITOR Versorgungsspannung Bildschirm 230 VAC 5 VDC 1000 mA Frequenz 2 4 GHz Reichweite bis zu 200 m im offenen Raum Anzahl Pixel 320 horizontal X 3 X 240 vertikal Freisprechanlage 4 HR TFT...

Страница 27: ...SCHEMA 1 2 2 5 7 8 12 15V 12 15V 1 2 3 4 5 6 7 8 MATCHING 200689002_PAC120_IM januari 2016 DE...

Страница 28: ...TST RKE LAUTST RKE USB PORT MONITORTASTE MENU EXIT TASTE T RSCHLOSS NAVIGATIONSTASTE aufw rts abw rts GESPR CHSTASTE BEST TIGEN LAUTSPRECHER ANRUFLAUTST RKE NAVIGATIONSTASTE links rechts FOTO TASTE TA...

Страница 29: ...GE 1 2 INSTALLATION MONITOR INSTALLATION KAMERA 1 1 2 3 Die Position des Monitors wird wie folgt bestimmt Die H he betr gt circa 170 cm und er liegt max 150 cm entfernt von einer Steckdose in die der...

Страница 30: ...drahtung weder verl ngert noch durchtrennt werden darf Dies f hrt zu Funktionsst rungen des Ger tes und der An spruch auf Garantie verf llt Falls ein T rschloss angeschlossen wird dann muss die Verbin...

Страница 31: ...en Sie dann die Best tigungstaste E Anschlie end k nnen Sie mit der Links Rechts Taste zwischen dem Ansehen Verwalten Ihrer Fotos oder Videos w hlen Best tigen Sie die Auswahl mit der Best tigungstast...

Страница 32: ...Men k nnen Sie nur die Lautst rke der Au eneinheit einstellen Andere Variablen k nnen ber die Tasten an der Seitenfl che der Au eneinheit einge stellt werden 4 SYSTEMEINSTELLUNGEN W hlen Sie vom Start...

Страница 33: ...die Best ti gungstaste E und dr cken Sie abschlie end die Exit Taste B um zum vorherigen Men zur ck zukehren D EINSTELLUNGEN F R SPRECHZEIT W hlen Sie das Symbol Einstellungen f r Sprechzeit und w hle...

Страница 34: ...atieren H GESPEICHERTE DATEN BERSCHREIBEN W hlen Sie das Symbol Gespeicherte Daten berschreiben Sie haben dann zwei M g lichkeiten zur Wahl Nein Wenn Sie Nein w hlen werden keine Fotos oder Filmaufnah...

Страница 35: ...Meldung pairing W hrend des Herstellens der Verbindung dr cken Sie mit der mitgelieferten Pinzette auf bei de Metallplatten hinten an der gew hlten Au eneinheit Wenn die Meldung OK erscheint ist die...

Страница 36: ...tortaste A 3 Sekunden lang gedr ckt halten wird eine Aufnahme gestartet Wenn Sie die Monitortaste A erneut 3 Sekunden gedr ckt halten wird die Aufnahme gestoppt ACHTUNG Wenn Sie bei Ihren Einstellunge...

Страница 37: ...nicht vorschriftsm ige Installation entstehen noch f r Sch den aufgrund unvorhergesehener Ereignisse wie Naturkatastrophen Blitzschl ge usw haftbar Alle sich daraus ergebenden Kosten gehen ausschlie l...

Страница 38: ...ltage 230VAC 5VDC 1000mA Frequency 2 4 GHz Range to 200 m in open space Number of pixels 320 Horizontal x 3 x 240 Vertical Hands free set 4 HR TFT LED colour screen Video system PAL NTSC Adjustable pi...

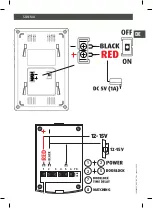
Страница 39: ...SCHEMA 1 2 2 5 7 8 12 15V 12 15V 1 2 3 4 5 6 7 8 MATCHING 200689002_PAC120_IM januari 2016 UK...

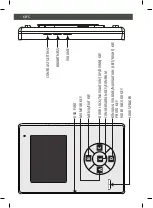
Страница 40: ...ST SETTING BRIGHTNESS VOLUME USB PORT MONITOR KEY MENU EXIT KEY DOOR LOCK NAVIGATION UP DOWN KEY CONVERSATION KEY CONFIRM LOUDSPEAKER RINGING VOLUME NAVIGATION LEFT RIGHT KEY PHOTO KEY VIDEO RECORD KE...

Страница 41: ...OR INSTALLATION CAMERA 1 2 3 The position of the monitor is determined as follows the height is approximately 170 cm and is max 150 cm from the plug socket into which the adapter will be plugged The m...

Страница 42: ...se that the power supply wiring may not be extended or cut through this causes the appliance to work poorly and invalidates the warranty If a door lock is to be connected its connection must be from t...

Страница 43: ...start screen select the file management icon then press the confirm key E You can then choose between viewing or managing your photos or videos using the left right key D Confirm with the confirm key...

Страница 44: ...s menu Note in this menu you can only set the volume of the external unit Other variables can be set using the keys on the side of the external unit 4 SYSTEM SETTINGS In the start screen select the se...

Страница 45: ...with the confirm key E and finally press the exit key B to go back to the previous menu D SETTINGS FOR SPEAKING TIME Select the settings for speaking time icon and use the up down key C to set the len...

Страница 46: ...ularly format your memory H MEMORY OVERWRITING Select the memory overwriting icon and you have two choices No if you select no no more photos or video recordings will be saved when the memory is full...

Страница 47: ...l unit shows the message pairing While making the connection use the pincers supplied to press both metal plates at the back of the selected external unit When OK ap pears the selected external unit i...

Страница 48: ...hotos by pressing the photo key D When you press the monitor key A for 3 seconds a video recording starts If you keep the monitor key A pressed for a further 3 seconds the recoding stops NOTE if in th...

Страница 49: ...tly installed according to the specified installation instructions nor for damage as a result of unforeseen circumstances such as natural disasters lightening strike etc All such resulting costs are c...

Отзывы: