background image


10. H Microphone Jack 
11. 10/100Mbps RJ45 Ethernet Port:

 support Ethernet connection


12. AC/DC In Jack: 

powered by 12V/3A AC/DC input


13. Power Switch:

 switch power ON/OFF 

14. IR Receiver & LED Indicator 

IR Receiver:

 support remote control 

LED Indicator: 

Power supply ON


Red then turn Green after kernel boot up. 

Power supply OFF


LED light off. 

15. WIFI:

 802.11b/g/n/ac 2.4G 

16. Temperature

Operation: 0

 ~ 40

 ( 32F ~104F) 

                                  Storage: -10°C ~ 55°C  (14°F ~ 131°F) 


Power on the Product 

Step 1

 Plug the power source into the AC/DC in jack (

#12

 in 

Product Instruction

).


Step 2

 Switch the power switch (

#13

) on the bottom of this product to 

ON

Insert SD Card 

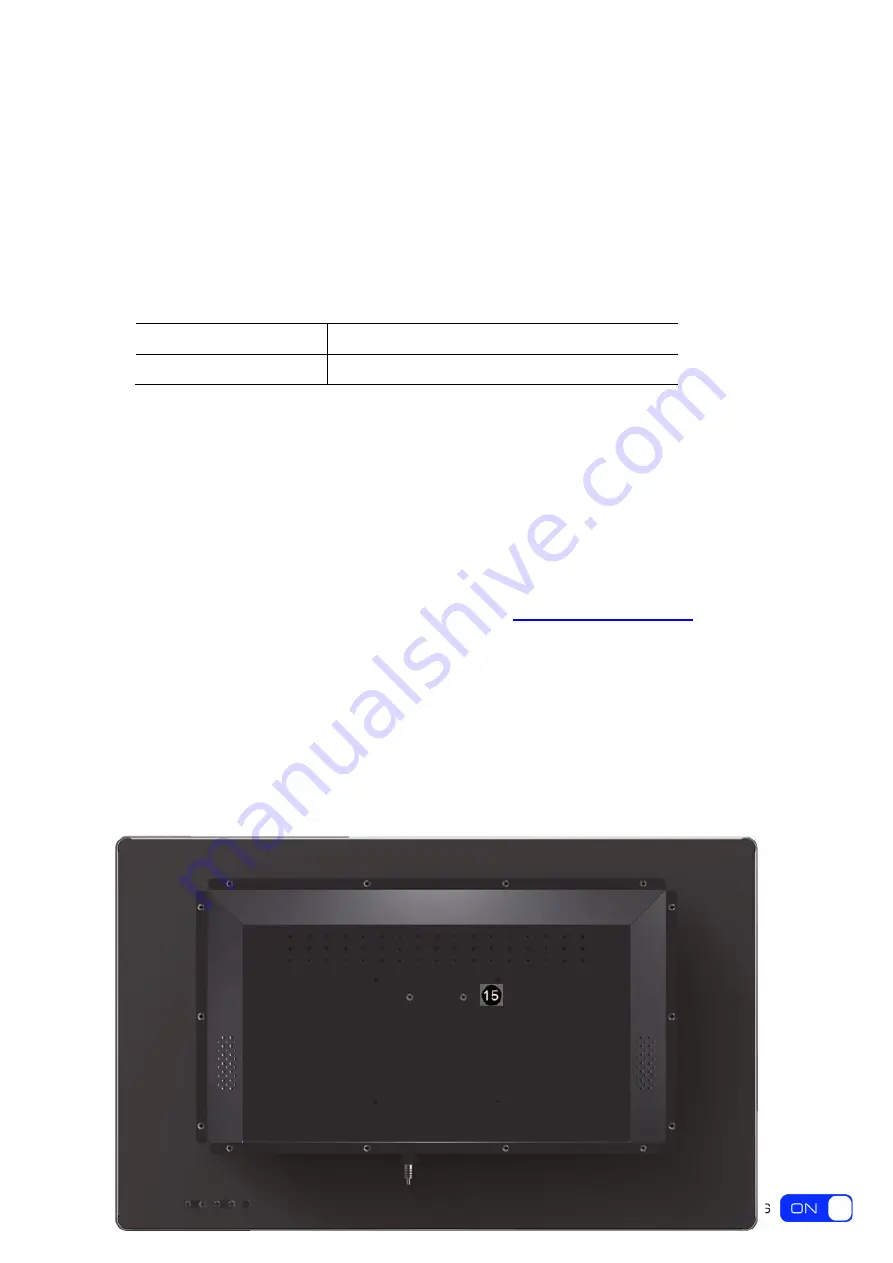
The SD card slot is provided inside the product. To install SD card, you need to open the back 
cover by unscrewing all the screws (circled in the picture blow). The SD card slot is located at 
position 

#15

 nearby on board. 


Содержание APPC-27X

Страница 1: ...User Manual APPC 27X...

Страница 2: ...Bar 8 Applications 10 Language 11 Date Time 12 Volume 14 Brightness 15 Scheduled Power On Off 16 Wi Fi 20 Ethernet 21 Bluetooth 22 Virtual Keyboard 25 Switch Input Methods 25 Take Photos Shots 26 Surf...

Страница 3: ...peration system error This product is not waterproof Use only approved add on enhancements Product Instruction 1 Camera optional 5M pixels camera 2 Function Keys Vol Vol Up Down Exit 3 Speakers audio...

Страница 4: ...ply OFF LED light off 15 WIFI 802 11b g n ac 2 4G 16 Temperature Operation 0 40 32F 104F Storage 10 C 55 C 14 F 131 F Power on the Product Step 1 Plug the power source into the AC DC in jack 12 in Pro...

Страница 5: ...and then you can do the file operations via the File Browser See in Browse Files Micro USB Connect the Micro USB port 8 in Product Instruction on the bottom of this product and the USB port on your co...

Страница 6: ...5 Home Screen In the home screen you can long press the blank space to change the wallpaper or drag widgets to desktop Change Wallpaper 1 Click WALLPAPER...

Страница 7: ...6 2 Select one picture from system presets or your own pictures 3 Click Set wallpaper on the upper left corner of the screen to apply the wallpaper Add Widgets 1 Click WIDGETS...

Страница 8: ...7 2 Long press a widget and drag it to desktop 3 If you want to remove an icon long press the widget and drag it onto Remove at the top of the screen and drop it until it turns red...

Страница 9: ...ar Navigation Buttons 1 Power key Power off or reboot devices 2 Volume Decrease the system volume 3 Back Return to the previous page 4 Home Return to the home screen 5 Recents Switch between recently...

Страница 10: ...lication from the list press the middle icon to remove the entire list Either swipe left or right or click x at the top right of the application item to remove it 6 Volume Increase the system volume S...

Страница 11: ...cut window including brightness adjustment wi fi automatic rotation airplane mode and position switch system Settings entry Applications Click at the bottom of home screen to enter the applications pa...

Страница 12: ...11 home screen Language In the App list click Settings to open the system setting app and select the option Language input...

Страница 13: ...st option Language under Language input and then you can change the system language according to your preference Date Time In the App list click Settings to open the system setting app and select the...

Страница 14: ...c date time under Date time system date and time will be synchronized automatically with network time when you connected a Wi Fi network If you want to set the time manually you need to disable Automa...

Страница 15: ...mat Volume On the system bar click the Volume icon to decrease the system volume and click the Volume icon to increase the system volume Or you can press the function keys 7 in Product Instruction at...

Страница 16: ...he screen open a shortcut window and click brightness Slide the brightness button to adjust the brightness of the screen or turn on Auto switch to automatically adjust the display s brightness to the...

Страница 17: ...function is used to power the device on and off automatically at the set time In the App list click Settings to open the system setting app and select the option Scheduled Click the single option Set...

Страница 18: ...llowing row is for sleep off clocks Click the third row to enter the settings of sleep on clocks Click the option Time to set the power on time of this device Click the option Repeat to select the day...

Страница 19: ...18 After setting click Done at the upper right corner of the screen to save them You will see the sleep on option checked after saving the settings...

Страница 20: ...19 For sleep off clocks you can set them as same as sleep on clocks For shutdown and reboot clocks you can set them to be the same as clock sleep...

Страница 21: ...r the settings the device will be powered off at set time and powered on again when achieves the appointed time Wi Fi In the App list click Settings to open the system setting app and select the optio...

Страница 22: ...omatically Select a network under Wi Fi networks and input the password to connect Ethernet In the App list click Settings to open the system setting app select the option More and then select Etherne...

Страница 23: ...is on please turn off Wi Fi to allow Ethernet working If you are Static IP user please set the configurations manually Bluetooth In the App list click Settings to open the system setting app and sele...

Страница 24: ...bient available Bluetooth devices automatically If you want to pair another Bluetooth device select it from the Available Devices list and then click Pair in the pop up window At the same time click P...

Страница 25: ...24 After pairing the paired device will be moved to the Paired Devices list Click on the top right to change the bluetooth name in the menu...

Страница 26: ...one When you click in a text input box the virtual keyboard will appear at the bottom of the screen To collapse the virtual keyboard you can click the icon in the system bar Switch Input Methods Selec...

Страница 27: ...era is an optional accessory In the App list open Camera Click the capture button to take a photo Click the button on the upper right to change the camera Settings Click to turn on the reference funct...

Страница 28: ...27 Slide the interface to the right click or under the capture button to switch take photos or videos Click the capture button for shooting a video...

Страница 29: ...hen connecting the device to a network you can visit websites play online media or download files via the browser In a browser window enter in a URL in the address bar and click in the virtual keyboar...

Страница 30: ...29 Browse Files In the App list open Explorer to view local files Long press a file or folder to do file operations such as copy delete move cut paste rename send share and create shortcut...

Страница 31: ...iles folders Play Media With the provided apps you can play your media files on your storage such as pictures music and videos Gallery Player Support JPG BMP GIF JPEG PNG Music Player Support MP1 MP2...

Страница 32: ...ice from your computer Then you can open ApkInstaller in the App list to install the downloaded app Click Install button Choose the installation file s location The apk files will be automatically sca...

Страница 33: ...32 Click the apk you want to install Click Install or Next until it turns to Install and then waiting for installation finished...

Страница 34: ...d an android app market and install the apps via the market If Install blocked is prompted when installing an app please open Settings and select the option Security allow Unknown sources and then bac...

Страница 35: ...nstall Apps To uninstall an app please open Settings in the App list and select the option Apps In this option you will see the installed apps list Click the app you want to remove to enter the detail...

Страница 36: ...and then waiting for uninstallation finished Reset to Factory Default Please make sure to back up the important data before resetting the device In the App list click Settings to open the system sett...

Страница 37: ...36 Click Factory data reset Click Reset tablet button...

Страница 38: ...37 Click Erase everything button and then waiting system reboots and resets to factory default...

Отзывы: