


www.usaprocom.com
200020-01A
12
NG
LP
Left Side of Heater
Back of Heater
NG
LP
Gas Inlet
Gas esté
INSTALLATION
CLEARANCES TO
COMBUSTIBLES
WARNING: You must main-
tain the minimum clearances. If
possible, provide greater clear-
ances from floor, ceiling, and
adjoining wall. Measure from
outermost point of heater.
Note: This firebox can not be installed in an
existing fireplace. Install this firebox only in
a ProCom Heating, Inc. mantel accessory
approved for this product.
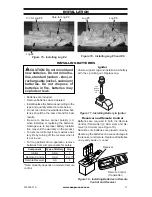
Minimum Clearances For Side
Combustible Material, Side Wall
and Ceiling
A. Clearance from the side of the fireplace to
any combustible material and wall should
not be less than 12" (see Figure 7).
B. Clearance from the top of the fireplace to
the ceiling must not be less than 48".
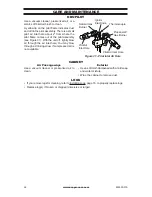
For changing from natural gas
supply to propane supply:
1. Remove bottom screw from cover plate
located on left side of heater (see Figure
4, page 11). Rotate to expose fuel selec-
tion device.
2. For propane gas, press in knob using a flat
screwdriver with a blade the thickness of
a quarter and turn knob counterclockwise
until the knob locks into the LP posi-
tion (see Figure 6). Fuel selection device
must be locked in the LP position. Do not
operate heater between locked positions.
3. Rotate and close cover over fuel selection
device and reinstall screw.
4. Remove hex plug (with wrench provided)
from propane/LP gas inlet of regulator
(see Figure 6). Install gas line into LP inlet
of regulator. Use thread sealant to assure
there are no leaks.
Figure 6 - Settings for Propane/LP Gas
Selection
Figure 7 - Minimum Clearance for
Combustible to Wall and Ceiling
Fuel Selector Knob
Gas
Connection
Fitting
Hex Plug


