-3-
The factory supplied 1000 ohm RTD sensor can be
extended using standard electrical hookup wire (22
awg or larger). The effect of additional 22 awg sensor
wire length on control calibration is approximately 1ºF
for every 65 feet.
Note: This does not apply to THERMOCOUPLES. You
MUST use specific thermocouple wire when extend-
ing the sensor wire length. Use of incorrect exten-
sion wire can cause hazardous operating conditions.
Overtemperature Protection
Component failure (sensors, relays, temperature con-
troller, etc.) in a temperature controlled process can
result in damage to the product, heater over tempera-
ture, and the possibility of a fire.
To safeguard against these events, install over tem-
perature protection. This will interrupt the heater power
supply in the event of low solution level. Process Tech-
nology heaters include a thermal device (Protector 1,
2, or 3) on the heater to monitor the heater’s surface
temperature. When wired properly, these devices cut
the power to the heater in low solution level conditions.
In addition to thermal protection, Process Technology
strongly recommends the use of liquid level controls
to monitor the solution level and shut off the heaters
prior to an overtemperature condition occurring.
**WARNING**
Overtemperature protection is necessary in any
system where a fault condition resulting in high tem-
perature could produce a fire or any other hazard-
ous condition. Operation without thorough safety
precautions can result in equipment failure, prop-
erty damage and personal injury.
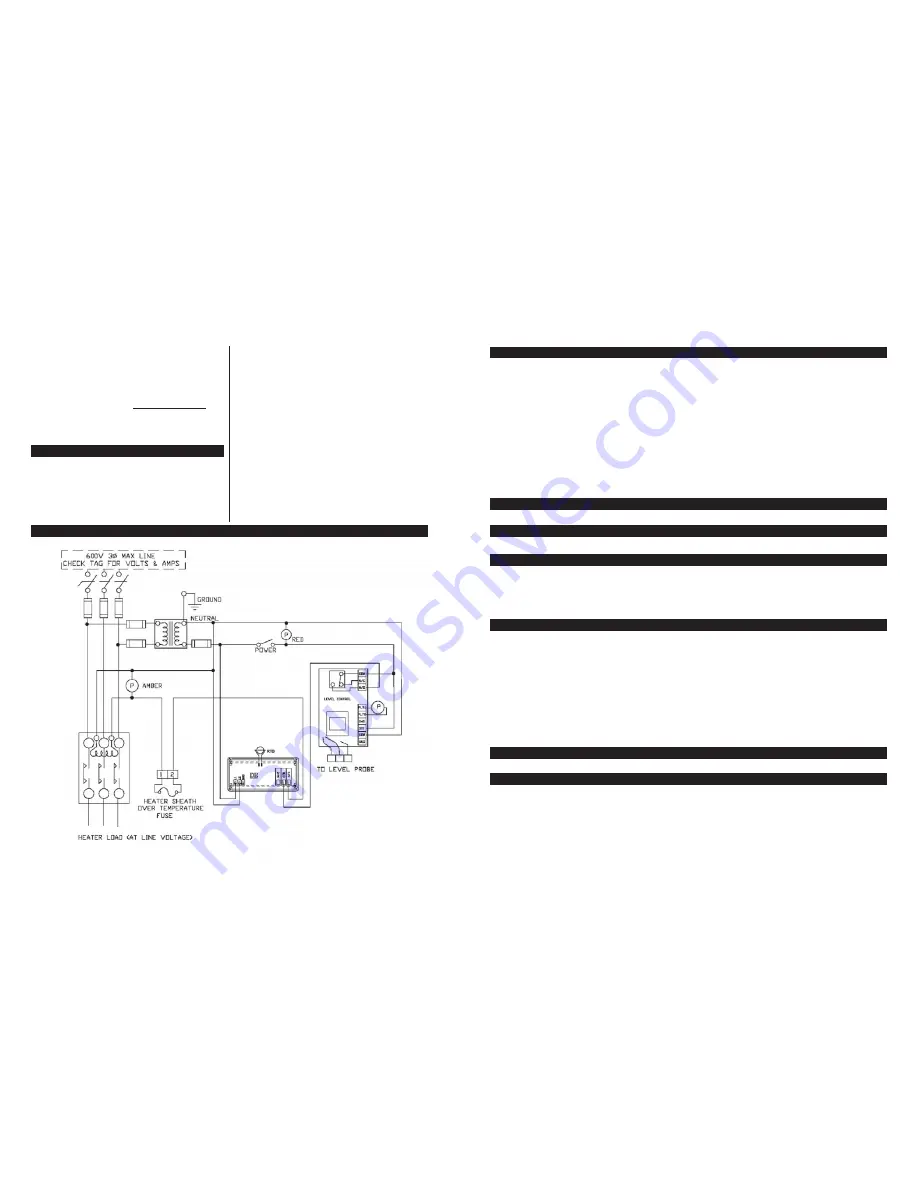
Overtemperature Protection Device with Low Level Cutoff Sample Wiring Diagram
(your wiring may differ)
-12-
U5, “SP1” Set Point Dead Band
U6, “SP2” Set Point Dead Band
U7, Power-Save Set Point Dead Band
This setting, which may be any number from 1 to +99, represents a dead band that only applies to the SET POINT.
Temperature Sensor -
Number represents degrees Celsius or Fahrenheit as
determined by the “F5” setting
Voltage Sensor -
Number represents tenths of a volt (0.1 VDC)
Current Sensor -
Number represents hundredths of milliamps (0.01 mA)
Resistance Signal Devices -
Number represents ohms
Frequency Signal Devices -
Setting represents hertz (counts/second)
This bandwidth applies to the low side of the “
SP1
” SET POINT. If the “
U5
” setting is set at 5ºF and the “
SP1
”
SET POINT is set at 115ºF, then the set point relay is de-energized when the (displayed) temperature reaches
115ºF, and it is reenergized when the temperature falls to 110ºF.
Note: The default and minimum for the setting is one (1).
Not available.
Not available.
If the display value changes by a digit or two in a steady state condition, this setting can be altered in
conjunction with the “
U4
” setting to reduce the display instability. Lower values cause maximum suppression;
larger values provide greater accuracy.
The default value for this setting is ten (10).
This setting, which may be any number between -99 and +999, is the maximum limit for all SET POINTS
except the ALARM SET POINT. This will prevent accidental setting of a set point, which could be too high or low
(depending upon the application).
Temperature Sensor -
Number represents degrees Celsius or Fahrenheit as
determined by the “F5” setting
Voltage Sensor -
Number represents tenths of a volt (0.1 VDC)
Current Sensor -
Number represents hundredths of milliamps (0.01 mA)
Resistance Signal Devices -
Number represents ohms
Frequency Signal Devices -
Setting represents hertz (counts/second)
Note: The default value for this setting is +999.
Not available.
When the setting is turned OFF (0), then the relay is reverse acting. That is, when the sensor reports a
temperature less than the SET POINT, the relay is energized. At temperatures greater than the SET
POINT, the
relay is de-energized. This setting is common for heating applications.
U8, Display Stabilizer
L, Set Point Limit
F1, Emulation Flag
F2, Heating or Cooling Switch
M-33-01-02 02/17/11
M-33-01-02 02/17/11
U
U
U
U
U
!


