background image

800.338.3884  •  procaresoftware.com

2

Connect Network Door Controller

      Connect to Your Router

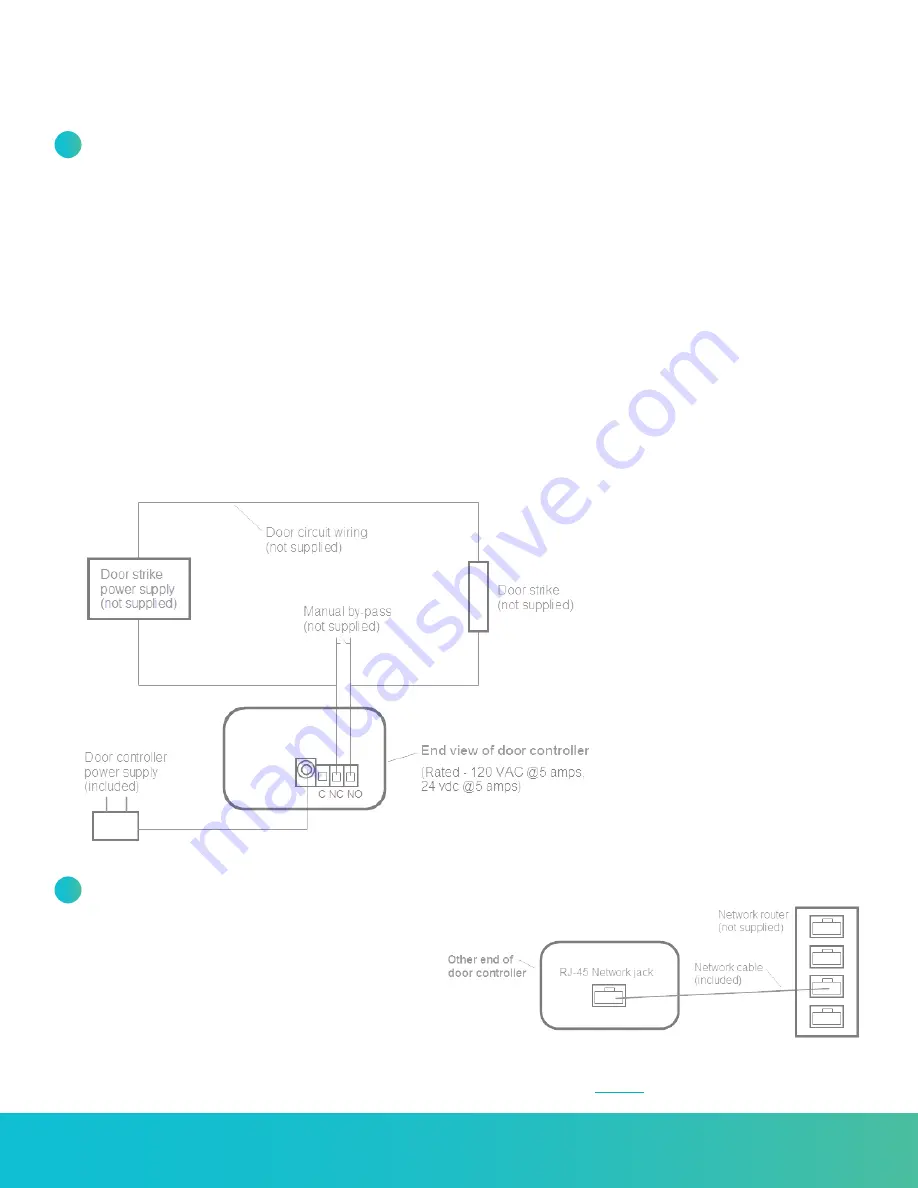
Connect the other end of the Door Controller to an open  

port on your router using the network cable (included)  

or your own CAT5 / RJ-45 network cable (diagram “B”).

The green (side) light should no longer be lit (it will stop 

flashing) and a solid orange light should appear on the  

RJ-45 connection, indicating it is connected to your  

network. A yellow flashing light indicates network traffic.  

See Indicator Lights (page 1).

DIAGRAM A

END VIEW OF DOOR CONTROLLER

DIAGRAM B

OTHER END OF DOOR CONTROLLER

      Connect to Your Electrically Operated Door

The Door Controller is designed as a switch for controlling an electrically operated door strike (not supplied).

a.

  Attach one wire from the Door Strike circuit to the Common (C) terminal (as shown in diagram “A”).

b.

  Attach the other wire to:

  •  For an electric door strike: Connect to the Normally Open (NO) terminal (as shown in diagram “A”).
  •  For a magnetic lock: Connect to the Normally Closed (NC) terminal.  

    (Note: Diagram “A” shows a “NO” connection. Change to a “NC” connection for a mag. lock).
  

NOTE:

 A manual bypass is strongly recommended so a staff person may open the door as needed.

c.

  Plug the Door Controller into a standard 110 VAC wall outlet. Use of a surge protector is strongly recommended.

  •  The red power indicator light should come on (side of Door Controller). See Indicator Lights (page 1).
  •  A flashing green light indicates it is not yet connected to the network, which is normal at this point.

   NOTE:

 You’ll need a separate power supply for your electrically operated door.

1

2

If connecting to your router is not feasible,  

see articl

KB0434

 at ProcareSupport.com.

Содержание Network Door Controller

Страница 1: ... of the pickup person In this case a check in computer is not necessary Settings for the Door Controller are accessed from your Procare Home screen For detailed instructions search ProcareSupport com for the following articles Install on a check in computer article KB0495 Special instructions for a Procare Touch computer article KB0911 Receptionist check in feature article KB0163 CONNECTIONS SETTI...

Страница 2: ...ied a Attach one wire from the Door Strike circuit to the Common C terminal as shown in diagram A b Attach the other wire to For an electric door strike Connect to the Normally Open NO terminal as shown in diagram A For a magnetic lock Connect to the Normally Closed NC terminal Note Diagram A shows a NO connection Change to a NC connection for a mag lock NOTE A manual bypass is strongly recommende...

Страница 3: ...omputer dbl click the Procare Check In shortcut on your desktop 2 Dbl click in the gray border area around the logo or press Esc on your keyboard and then click Options 3 Click the Hardware button right side 4 Choose Network as the type of door controller and click Select Check In Computer Settings Test ...

Страница 4: ... on the side of the controller should come on for just a moment b Click Select to choose this device and return to the Hardware screen 7 At the Hardware screen a Set the Delay time to wait before the door opens and Duration time you d like the door to stay open b Click the Test button to confirm the door opens Your door circuit must be attached to the Door Controller and both the door strike and c...

Страница 5: ...3 Uncheck Not Using a Door Controller and then click Choose a Device 4 Locate the Door Controller or manually add it to the list a If you have just one door controller it should be found automatically b If you have more than one choose the one this computer will use c If it is not found manually type the IP address and choose Add to List d Optional The Advanced button should only be used to change...

Страница 6: ...like the door to stay open b Click the Test button to confirm the door opens Your door circuit must be attached to the Door Controller and both the door strike and controller unit must have power 7 Click Save Exit Receptionist Settings Test Optional A front desk person uses the Receptionist method to check children in on behalf of the pickup person Buzz Door Open using the Receptionist a From the ...

Отзывы: