background image

3

NOTICE:


If tire is at higher pressure than value set on 

gauge, compressor will not start.

NOTICE:  

Do not rotate gauge dial during inflation.

NOTICE:

  Always double check air pressure using a reli-

able pressure gauge.

B. For use with low pressure inflatables

NOTICE:  

The automatic shut-off feature does not function 

on low pressure inflatables.

1. To inflate air mattresses, beach balls, life jackets, etc., 

remove plastic air hose and air hose inflator adapters 

from storage compartment.

2. Insert plastic air hose inflator adapter into low pressure 

inflater outlet (labeled “OUT”) in front of compressor, 

and use to connect plastic air hose.

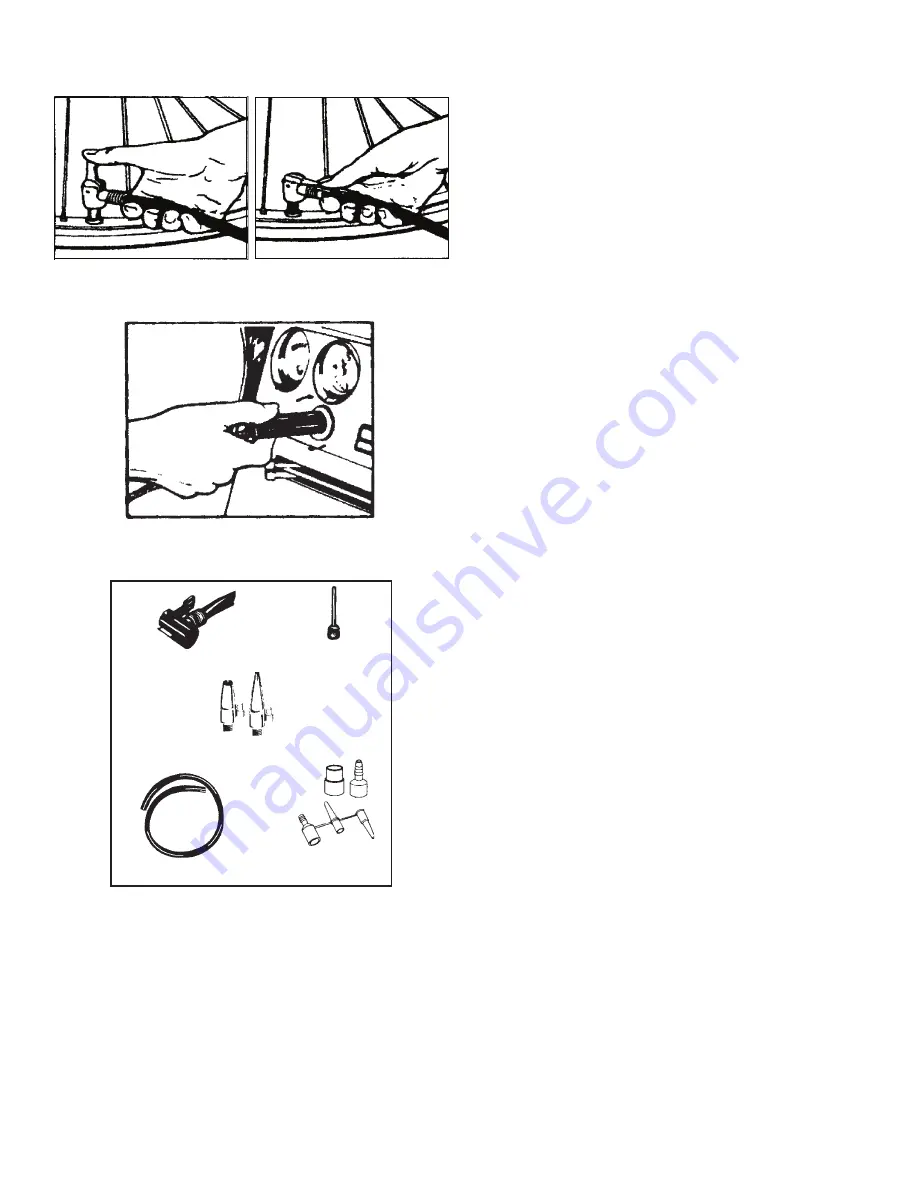
3. At opposite end of hose, connect suitable adapter for 

inflatable (Fig. 5) and insert into appropriate receiver in 
inflatable.

4. Plug the compressor into the DC 12V outlet.  Toggle air 

ON/OFF switch to ON position.  Unit should begin inflat

-

ing.

5. Inflate to a pressure or level of firmness recommended 

by the manufacturer.  Toggle air ON/OFF switch to OFF 

and check for desired firmness or pressure as needed.

6. Remove plastic hose adapter from inflatable.

7. Remove the adapter from plastic hose.

C. DEFLATING INFLATABLES

1. To deflate air mattresses, beach balls, life jackets, etc., 

remove plastic hose and plastic air hose adapters from 

storage compartment.

2. Insert plastic hose inflator adapter into low pressure 

deflator outlet in front of compressor (labeled “IN”) and 

connect plastic hose.

3. At other end of hose, select and insert suitable adapter 

(Fig. 5).

4. Insert the adapter into the appropriate receiver on the 

item to be deflated.

5. Connect the 12V DC plug to a suitable power source and 

toggle the ON/OFF switch to ON.  Compressor should 

begin deflation.

6. When item is sufficiently deflated, toggle ON/OFF switch 

to OFF.

7. Remove plastic hose from deflated item, remove adapter 

from plastic hose and place them in storage compart-

ment.

D. OPERATING THE WORK LIGHT

1. Plug the compressor into a suitable 12V DC power 

source.  Toggle light ON/OFF switch to ON position.

2. Toggle switch to OFF position to extinguish light.

Quick Connector

Adapters for Inflatables

Plastic air hose

inflator adapters

Sports Adapter

Hose

Figure 2

Figure 3

Figure 4

Figure 5

4. Insert power cord into a suitable outlet or 12V DC source 

(Fig. 4).  Toggle air ON/OFF switch to ON position.  Unit 

should begin inflating.

5. Compressor will inflate tire (or other inflatable) to the 

preset pressure, then automatically shut off.

6. Toggle air ON/OFF switch to OFF, disconnect Quick 

Connector and unplug the compressor power cord.

7. Use a tire gauge to check inflation and adjust to desired 

pressure as recommended by the vehicle and/or tire 

manufacturer.

Содержание W-1706

Страница 1: ...a Ave Kansas City MO 64153 Tel 816 891 6390 Fax 816 891 6599 Printed in China W 1706 M0_042012 This is the safety alert symbol It is used to alert you to potential personal injury hazards Obey all saf...

Страница 2: ...s which may arc during normal operation This arcing may ignite flammable gases Do not operate in a flammable environment Keep out of reach of children The power cord on this product contains chemicals...

Страница 3: ...ose and plastic air hose adapters from storage compartment 2 Insert plastic hose inflator adapter into low pressure deflator outlet in front of compressor labeled IN and connect plastic hose 3 At othe...

Страница 4: ...ntly remove 12V fuse and replace with fuse of same rating and size 3 Place fuse properly in position to allow installation of plastic cap 4 Reinstall plastic 12V DC plug cap TIPS FOR OPERATION 1 Ensur...

Страница 5: ...e Kansas City MO 64153 Tel 816 891 6390 Fax 816 891 6599 Imprim en Chine W 1706 M0_042012 Ceci est le symbole de prudence Il indique un risque potentiel de danger Pour ne pas subir de blessures et ou...

Страница 6: ...durant la manipulation normale Cet arc lectrique peut allumer les gaz inflammables Ne pas faire fonctionner dans un environnement inflammable Tenir hors de port e des enfants Le cordon d alimentation...

Страница 7: ...yau d air en plastique du compartiment de rangement 2 Ins rez l adaptateur du tuyau d air en plastique dans l orifice de d gonflage basse pression qui se trouve l avant du com presseur intitul IN et b...

Страница 8: ...rectement pour pouvoir remettre le capu chon en plastique 4 R installez le capuchon en plastique de la fiche 12VDC CONSEILS DE FONCTIONNEMENT 1 V rifiez si la batterie du v hicule est suffisamment cha...

Страница 9: ...omona Ave Kansas City MO 64153 Tel 816 891 6390 Fax 816 891 6599 Impreso en China W 1706 M0_042012 Este es un s mbolo de alerta de seguridad Se usa para avisar de peligros potenciales Obedezca los men...

Страница 10: ...l Este arqueado puede prender gases inflamables No usar en un ambiente inflamable Mantener fuera del alcance de los ni os El cord n de la corriente de ste producto contiene qu micos considerados en el...

Страница 11: ...a manguera y los adapta dores de donde est n guardados 2 Insertar el adaptador para desinflar de la manguera en la salida de presi n baja marcada IN y conectar la manguera de pl stico 3 En el otro lad...

Страница 12: ...fusible en posici n apropiada para la insta laci n de la tapa de pl stico 4 Reinstalar la tapa de plastic 12V DC RECOMENDACIONES DE FUNCIONAMIENTO 1 Asegurarse que la bater a del veh culo est suficien...

Отзывы: