background image

11

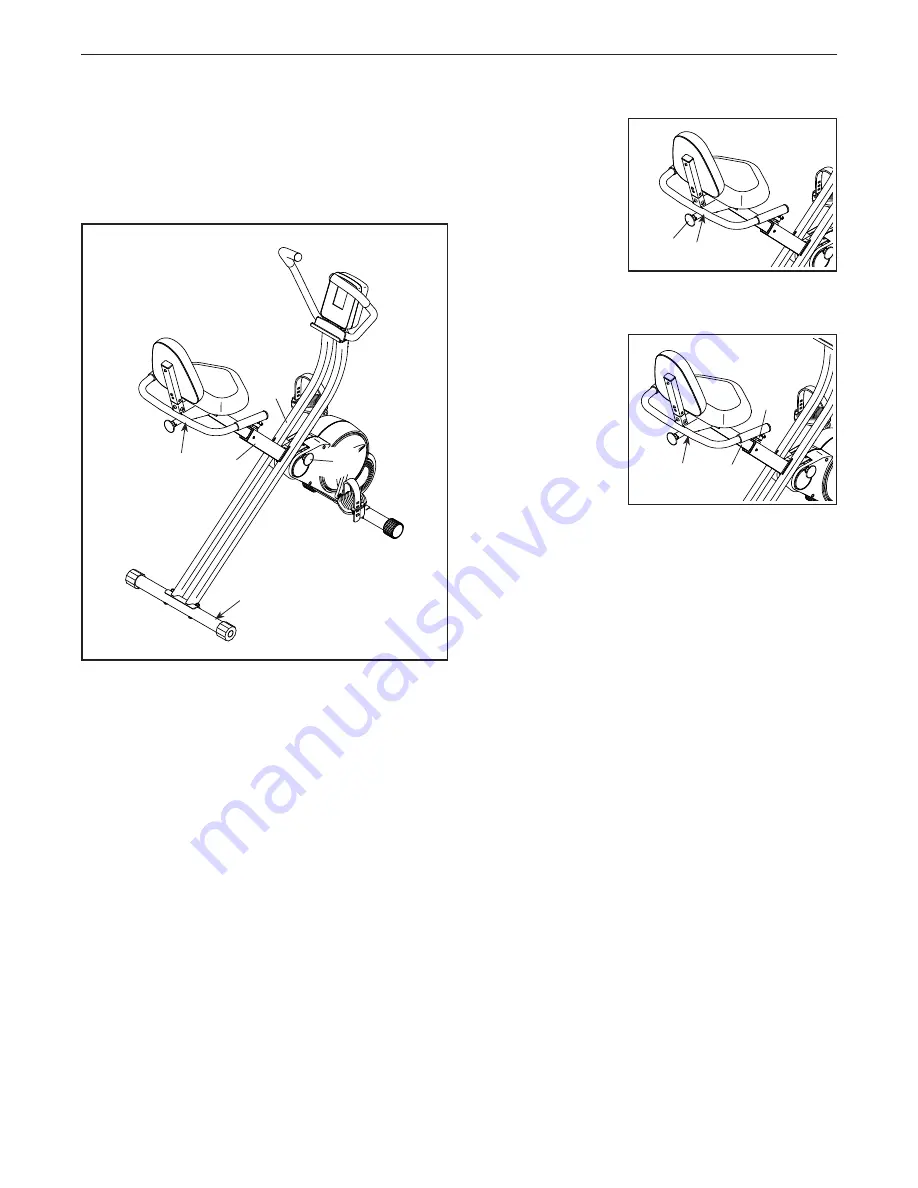
HOW TO USE THE UPRIGHT POSITION

Move the Frame (1) to the upright position. Place 

your foot on the Rear Stabilizer (4) and hold the Seat 

Frame (8) with one hand in the indicated locations. 

Next, pull upward on the Seat Frame (8) and pull the 

Frame Pin (13) outward with your other hand. Then, 

move the Upright (2) upward or downward until the 

exercise bike is in the upright position, and release 

the Frame Pin into the hole in the Frame (1); make 

sure that the Frame Pin is securely engaged in the 

Frame.

Adjust the Seat 

Frame (8) to the 

upright posi-

tion. Pull the Seat 

Frame Pin (33) 

outward and move 

the Seat Frame to 

the upright position; 

make sure that 

the Seat Frame 

Pin is securely engaged. 

Adjust the Seat 

Post (7) to the 

desired posi-

tion. For effective 

exercise, the seat 

should be at the 

proper height. As 

you pedal, there 

should be a slight 

bend in your knees 

when the pedals 

are in the lowest position. Hold the Seat Frame (8) in 

the indicated location. Then, loosen and pull the Seat 

Post Knob (31) outward, move the Seat Post upward 

or downward to the desired position, release the Seat 

Post Knob into an adjustment hole in the Seat Post, 

and then tighten the Seat Post Knob. Make sure that 

the Seat Post Knob is securely engaged in an 

adjustment hole.

1

2

4

8

13

8

31

7

HOW TO USE THE EXERCISE BIKE

8

33

Содержание X-Bike Duo

Страница 1: ...uipment Keep this manual for future reference Model No 831 21926 0 Serial No Write the serial number in the space above for reference Sears Roebuck and Co Hoffman Estates IL 60179 BIKE EXERCISER User...

Страница 2: ...g shows the location s of the warning decal s If a decal is missing or illegible call 1 888 533 1333 and request a free replacement decal Apply the decal in the location shown Note The decal s may not...

Страница 3: ...a garage or covered patio or near water 7 Place the exercise bike on a level surface with a mat beneath it to protect the floor or carpet Make sure that there is at least 2 ft 0 6 m of clearance arou...

Страница 4: ...If you have questions after reading this manual please see the back cover of this manual To help us assist you note the product model number and serial number before contacting us The model number and...

Страница 5: ...ings below to identify the small parts needed for assembly The number in parentheses below each drawing is the key number of the part from the PART LIST near the end of this manual The number followin...

Страница 6: ...f wrenches To avoid damaging parts do not use power tools ASSEMBLY 2 Move the Frame 1 and the Upright 2 apart until the Frame Pin 13 snaps into the Frame this is the storage position Next pull the Fra...

Страница 7: ...n 4 Attach the Rear Stabilizer 4 to the Upright 2 with two M8 x 60mm Bolts 75 and two M8 Locknuts 67 3 4 75 3 4 5 2 2 A 1 48 71 75 67 75 67 5 5 Orient the Handlebar 5 so that the screw A is in the ind...

Страница 8: ...Washer 72 into each end of the Seat Axle at the same time 7 Attach the Seat Bracket 9 to the Seat Frame 8 with three M8 x 20mm Screws 70 start all the Screws and then fully tighten them B 9 57 72 72...

Страница 9: ...d the battery cover C and insert batteries into the battery compartment Make sure to orient the batteries as shown by the diagram inside the battery compartment Then reattach the bat tery cover To pur...

Страница 10: ...d inspect it to make sure that it is assembled correctly and that it functions properly Make sure that all parts are properly tightened before you use the exercise bike Extra parts may be included Pla...

Страница 11: ...ll the Seat Frame Pin 33 outward and move the Seat Frame to the upright position make sure that the Seat Frame Pin is securely engaged Adjust the Seat Post 7 to the desired posi tion For effective exe...

Страница 12: ...posi tion Pull the Seat Frame Pin 33 out ward and move the Seat Frame to the recumbent position make sure that the Seat Frame Pin is securely engaged Adjust the Seat Post 7 to the desired posi tion F...

Страница 13: ...the indicated locations See the drawing at the left Next pull upward on the Seat Frame 8 and pull the Frame Pin 13 outward with your other hand Then move the Upright 2 upward or downward until the ex...

Страница 14: ...he console and use an iFit app to record and track your workout information The console also offers a selection of preset work outs Each preset workout automatically changes the resistance of the peda...

Страница 15: ...each segment of the workout The upper display This display will show your pedal ing speed in revolutions per minute RPM and your power output in watts The display will change every few seconds This d...

Страница 16: ...easure your heart rate For more information about the optional chest heart rate monitor see page 18 Note The console is compatible with BLUETOOTH Smart heart rate monitors To connect your heart rate m...

Страница 17: ...udes a range of speeds that are within a few RPMs of the target speed for the segment The solid bars represent your actual pedaling speed As you exercise keep your pedaling speed within the target spe...

Страница 18: ...rt device to the console When a connection is established the LED on the console will flash blue Press the Bluetooth Smart button on the console to confirm the connection the LED on the console will t...

Страница 19: ...ted and found to comply with the limits for a Class B digital device pursuant to part 15 of the FCC Rules These limits are designed to provide reasonable protection against harmful interference in a r...

Страница 20: ...EED SWITCH If the console does not display correct feedback the reed switch should be adjusted See the EXPLODED DRAWING on page 23 Identify the Right Shield 15 Remove the five M4 x 16mm Screws 81 from...

Страница 21: ...c Exercise If your goal is to strengthen your cardiovascular system you must perform aerobic exercise which is activity that requires large amounts of oxygen for prolonged periods of time For aerobic...

Страница 22: ...pacer 52 1 Short Pulley Spacer 53 1 Pivot Axle 54 2 Pivot Bushing 55 1 Right Pedal Strap 56 1 Left Pedal Strap 57 1 Seat Axle 58 1 E clip 59 2 M6 Eyebolt 60 2 Adjustment Bracket 61 2 M10 Flange Nut 62...

Страница 23: ...35 37 37 40 41 41 43 46 48 48 50 50 52 45 42 44 47 49 51 54 54 56 58 59 59 53 55 57 60 60 61 61 63 66 66 68 68 65 62 64 64 67 67 67 69 69 90 70 80 80 76 76 70 70 70 72 72 71 74 74 82 82 78 81 81 81 81...

Страница 24: ...HOME 1 800 469 4663 to arrange for free repair or replacement if repair proves impossible The frame is warranted for 5 years This warranty does not apply when the Bike Exerciser is used commercially o...

Отзывы: