background image

18

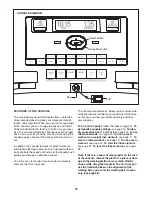
4. Press the Start button to start the workout.

A moment after you press the Start button, the
treadmill will automatically adjust to the first speed
and incline settings of the workout. Hold the
handrails and begin walking. 

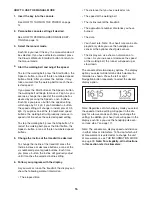
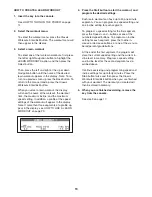
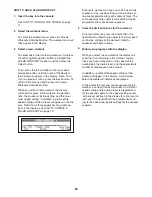
5. Follow your progress with the display.

When you select a preset workout or a weight loss
workout, the display will show the time remaining in
the workout, the distance you have walked or run,
the approximate number of calories you have
burned, the incline level, and the speed of the walk-
ing belt. 

In addition, a profile of the speed settings of the
workout will appear in the display. A small arrow
below the profile will indicate your progress. 

At the end of the first one-minute segment of the
workout, a series of tones will sound. If a different
speed setting and/or incline level is programmed
for the second segment, the speed setting and/or
incline level will flash in the display for a moment to
alert you. The treadmill will then automatically ad-
just to the speed and incline settings for the second
segment.

The workout will continue in this way until the small
arrow reaches the right end of the profile. The
walking belt will then slow to a stop.

If the speed setting or incline level for the current
segment is too high or too low, you can override
the setting by pressing the Speed or Incline but-
tons; however, when the next segment begins, 

the

treadmill will automatically adjust to the speed
and incline settings for the next segment.

To stop the workout at any time, press the Stop
button. To restart the workout, press the Start but-
ton. The walking belt will begin to move at 2 kph.
When the next segment of the workout begins, the
treadmill will automatically adjust to the speed and
incline settings for the next segment.

6. Measure your heart rate if desired.

See step 7 on page 17.

7. Turn on the fan if desired.

See step 8 on page 17.

8. When you are finished exercising, remove the

key from the console.

See step 9 on page 17

.

Содержание PETL40707.0

Страница 1: ...to providing complete customer satisfaction If you have questions or if there are missing parts please contact us at the numbers or addresses listed below Call 08457 089 009 Outside UK 0 44 113 38771...

Страница 2: ...G 32 ORDERING REPLACEMENT PARTS Back Cover RECYCLING INFORMATION Back Cover 2 PROFORM is a registered trademark of ICON IP Inc The decals shown here have been applied in the locations shown If a decal...

Страница 3: ...uit When replacing the fuse an ASTA approved BS1362 type should be fitted to the fuse carrier A 13 amp fuse should be used 12 If an extension cord is needed use only a 3 conductor 1mm2 14 gauge cord t...

Страница 4: ...and properly tighten all parts of the treadmill regularly 24 DANGER Always unplug the power cord immediately after use before cleaning the treadmill and before performing the mainte nance and adjustm...

Страница 5: ...you have questions after read ing this manual please see the front cover of this man ual To help us assist you note the product model number and serial number before contacting us The model number and...

Страница 6: ...and wire cutters Use the drawings below to identify the assembly hardware The number in parentheses below each drawing is the key number of the part from the PART LIST near the end of this manual The...

Страница 7: ...t that you removed in step 1 Do not overtighten the Nut the Wheel must turn freely 83 4 8 3 84 Wire Tie 78 38 2 With the help of a second person carefully tip the treadmill onto its left side Partiall...

Страница 8: ...the Frame yet Remove and discard the two indicated bolts A and the shipping bracket B Attach a Base Pad 81 to the Base 83 in the location shown with a 1 Tek Screw 2 and a Base Pad Spacer 13 Then atta...

Страница 9: ...95 Connectors Front Edge 74 78 10 7 7 7 10 9 Have a second person hold the Bridge 95 near the Right Upright 78 Remove the wire tie from the Upright Wire 38 Connect the Upright Wire 38 to the Bridge W...

Страница 10: ...he Bridge Wire 52 to the console assembly wire See the inset drawing in step 9 The connec tors should slide together easily and snap into place If they do not turn one connector and try again IF THE C...

Страница 11: ...y tightened before you use the treadmill If there are sheets of clear plastic on the treadmill decals remove the plastic To protect the floor or carpet place a mat under the tread mill Note Extra hard...

Страница 12: ...See drawing 2 Press the pins on the power cord into the metal clips in the adapter as shown Close the adapter cover over the end of the power cord and tighten the screw in the adapter Important Make s...

Страница 13: ...orkouts and save them for future use The console also features a fitness journal which auto matically records and stores your exercise information so that you can view your workout history and track y...

Страница 14: ...u enter will also be recorded and stored in the fitness journal which allows you to view your workout history see HOW TO VIEW THE FITNESS JOURNAL on page 22 Follow the steps below to personalize conso...

Страница 15: ...journal To set the date and time first highlight the CHANGE DATE OR TIME option in the setup menu and press the Select button The date setting will then appear in the display To set the date first pre...

Страница 16: ...mill press the Incline increase or decrease buttons or one of the six numbered percent grade buttons Each time you press a button the incline will gradually adjust until it reaches the selected inclin...

Страница 17: ...ext re move the key from the console and put it in a secure place When you are finished using the treadmill switch the reset off circuit breaker to the off position and unplug the power cord Important...

Страница 18: ...evel will flash in the display for a moment to alert you The treadmill will then automatically ad just to the speed and incline settings for the second segment The workout will continue in this way un...

Страница 19: ...e If more than three segments of a profile ap pear in the display see HOW TO USE A LEARN WORKOUT on page 20 4 Press the Start button to start the workout and program the desired settings Each learn wo...

Страница 20: ...on page 19 Each learn workout can have up to 40 one minute segments One speed setting and one incline set ting are programmed for each segment Note The same speed setting and or incline setting may be...

Страница 21: ...red If desired you can change the workout while using it To change the speed or incline setting for the current segment simply press the Speed or Incline buttons When the current segment ends the new...

Страница 22: ...infor mation for 11 different years 5 View exercise information by month After a few seconds the view month menu will ap pear in the display To view exercise information by month press the up or down...

Страница 23: ...d down the Stop button insert the key into the console and then release the Stop button When the information mode is se lected the following information will appear in the dis play The display will sh...

Страница 24: ...is locked in the storage position To protect the floor or carpet from damage place a mat under the treadmill Keep the treadmill out of di rect sunlight Do not leave the treadmill in the stor age posi...

Страница 25: ...t It may be neces sary to push the frame forward as you pull the knob to the left Pivot the frame downward and release the latch knob 2 Hold the metal frame firmly with both hands and lower it to the...

Страница 26: ...OBLEM The power turns off during use SOLUTION a Check the reset off circuit breaker see the drawing above If the circuit breaker has tripped wait for five minutes and then press the switch back in b M...

Страница 27: ...w seconds If the displays are still lit see THE INFORMATION MODE on page 23 to turn off the demo mode PROBLEM The walking belt slows when walked on SOLUTION a If an extension cord is needed use only a...

Страница 28: ...n the power cord insert the key and run the treadmill for a few minutes Repeat until the walk ing belt is centered b If the walking belt slips when walked on first re move the key and UNPLUG THE POWER...

Страница 29: ...goal is to strengthen your cardiovascular system you must perform aerobic exer cise which is activity that requires large amounts of oxygen for prolonged periods of time For aerobic ex ercise adjust t...

Страница 30: ...e 39 3 Cage Nut 40 2 Foot Rail Decal 41 1 Left Foot Rail 42 1 Warning Decal 43 2 Walking Platform Cushion 44 1 Walking Platform 45 1 Walking Belt 46 2 Belt Guide 47 2 Frame Endcap 48 2 Frame Spacer 49...

Страница 31: ...ft Frame Ground Wire 108 1 5 32 Hex Key 109 1 Filter 110 1 Transformer 111 1 Receptical 112 4 1 2 Console Screw 113 2 10 Star Washer 114 1 Latch Bracket 115 1 15 1 2 Wire Tie 116 1 1 2 Console Ground...

Страница 32: ...20 20 31 30 31 30 60 59 12 12 29 29 46 46 25 25 25 47 25 25 25 25 25 40 41 36 36 36 49 50 47 48 36 43 44 42 45 49 51 55 40 58 43 56 57 57 48 103 102 3 108 15 15 14 14 113 113 32 EXPLODED DRAWING A Mo...

Страница 33: ...11 11 11 11 72 15 71 37 37 37 12 12 12 19 19 24 106 24 67 26 27 32 64 63 27 28 34 35 62 61 65 66 73 105 107 68 69 111 117 70 1 1 1 1 110 109 EXPLODED DRAWING B Model No PETL40707 0 R0807A 33...

Страница 34: ...81 2 81 2 4 84 8 8 84 4 6 9 6 6 9 9 7 10 7 10 7 10 7 10 21 22 34 34 75 23 23 8 8 77 77 74 78 83 82 76 79 82 86 85 80 80 80 13 81 2 13 38 104 4 114 115 8 34 EXPLODED DRAWING C Model No PETL40707 0 R08...

Страница 35: ...1 1 1 1 1 5 9 12 16 16 116 101 33 1 90 1 1 112 1 112 1 1 1 1 112 93 94 95 88 89 1 87 97 96 98 12 92 99 99 91 100 52 52 39 33 33 12 12 35 EXPLODED DRAWING D Model No PETL40707 0 R0807A...

Страница 36: ...rts s see the PART LIST and the EXPLODED DRAW ING near the end of this manual RECYCLING INFORMATION This electronic product must not be disposed of in municipal waste To preserve the environment this...

Отзывы: