background image

15

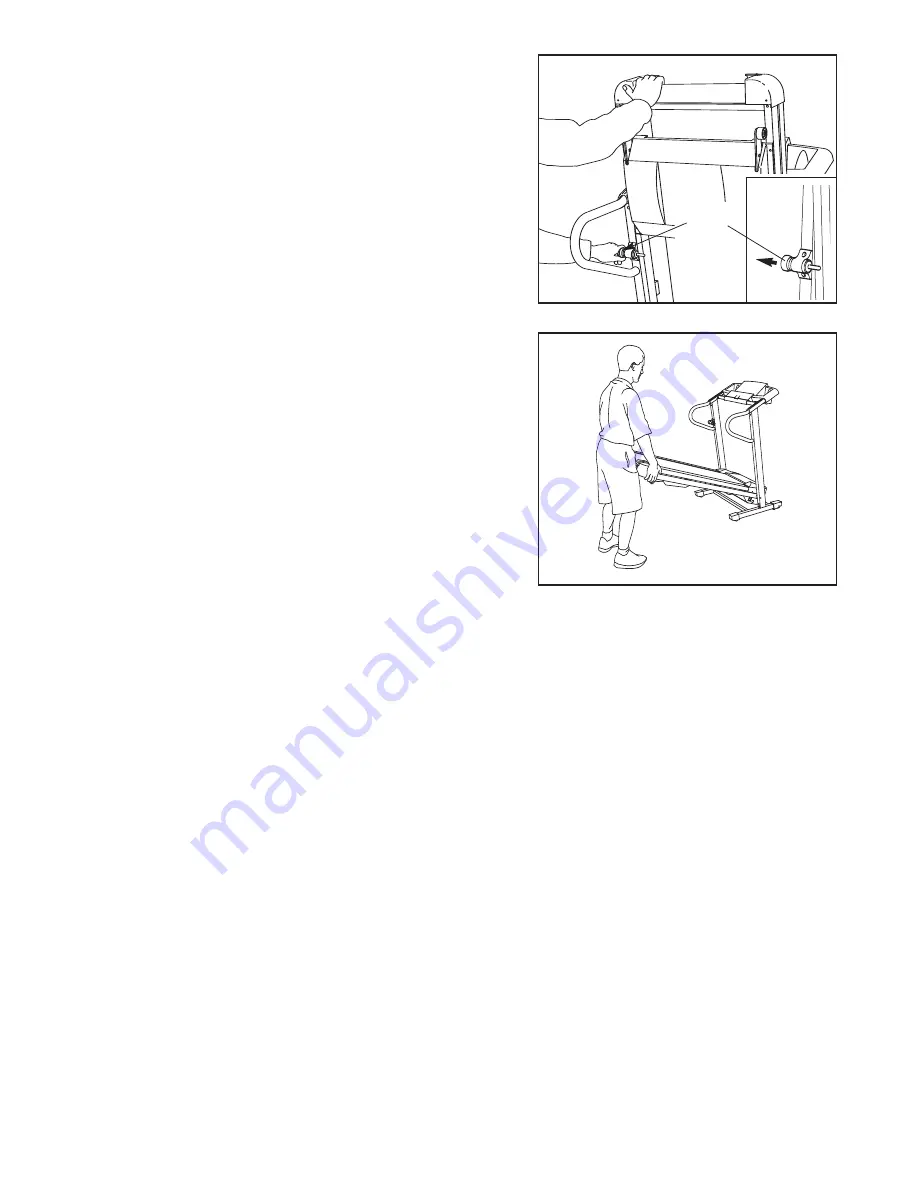
HOW TO LOWER THE TREADMILL FOR USE

1. Hold the upper end of the treadmill with your right hand as

shown. Using your left hand, pull the latch knob to the left
and hold it. Pivot the treadmill down until the frame is past
the latch pin. Slowly release the latch knob.

2. Hold the treadmill firmly with both hands, and lower the tread-

mill to the floor. 

Do not drop the treadmill frame to the

floor. To decrease the possibility of injury, bend your
legs and keep your back straight.

Latch

Knob

Содержание 365p Treadmill

Страница 1: ...mber Decal Model No PETL31131 Serial No QUESTIONS As a manufacturer we are com mitted to providing complete customer satisfaction If you have questions or if there are missing or damaged parts please call or write ICON Health Fitness Ltd Customer Service Department Unit 4 Revie Road Industrial Estate Revie Road Beeston Leeds LS118JG UK email csuk iconeurope com 08457 089 009 ...

Страница 2: ...ATION AND ADJUSTMENT 9 HOW TO FOLD AND MOVE THE TREADMILL 14 TROUBLESHOOTING 16 CONDITIONING GUIDELINES 18 ORDERING REPLACEMENT PARTS Back Cover Note An EXPLODED DRAWING and a PART LIST are attached in the centre of this manual PROFORM is a registered trademark of ICON IP Inc 2 ...

Страница 3: ...e power cord into an earthed circuit No other appliance should be on the same cir cuit When replacing the fuse an ASTA ap proved BS1362 type should be fitted to the fuse carrier A 13 amp fuse should be used 12 If an extension cord is needed use only a 3 conductor 1mm2 14 gauge cord that is no longer than 1 5 m 13 Keep the power cord away from heated surfaces 14 Do not change the incline of the tre...

Страница 4: ...justment procedures described in this manual Never remove the motor hood un less instructed to do so by an authorised ser vice representative Servicing other than the procedures in this manual should be performed by an authorised service representative only 24 The treadmill is intended for in home use only Do not use the treadmill in a commer cial rental or institutional setting WARNING Before beg...

Страница 5: ...ad ing this manual please call our Customer Service Department at 08457 089 009 To help us assist you please note the product model number and serial num ber before calling The model number of the treadmill is PETL31131 The serial number can be found on a decal attached to the treadmill see the front cover of this manual for the location Before reading further please familiarise yourself with the ...

Страница 6: ...oles Open part bag A Attach the Wheels 63 to the Wheel Housings 62 with 2 1 2 Bolts 61 and Motor Pivot Nuts 15 Make sure that the Motor Pivot Nuts are on the sides shown do not overtighten the Bolts Slide the two Base Endcaps 75 onto the other ends of the Base 79 only one Base Endcap is shown Attach the four Base Pads 73 to the Base Endcaps and the Wheel Housings 62 with four 1 1 4 Tek Screws 60 2...

Страница 7: ...There is not a wire harness in the Left Upright 65 43 44 104 45 43 44 45 40 40 117 56 Large Hole Bracket 5 5a 5b 4 Attach the Latch Housing 46 to the Left Upright 47 with two 3 4 Screws 38 Make sure that the large hole in the Latch Housing is on the side shown Remove the Latch Knob 48 from the Latch Pin 52 Make sure that the Latch Pin Collar 49 and the Spring 50 are on the Latch Pin Insert the Lat...

Страница 8: ...arness 65 through the indicated nylon tie on the Console Base 67 Next touch the right Handrail 40 to discharge any static See drawing 7a Find the connector on the end of the Wire Harness Insert the con nector into the red socket beneath the Console 69 The connector should slide easily into the socket and snap into place If the connector does not slide easily and snap into place turn the connector ...

Страница 9: ...ing an equipment earthing conductor and an earthing plug Important If the power cord is damaged it must be replaced with a manufacturer recommended power cord See drawing 1 Plug the indicated end of the power cord into the socket on the treadmill If a ferrite box is included lift the tab on the ferrite box and clamp the ferrite box around the power cord Fasten the included plastic tie just behind ...

Страница 10: ...feedback You can even measure your heart rate using the built in pulse sensor Two speed programs are also offered Each program automatically controls the speed of the treadmill as it guides you through an effective workout HOW TO TURN ON THE POWER Note If there is a sheet of clear plastic on the face of the console remove the plastic Plug in the power cord see page 9 Locate the on off switch on th...

Страница 11: ...5 mph To stop the walking belt press the Stop button The Time Pace display will begin to flash To restart the walking belt press the Start button or the Speed increase button Note During the first few minutes that the treadmill is used inspect the alignment of the walking belt and align the walking belt if necessary see page 17 Change the incline of the treadmill as desired To change the incline o...

Страница 12: ...desired To measure your heart rate stand on the foot rails and place your thumb on the pulse sensor Do not press too hard or the circu lation in your thumb will be restricted and your pulse will not be detected When your pulse is detected the heart shaped indicator in the Pulse display will flash each time your heart beats and your heart rate will be shown Hold your thumb on the pulse sensor for a...

Страница 13: ... setting is pro grammed for the next period The program will continue until all 30 periods are completed The walking belt will then slow to a stop To change the incline setting during the program press the Incline buttons If the speed setting is too high or too low during the program you can manually override the setting by pressing the Speed buttons However when the next period begins the treadmi...

Страница 14: ...l the frame is past the latch pin Slowly release the latch knob Make sure that the frame is securely held by the latch pin To protect the floor or carpet from damage place a mat under the treadmill Keep the treadmill out of direct sun light Do not leave the treadmill in the storage position in temperatures above 30 C 85 F HOW TO MOVE THE TREADMILL Before moving the treadmill convert the treadmill ...

Страница 15: ...h knob to the left and hold it Pivot the treadmill down until the frame is past the latch pin Slowly release the latch knob 2 Hold the treadmill firmly with both hands and lower the tread mill to the floor Do not drop the treadmill frame to the floor To decrease the possibility of injury bend your legs and keep your back straight Latch Knob ...

Страница 16: ...er wait for five minutes and then press the switch back in d Check the on off switch located on the treadmill near the power cord The switch must be in the on position PROBLEM The power turns off during use SOLUTION a Check the circuit breaker located on the treadmill near the power cord see c above If the cir cuit breaker has tripped wait for five minutes and then press the switch back in b Make ...

Страница 17: ...d run the treadmill for a few minutes Repeat until the walking belt is properly tight ened c If the walking belt still slows when walked on call our Customer Service Department PROBLEM The walking belt is off centre or slips when walked on SOLUTION a If the walking belt is off centre remove the key and UNPLUG THE POWER CORD If the walking belt has shifted to the left use the hex key to turn the le...

Страница 18: ...must be aerobic Aerobic exercise is activity that requires large amounts of oxygen for prolonged periods of time This increases the demand on the heart to pump blood to the muscles and on the lungs to oxygenate the blood For aerobic exercise adjust the speed and incline of the treadmill until your heart rate is near the highest number in your training zone WORKOUT GUIDELINES Each workout should in...

Страница 19: ...s Stretch With one leg in front of the other reach forward and place your hands against a wall Keep your back leg straight and your back foot flat on the floor Bend your front leg lean forward and move your hips toward the wall Hold for 15 counts then relax Repeat 3 times for each leg To cause further stretching of the achilles ten dons bend your back leg as well Stretches Calves achilles ten dons...

Страница 20: ...rew 37 2 1 4 Washer 44 4 1 4 Star Washer 45 4 3 8 Star Washer 55 2 2 1 2 Bolt 61 2 3 Bolt 58 4 4 Bolt 117 2 1 2 Screw 5 1 5 16 Star Washer 57 4 1 1 4 Tek Screw 60 4 Remove this chart and use it to identify small parts during assembly Save this chart and the EXPLODED DRAWING PART LIST for future reference PART IDENTIFICATION CHART ...

Страница 21: ...9 2 Upright Spacer 60 2 1 1 4 Tek Screw 61 2 2 1 2 Bolt 62 2 Wheel Housing 63 2 Wheel 64 1 Belly Pan Plug 65 1 Wire Harness 66 2 Silver Ground Screw 67 1 Console Base 68 1 Book Lens 69 1 Console 70 1 Plastic Tie 71 1 Key Clip 72 1 Console Warning Decal 73 4 Base Pad 74 4 U Nut 75 2 Base Endcap 76 1 Upright Grommet 77 1 Frame Ground Wire 78 10 Screw 79 1 Base 80 1 Filter Wire 81 1 Belly Pan 82 1 Fe...

Страница 22: ...5 42 43 45 44 38 47 38 40 65 67 53 52 54 49 50 55 57 58 79 63 61 62 15 51 74 60 65 73 76 78 77 62 58 57 74 55 54 15 61 63 73 60 78 88 43 38 38 38 42 45 44 45 44 43 71 66 38 69 68 38 5 38 84 104 9 85 86 87 5 101 38 70 38 99 100 105 103 94 7 7 7 72 12 106 23 108 107 46 98 95 94 92 102 92 92 109 110 111 89 91 90 33 109 90 115 113 113 112 112 91 89 116 117 117 13 119 64 114 114 59 9 56 9 59 56 EXPLODE...

Страница 23: ...ad Beeston Leeds LS118JG UK Tel Outside the UK 0 044 113 387 7133 Fax 0 044 113 387 7125 To help us assist you please be prepared to give the following information The MODEL NUMBER of the product PETL31131 The NAME of the product PROFORM 365 P treadmill The SERIAL NUMBER of the product see the front cover of this manual The KEY NUMBER and DESCRIPTION of the desired part s see the PART LIST and the...

Отзывы: