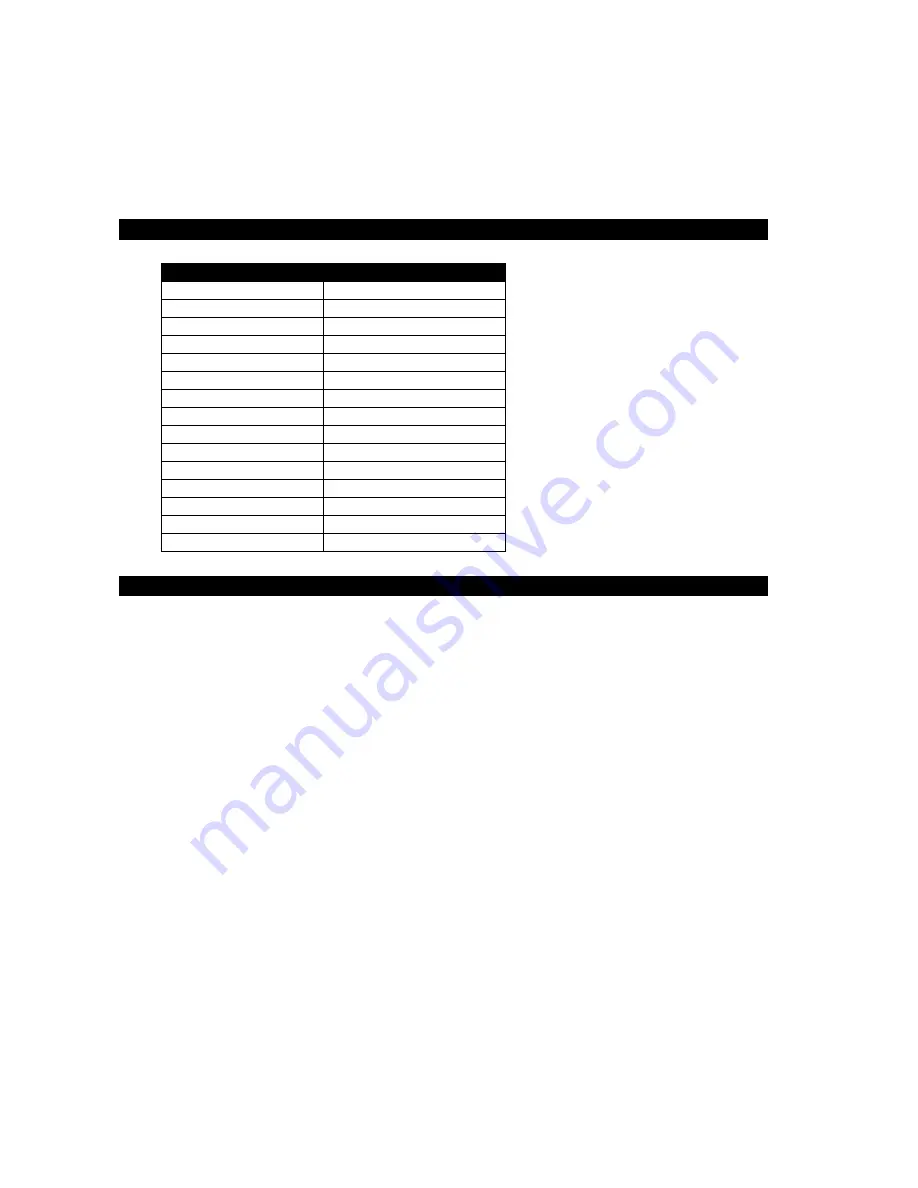
Pro-face Xycom SXT1811 Скачать руководство пользователя страница 15

4. Hardware

Signal Name

15-pin D-Shell (Female)

Red

1

Green

2

Blue

3
4

GND-Digital

5

GND-Red return

6

GND-Green return

7

GND-Blue return

8
9

GND-Digital

10
11
12

Hsync

13

Vsync

14
15

After 50,000 hours of use, the two lamps used for LCD back lighting may become dim or
burn out. You may return the monitor to Xycom for lamp replacement or you can order
new lamps and follow the procedure below to install them. You can perform the lamp
replacement procedure without removing the monitor from the NEMA enclosure where it
is mounted, but you should do this only in a clean environment. Otherwise, the procedure
is better performed at a service bench.

1. 

TURN THE MONITOR POWER OFF AND DISCONNECT THE LINE CORD

2. 

Loosen the four thumbscrews that hold the back of the monitor on.

3. 

Separate the two halves of the monitor. If the unit is equipped with a touchscreen,

you will have to disconnect its cable.

4. 

The lamps are mounted in small plastic carriers that slide in the right side of the LCD

display at the top and bottom edges.

5. 

Note their orientation and then unplug the two sets of lamp wires (3" pink and white

silicone wires) from the nearby inverter.

6. 

Look in the hole where the lamp is presently installed and note the small black

locking tab on the front side of each hole. With a small slotted screwdriver, depress
the tab while carefully pulling on the wires and slide the lamps outward. Discard the
old lamps.

4-1

VGA Input Connector Pin Out

Back Light Replacement Procedure

Содержание Xycom SXT1811

Страница 1: ...SXT1811 FLAT PANEL INDUSTRIAL MONITOR FLAT PANEL INDUSTRIA Hardware Guide...

Страница 2: ...in a residential area is likely to cause harmful interference in which case the user will be required to correct the interference at his own expense For European Users WARNING This is a Class A produc...

Страница 3: ...ulatory Compliance 1 4 Safety Agency Approvals 1 4 2 Installation 2 1 Environmental Considerations 2 1 System Power 2 1 Excessive Heat 2 1 Electrical Noise 2 2 Line Voltage Variation 2 2 Location and...

Страница 4: ...h an optional integrated high performance 35 million touch touchscreen Front panel controls with onscreen menus lock switch on rear of units Long lasting 50 000 hour backlight Hinged design for easy b...

Страница 5: ...the user will appear in a monospace font Operator interfaces such as the Start menu button and keyboard keys such as Enter appear in a narrow bold typeface Other text such as the word Note is bold to...

Страница 6: ...F ON P OW E R ME NU 18 51 470 15 15 70 398 78 3 35 85 09 in mm Front Panel Controls The front panel controls from left to right are Menu Select Increment Decrement Their use is detailed in Chapter 3...

Страница 7: ...006 peak to peak displacement 1 0 g maximum acceleration 0 015 peak to peak displacement 2 5 g maximum acceleration Altitude Sea level to 10 000 ft 3 000 m Sea level to 40 000 ft 12 000 m Electrical A...

Страница 8: ...owing practices Separate the power and ground P E or Protective Earth cable from signal cables at the point of entry to the enclosure To minimize the ground wire length within the enclosure locate the...

Страница 9: ...in the specified line fluctuations and still allow the system to function in its operating margin As long as the incoming voltage is adequate the power supply provides all the logic voltages necessary...

Страница 10: ...ccessible disconnect device in the fixed wiring on permanently connected equipment Avoid overloading the supply circuit This monitor should be mounted in and used where NEMA 4 and NEMA 12 type enclosu...

Страница 11: ...atically detected by the operating system If you are not using Plug and Play set your monitor type to Manufacture Standard monitor type Model Super VGA 1290 x 1024 60 Hz Vertical Refresh 60 Hz Resolut...

Страница 12: ...e onscreen menu Also steps to the next menu group Select These buttons highlight and select menu items They also increase or decrease brightness Increment and Decrement These buttons are used to scrol...

Страница 13: ...PIP window Auto automatic detection of Composite or S video Comp manual select composite video only SVid manual select S video only Adjust the image brightness of the PIP window Adjust the image contr...

Страница 14: ...Pan Vertical Pan Direct Access 1 Direct Access 2 Define the hot key function and for one of the following adjustments Brightness Contrast Volume Freeze Zoom Video Source Define the hot key function a...

Страница 15: ...e bench 1 TURN THE MONITOR POWER OFF AND DISCONNECT THE LINE CORD 2 Loosen the four thumbscrews that hold the back of the monitor on 3 Separate the two halves of the monitor If the unit is equipped wi...

Страница 16: ...Reconnect the lamp wires to the inverter These are keyed connectors permitting insertion in only one orientation 9 You may now want to clean the LCD and the inside of the monitor window or touchscreen...

Страница 17: ...oft Diagnostic utility MSD or other diagnostic applications 5 Details of attempts made to rectify the problem s and results 6 The log number assigned from Xycom Automation Technical Support if this is...

Страница 18: ...141285 B Xycom Automation Inc 750 North Maple Drive Saline MI 48176 734 429 4971 Fax 734 429 1010 http www xycom com...

Отзывы: