


Miss GEICO Zelos
®
Twin 36
EN
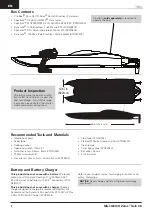
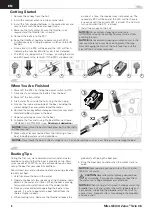
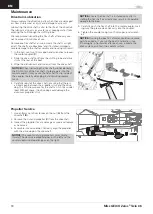
Propeller Service
1. Use an 8mm nut driver to loosen the nut (
A
) from the
driveshaft (
B
).
2. Remove the nut and propeller (
C
) from the driveshaft.
3. Inspect the propeller for any damage or wear and replace
as necessary.
4. Assemble in reverse order. Correctly align the propeller
with the drive dog on the driveshaft.
NOTICE:
The counter-rotating propellers must rotate
inward. The clockwise propeller goes on the left and the
counterclockwise propeller goes on the right.
10
A
B
C
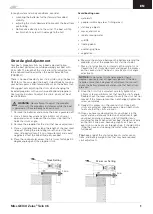
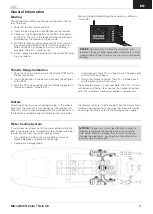
Maintenance
Drivetrain Lubrication
Always replace the drivetrain parts when they are damaged
or show visible wear or injury and damage may result.
Lubricating the drive shaft is vital to the life of the drivetrain.
The lubricant also acts as a water seal, keeping water from
entering the hull through the stuffi ng tube.
We recommend lubricating the fl ex shafts after every use,
not to exceed 15 minutes of use.
Remove one fl ex shaft at a time, or mark the shafts as right
or left. The shafts are directional and if installed improperly,
severe damage to the shaft assembly and housing will result.
1. In the hull, use two 10 mm open-end wrenches to loosen
the motor coupler (
C
).
2. Slide the drive shaft out from the stuffi ng tube and drive
strut at the rear of the boat.
3. Wipe the old lubricant and material from the drive shaft.
NOTICE:
When lubricating the fl ex shaft, do not lubricate
the fi rst 20mm of the fl ex shaft. If grease gets into the
motor coupler, it may cause the fl ex shaft to slip inside of
the coupler, thereby damaging it and requiring replace-
ment.
4. Carefully reinstall the drive shaft, ensuring that there is
a 2.5mm gap between the propeller strut and the drive
dog. This will allow space for the shaft as it shrinks under
load. Without space, the drive dog could damage the
aluminum propeller strut.
NOTICE:
Ensure the fl ex shaft is installed correctly. In-
stalling the fl ex shaft incorrectly may result in irreparable
damage to the boat.
5. Carefully push the fl ex shaft into the motor coupler, mak-
ing sure the grease does not carry into the coupler.
6. Tighten the coupler using two 10mm open-end wrench-
es.
NOTICE:
Running the boat in saltwater could cause some
parts to corrode. If you run the boat in saltwater, rinse
it thoroughly in freshwater after each use, lubricate the
drive system, and fl ush the coolant system.
A
B
C


