


16 -
PRM 60
9. SERVICING AND REPAIRS
– GENERAL
WARNING:
Before removal of the gearbox for repair or overhaul carefully study the following
procedures. Use proper hand tools, slings or hoists for the job
–
WORK SAFELY
Keep all work areas, tools and gearbox clean. Wipe up and spilled oil or fluids to prevent accidents.
Wear correct safety equipment i.e. safety glasses and safety shoes to guard against personal injury/
Remember
WORK SAFELY
– USE COMMON SENSE.
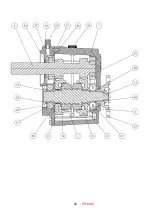
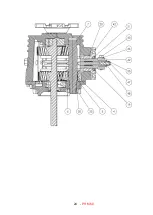
Drawings showing all internal components are contained in the parts list.
9.1 Seals
Remove oil seals carefully to prevent damage if they are to be re-used, however it is best to replace these items.
9.2 Bearings
If removing bearings for re-use keep them in a clean area to prevent dirt contamination.
9.3 Cleaning
WARNING:
If using cleaning solvents these can be toxic, flammable, a skin irritant or give off harmful
fumes. Avoid prolonged contact, vapour inhalation, or smoking. Failure to take care can result in injury
or death.
Rinse all metal parts in solvent to remove dirt, grease and oil.
Be careful to remove solvent from items before re-fitting.
9.4 Inspection
9.4.1
Gearcase
Inspect for cracks. Check sealing surfaces for any scratches, damage etc. which will lead to oil leaks.
9.4.2 Gears
Inspect for any chipped broken or cracked gear teeth, also for any excessive wear, i.e. gear pitting.
9.4.3 Bearings
Inspect for any damage, pitting or over-heating.
9.4.4 Threaded parts
Inspect for stripped or damaged threads.
9.5 Assembly
CAUTION:
All threaded fasteners must be tightened to the torques listed in table 10.2, to prevent
premature failure.
CAUTION:
A new drive flange nut must be fitted if this is removed. Prior to assembly oil all internal
parts with clean gearbox oil.
9.6 Disassembly of Gearbox
Drain oil and remove adaptor plate. Hold output coupling (23) securely whilst removing locknut (36) , carefully remove
the “staked” portion of locking device so as to avoid damaging the thread of the output shaft (14).
9.6.1 Selector assembly
Remove the output coupling (23). Remove the two socked head cap screws (42) securing selector housing (19).
Withdraw selector assembly ensuring selector shoe (22) and spring (15) do not fall into the gearbox.
Содержание PRM 60
Страница 1: ...PRM 60 WORKSHOP MANUAL...
Страница 2: ......
Страница 11: ...9 PRM 60 BASIC INSTALLATION DETAILS PRM 60 Figure 4 Intallation Details...
Страница 23: ...21 PRM 60 13 Exploded view and Cross section Figure 5 Exploded view and cross section...
Страница 24: ...22 PRM 60...
Страница 25: ...23 PRM 60...
Страница 26: ...24 PRM 60...
Страница 28: ...26 PRM 60 NOTES...