


28
EN
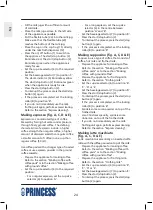
Descaling (fig. A, B, C, K, L & M)
The appliance must be descaled regularly.
The appliance has an automatic descaling
indicator which informs the user when
descaling is required.
If the descaling indicator (5) flashes, the
•
appliance must be descaled. It is still possible
to brew coffee and prepare hot water, but
frothing milk for cappuccino, latte macchiato
or café au lait is no longer possible.
If the descaling indicator (5) lights continuously,
•
the descaling program is running.
The automatic descaling program of the appliance
is optimised to be used for 125 ml of durgol®
swiss espresso®. The product is used undiluted,
is highly effective and guarantees a reliable
descaling and therefore a long operational life of
the appliance. The descaling agent is available
from our service station.
Before you proceed, we need you to pay attention
to the following notes:
- Be careful when descaling the appliance to
prevent damage to furniture or clothing.
Place an empty pot (at least 1.8 l) under the
coffee dispenser (10), the hot water
dispenser (11) and the milk froth dispenser
(12) in such a way as to prevent splashes.
Before you proceed, we would like you to focus
your attention on the following notes:
- Only use durgol® swiss espresso® in the
specified quantity to descale the appliance.
- Do not use vinegar or vinegar concentrate
to descale the appliance.
- Do not use citric acid to descale the appliance.
Preparation
Press the on/off button (1) to switch off the
•
appliance.
Remove the dispenser cassette (9) from the
•
appliance.
Remove the milk frothing unit from the
•
appliance.
Manually remove the red steam nozzle (27)
•
from the steam outlet (30). If necessary, use
the hexagonal key (29) at the underside of
the coffee dispenser filter (28).
Remove the water reservoir (17) from the
•
appliance.
Remove the lid (19) from the water reservoir
•
(17).
Remove the cover (20) from the filter holder
•
(21).
Remove the anti-chlorine filter (18) from
•
the filter holder (21).
Put the red steam nozzle (27) in the filter
•
holder (21).
Place the cover (20) on the filter holder (21).
•
Make sure that the arrow on the cover (20)
points in the direction as shown (fig. B).
Fill the empty water reservoir (17) with
•
125 ml of durgol® swiss espresso®.
Place the lid (19) on the water reservoir (17).
•
Fill the water reservoir (17) with water up
•
to the maximum mark in the filling opening
of the lid (19).
Place the water reservoir (17) in the appliance.
•
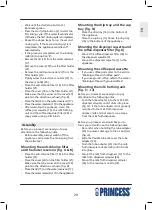
Part 1 - Descaling
Set the beverage selector (7) to position ’A’
•
or ’B’.
Insert the coffee pad cassette (13) into the
•
appliance.
Set the locking collar (8) to position ’A’.
•
Place an empty pot (at least 1.8 l) under
•
the coffee dispenser (10).
Press the on/off button (1) to switch on
•
the appliance.
Keep the on/off button (1) and the start/stop
•
button (2) pressed at the same time until
the pump starts to run. The descaling phase
is running. The descaling indicator (5)
remains on as long as the descaling phase
is running.
Wait for approximately 35 minutes until
•
the water level indicator (3) starts to flash.
Part 2 - Rinsing
Place the lid (19) on the water reservoir (17).
•
Fill the water reservoir (17) with water up
•
to the maximum mark in the filling opening
of the lid (19).
Place the water reservoir (17) in the
•
appliance.
Place an empty pot (at least 1.8 l) under
•
the coffee dispenser (10).
Содержание 242124
Страница 2: ...2 14 13 11 15 9 10 12 13 8 17 7 6 3 2 1 4 5 18 16 15 A...
Страница 3: ...3 13 13 19 20 18 21 17 C B A 8 F2 B C F1 A B C D E 6 F A B E 7 C D D E...
Страница 4: ...4 27 26 12 24 25 25 26 25 26 23 22 14 13 14 J2 G H I1 I2 J1...
Страница 5: ...5 5 16 15 31 13 24 A 12 25 25 26 28 9 O J3 K 30 27 29 28 19 20 21 27 18 21 17 L M N...
Страница 6: ...6 P...
Страница 152: ...152 EL 500 ml 10 11 12 24 24 on off 1 2 45 2 2 2 8 B 2 80 2 3 4 5 on off 1 2 2 on off 1 2 2 3 4 5 3...
Страница 153: ...153 EL 5 2 2 6 7 17 30 A 17 3 D 6 A 1 B 1 C 1 D 2 E 1 7 A B C D E F Caf au lait A C D E F I 7 cm 7 cm 1 2...
Страница 155: ...155 EL 2 2 8 B A C D E J 1 3 24 24 15 12 on off 1 2 2 6 7 C 4 2 2 2 8 B A C D E 50 ml...
Страница 157: ...157 EL A C D E 15 11 on off 1 2 2 6 7 A 2 2 8 B A B D E...
Страница 162: ...162 EL 28 9 9 J1 J3 J2 25 J3 24 25 25 26 12 26 26 27 A O 8 1 13 31 13 31 3 cm 8 13 13 13 14 P...
Страница 163: ...163 EL 8 A 8 B 8 A C 1 500...
Страница 164: ...164 EL 14 cm on off on off 7 A B 8 3 x 1 mm2...
Страница 165: ...165 EL 1 500...
Страница 166: ...166 AR 1 500...
Страница 167: ...167 AR 14 A 7 B 8 2 1 3...
Страница 168: ...168 AR 31 3 8 13 13 13 14 P A 8 B 8 A 8 C 1 500...
Страница 169: ...169 AR 13 28 B A 21 18 21 20 20 B 17 19 17 N 16 15 16 K 28 9 9 J1 J3 J2 25 J3 A 24 25 25 26 12 26 26 27 O A 8 13 31 13...
Страница 173: ...173 AR E C B A 17 21 20 17 17 19 17 19 17 B A 7 13 A 8 500 11 10 12...
Страница 175: ...175 AR 24 24 15 12 1 2 2 6 C 7 4 2 2 2 8 B E D C A 50 6 A 6 B A 6 B 7 2 2 8 B E D C A...
Страница 177: ...177 AR A 3 17 D 6 1 A 1 B 1 C 2 D 1 E E 7 A B C D E F I F E D C A 7 7 1 2 C 8 13 13 1 F1 2 F2...
Страница 178: ...178 AR 24 24 1 2 45 2 2 2 B 8 2 80 2 3 4 5 A 2 1 2 1 2 2 3 5 3 5 2 2 6 17 7 30...


