background image

537-5

28rev

C-EN


Printed in USA 

2/06

 © 200

6

3

TOASTER

TX-230

E

BKCE

Operation

1

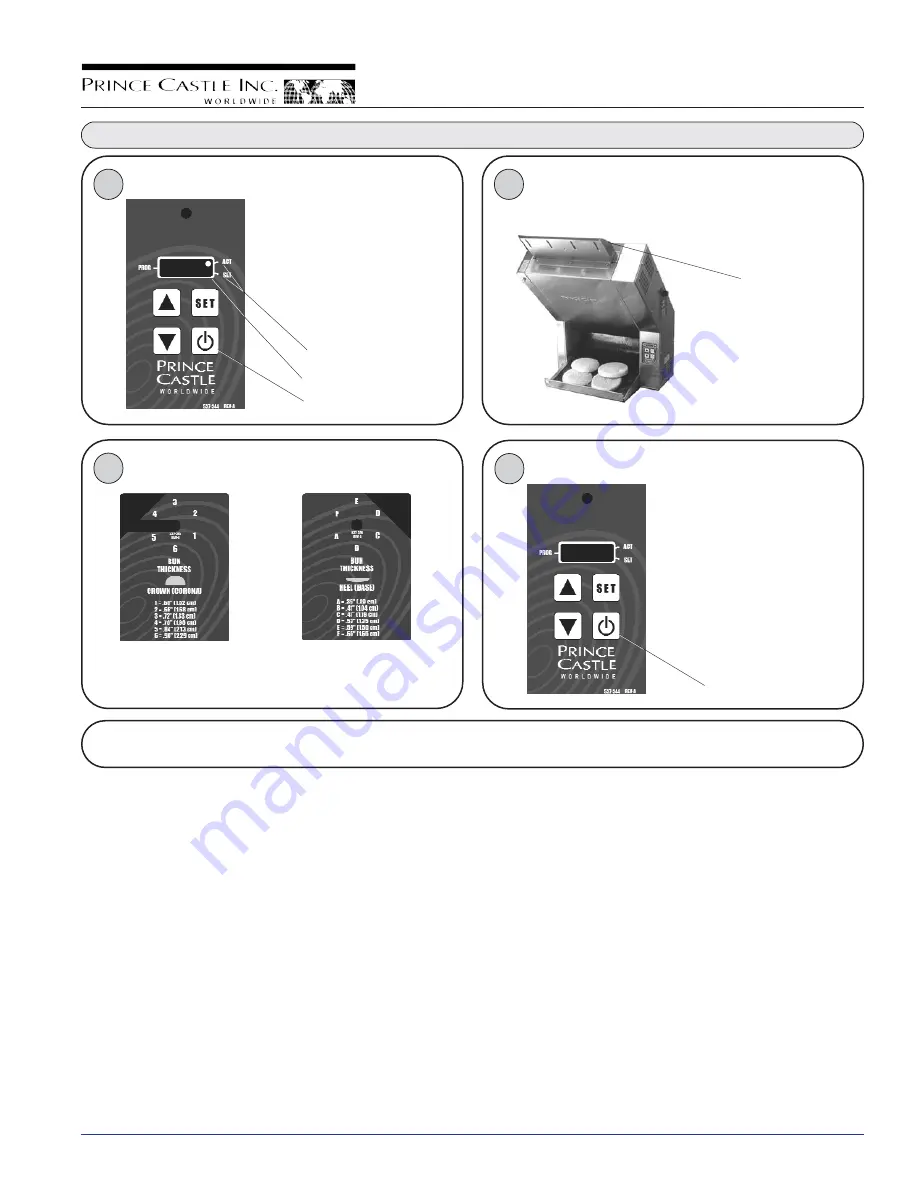
Power On/Off Button

Display

Temperature LED’s

Press the On/Off Button to turn the unit on.

The conveyor will begin to turn
and the display will read “

L

LO

O

”.

When the unit is at operating
temperature the display will
read “

R

RD

DY

Y

” and the ACT (actual

temperature) LED will be lit.

2

Turn the Bun Thickness Adjustment Knobs to the desired setting.

R

R D

D Y

Y

Power On/Off Button

If the heater is above 450°F, the
display will alternately show

C

CO

OO

OL

L

” and “

O

OF

FF

F

”, and the con-

veyor belt will continue to run
approximately 45 minutes. When
the unit has cooled sufficiently,
the display will go blank and the
conveyor motor will turn off.

Left Side Control

1 = Thinnest Cut

6 = Thickest Cut

Right Side Control

A = Thinnest Cut

F = Thickest Cut

3

Feed the buns into the bun chute, flat (toasted) side up.

4

Press the On/Off Button to turn the unit off.

Bun Chute

NOTE: Factory preset temperature is 570°F and should provide satisfactory results in most applications. Maximum
temperature of unit is 580°F (304°C).

Содержание TX-230EBKCE

Страница 1: ...the customer for parts and labor This warranty covers on location service i e trip charges and or mileage Travel mileage is limited to 100 miles 200 Kilometers round trip one trip warranty from an au...

Страница 2: ...e proper electrical receptacle All electrical connections must be in accordance with local electrical codes and any other applicable codes Important Prince Castle reserves the right to change specific...

Страница 3: ...r On Off Button If the heater is above 450 F the display will alternately show C CO OO OL L and O OF FF F and the con veyor belt will continue to run approximately 45 minutes When the unit has cooled...

Страница 4: ...CAUTION This unit is not watertight Do not clean with a water jet or jet spray Do not immerse the unit in water 1 Turn the unit off and unplug the power cord from the electrical receptacle 2 Wipe all...

Страница 5: ...range side facing out The Teflon sheet uses both sides as the contact surface When re installing rotate the usage by turning top to bottom and or turning the sheet inside out When reassembling convey...

Страница 6: ...DOWN Arrow Button and turn the unit back on When you release the Arrow Button the dis play will be in Celsius To switch from Celsius to Fahrenheit turn the unit off Press and hold the UP Arrow Button...

Страница 7: ...ocated at the right hand rear of the unit Allow the unit to cool approximately 15 min utes before starting Tighten motor connection Replace motor Replace drive gear Reset limit switch Using a pencil o...

Страница 8: ...537 298 Cam Bracket 17 537 379 Guide Bracket 18 537 717 LH Cam Shaft 19 537 300 LH Slide Plate 20 537 381 Conveyor Bracket 21 537 382 Conveyor Bracket 22 537 319 Ramp 23 537 336 LH Upright 24 537 335...

Страница 9: ...5 537 370S Lower Bearing Package of 2 6 537 318S Lower Shaft Short 7 537 316S Lower Shaft Long 8 197 279 Pin 9 537 334 Slide Bracket 10 537 411 Upper Roller 11 537 315 Upper Shaft 12 537 317S Upper B...

Страница 10: ...K BLU WHT BRN BLK WHT WHT BLK BLK BLK BLK WHT POWER CORD GRN YEL 3A FUSE BLOCK CONNECTION DETAIL USED ONLY ON TX 208 TX 240 MOTOR BLK BLK CONNECT WHITE WIRE TO PROPER MOTOR VOLTAGE TAB WHT 240V 200V J...

Отзывы: