62
516514
Section 5 Service Procedures
To reduce the risk of electric shock, fire, explosion, serious injury or death:
• Disconnect electric power to the dryer(s) before servicing.
• Close gas shut-off valve to gas dryer(s) before servicing.
• Never start the dryer(s) with any guards/panels removed.
• Whenever ground wires are removed during servicing, these ground wires must be
reconnected to ensure that the dryer is properly grounded.
W001R1
WARNING
h. Pull assembly forward and disengage the
middle exhaust duct.
i. Rotate the assembly 90° counterclockwise and
slide out through front of dryer.
j. Motor pulley and idler pulley assemblies.
Refer to Figure 47 for motor and idler pulley
removal.
NOTE: When repairing or replacing the idler arm,
it is important to make sure the idler arm moves
freely. To ensure that the idler arm can move freely,
proceed as follows:
(1) Unhook idler spring.
(2) Lift idler arm approximately 3 inches and
release. If idler arm does not fall back to the
base of the motor mount, then idler arm
bolt is too tight.
(3) Loosen idler arm bolt 1/4 turn.
(4) Add grease between idler arm and motor
mount.
k. Impeller and housing.
(1) Remove screws holding cover to housing.
Refer to Figure 46.
(2) Hold motor pulley securely and unthread
impeller from motor shaft (right hand
thread). Use a 7/8 inch, 6 point socket to aid
in the removal of the impeller.
(3) Remove three screws holding the exhaust
housing to the motor mounting bracket.
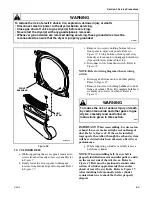
Refer to Figure 49.
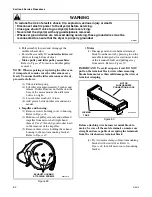
l. Motor
(1) Disengage motor wire harness terminal
block from the motor by pressing in on the
movable locking tabs (located on each side
of the terminal block) and pulling away
from motor. Refer to Figure 50.
IMPORTANT: To avoid an open circuit, DO NOT
pull on the terminal block wires when removing
blocks from motor as this could damage the wires or
terminal crimping.
Before attaching wire harness terminal block to
motor, be sure all the male terminals on motor are
straight and are capable of accepting the terminals
from the wire harness terminal block.
(2) Pry two motor clamps off motor mounting
bracket with screwdriver. Refer to
Figure 48, then lift motor out of mounting
bracket.
Figure 49
EXHAUST HOUSING
ATTACHING SCREWS
D402SE1A
Figure 50
LOCKING
TABS
MOTOR
WIRE HARNESS
CONNECTION BLOCK
D250SE3A
Содержание DAM 9
Страница 1: ...DAM 9 SERVICE MANUAL INDUSTRIAL DRYERS PUBLICATION DATE 02 01 516514 ...
Страница 2: ......
Страница 24: ...22 516514 Section 4 Grounding Copyright Alliance Laundry Systems LLC DO NOT COPY or TRANSMIT Notes ...
Страница 90: ...88 516514 Section 6 Adjustments Copyright Alliance Laundry Systems LLC DO NOT COPY or TRANSMIT Notes ...
Страница 126: ...124 516514 Section 8 Wiring Diagrams Copyright Alliance Laundry Systems LLC DO NOT COPY or TRANSMIT Notes ...
Страница 127: ......
Страница 128: ......


