516514
57
Section 5 Service Procedures
To reduce the risk of electric shock, fire, explosion, serious injury or death:
• Disconnect electric power to the dryer(s) before servicing.
• Close gas shut-off valve to gas dryer(s) before servicing.
• Never start the dryer(s) with any guards/panels removed.
• Whenever ground wires are removed during servicing, these ground wires must be
reconnected to ensure that the dryer is properly grounded.
W001R1
WARNING
43. BURNER HOUSING AND HEAT SHROUD
(Gas Models)
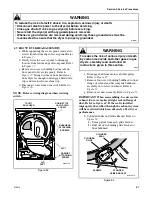
a. While supporting the access panel, remove two
screws from bottom edge of access panel. Refer
to Figure 7.
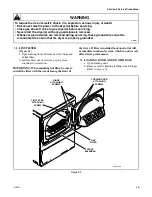
b. Gently lower the access panel to disengage
locators from bottom edge of front panel. Refer
to Figure 37.
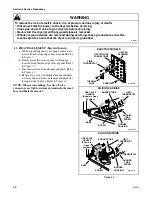
c. Silicon Carbide Ignition: Disconnect igniter
wires at disconnect blocks, sensor wires from
flame sensor terminals, and wires from gas
valve coils at the quick disconnect blocks.
Refer to Figure 39.
Silicon Nitride Ignition – Disconnect wire
harness from igniter and sensor assembly, and
from gas valve coils at disconnect blocks. Refer
to Figure 39.
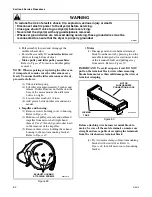
d. Remove screw from right side of burner
housing, while holding burner tube in place.
Refer to Figure 43.
e. Gently move burner tube toward rear of dryer to
disengage tab from slot on left side of burner
housing. Refer to Figure 39.
f. Carefully rotate burner tube and igniter
counterclockwise so tab is at 8 o’clock
position.
g. Move air shutter end of burner tube slightly to
the right and CAREFULLY remove burner
tube and igniter assembly out through front of
dryer.
IMPORTANT: The igniter is very fragile. Be careful
not to damage it during removal.
h. Remove screw holding burner housing to heat
shroud. Refer to Figure 39.
i. Remove screw holding front of burner housing
to dryer base and remove housing out through
front of dryer. Refer to Figure 43.
j. Remove two screws holding heat shroud to
heater box and take heat shroud out through
front of dryer.
44. LIMIT THERMOSTAT
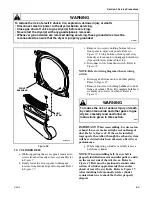
a. While supporting the access panel, remove two
screws from bottom edge of access panel. Refer
to Figure 7.
b. Gently lower the access panel to disengage
locators from bottom edge of front panel. Refer
to Figure 37.
c. Disconnect wires and remove screws holding
limit thermostat to burner housing (gas models)
or element plate (electric models). Refer to
Figure 43.
d. Repeat procedure on models with more than
one thermostat.
To Test Heater Assembly
(Electric Models)
1. Disconnect wires from heater assembly. Refer
to Figure 43.
NOTE: Refer to appropriate wiring diagram
when rewiring heater assembly.
2. Set meter to read Ohms. Apply meter probes to
the heater assembly terminals. Meter should
read as follows: (Cold Ohms). Refer to
Figure 43.
Color
KW
Voltage/Hz.
Resistance Reading
Orange
5.35
240 V 60 Hz.
9.6 ± .31 Ohms cold
White
4.75
208 V 60 Hz.
8.2 ± .5 Ohms cold
Red
5
240 V 60 Hz.
10.4 ± .32 Ohms cold
Green
4.8
240 V 50 Hz.
10.8 ± .32 Ohms cold
Yellow
4
240 V 50 Hz.
13.0 ± .40 Ohms cold
Blue
3.1
240 V 50 Hz.
16.7 ± .50 Ohms cold
Содержание DAM 9
Страница 1: ...DAM 9 SERVICE MANUAL INDUSTRIAL DRYERS PUBLICATION DATE 02 01 516514 ...
Страница 2: ......
Страница 24: ...22 516514 Section 4 Grounding Copyright Alliance Laundry Systems LLC DO NOT COPY or TRANSMIT Notes ...
Страница 90: ...88 516514 Section 6 Adjustments Copyright Alliance Laundry Systems LLC DO NOT COPY or TRANSMIT Notes ...
Страница 126: ...124 516514 Section 8 Wiring Diagrams Copyright Alliance Laundry Systems LLC DO NOT COPY or TRANSMIT Notes ...
Страница 127: ......
Страница 128: ......


