background image


English Instructions 

IMPORTANT: 

Read  these  instructions  carefully  and  retain  them  for 

future reference.  

IMPORTANT: 

Primo


reserves  the  right  to  modify  the  product  for  technical  or  commercial 

reasons without prior notice.  

IMPORTANT:

  This  product  must  be  used  for  the  purpose  that  it  was  designed  for;  any 

misuse  releases  PRIMO  from  an y  an d  all  respon sib ilities.  Ne ve r  u se  rep lacement 

parts othe r than th ose  supplied by the PRIMO. 

IMPORTANT:

 Never leave your child unattended! 

1.  Firmly pu sh  the 4 lo wer tube s throu gh  the holes in the front and rear  wheels, 

as sho wn in fig.1  & 2.  The notched end of tube should be to ward the whee l.  

2.  Attach the two (2) handles and then the two (2)  bath support tubes as shown in 

fig.3. Line up all 3 holes and screw together using 1 " X" typ e scre w on each le g .  

3 .  Assemble the lower shelf as shown in fig. 4.  Make sure that you first lock 

the bigger 

“L” slot (PART "F") and then the smaller one (PART "G").  

Yo u  will hea r the  sh e lf sna p into  p lace .  

4 .  Assemble the higher shelf as shown in fig.5. Make sure that you first lock 

the bigger 

“L” slot (PART "H") and then the smaller one (PART "I").  

5.  Put the bath on the frame (fig.6).  Insert the drainage tube to the underside of 

the bath as shown (fig.7).  Insert rectangular drain plug into hole inside the 

bath. 

6.  Screw the hinges on the back of the changing top with the 4 " Z" type screws 

as shown in fig.8.  You can feel the pre-drilled screw holes under the fabric. 

7 .  Fit the changing top with the hinges assembled onto the bath and then screw the 

fixed part of the  h inge s th ro u gh  the  frame , u sin g  4  " X" type  scre ws (f ig.9 ) . 

8.  Fit the accessory trays on the 2 shelves as shown in fig.10; slide them to the 

desired position. 

9.  To close changing pad, lift up and the locking mechanism will release


(PRIMO

®


EuroSpa™ Part # 351) 

Содержание 7 34970 00351 7

Страница 1: ...m Style PRI 351 UPC code 7 34970 00351 7 Made in China Hecho en China Fabriqué en Chine Colors and fabric patterns may vary Los colores y el estampado de las telas pueden variar Les couleurs et motifs du tissu peuvent varier Accessories not included No incluye accesorios Accessoires en sus No Lead No Phthalates No BPA No contiene plomo No contiene ftalatos No contiene bisfenol A Sans plomb Sans ph...

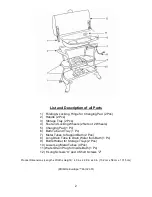
Страница 2: ...1 Pc 6 Bath Tub and Tray 1 Pc 7 Metal Tubes to Support Bath 2 Pcs 8 Long Drain Tube to Drain Water from Bath 1 Pc 9 Bottle Holder for Storage Trays 2 Pcs 10 Lower Leg Metal Tubes 4 Pcs 11 Water Drain Plug for Inside Bath 1 Pc 12 8 Long Screws X and 4 Short Screws Z Product Dimensions Length x Width x Height 40 in x 22 8 in x 40 in 102 cm x 58 cm x 101 5 cm PRIMO EuroSpa Part 351 ...

Страница 3: ...3 ...

Страница 4: ...4 PRIMO EuroSpa Part 351 ...

Страница 5: ...ch leg 3 Assemble the lower shelf as shown in fig 4 Make sure that you first lock the bigger L slot PART F and then the smaller one PART G You will hear the shelf snap into place 4 Assemble the higher shelf as shown in fig 5 Make sure that you first lock the bigger L slot PART H and then the smaller one PART I 5 Put the bath on the frame fig 6 Insert the drainage tube to the underside of the bath ...

Страница 6: ...eat 5 Clean the product with warm water and soap or mild detergent Do not use bleach or abrasive substances WARNING NOT A SAFETY DEVICE WARNING DROWNING HAZARD Infants have DROWNED in infant bath tubs NEVER lift this product with an infant in it FALL HAZARD To prevent death or serious injury ALWAYS keep infant within arm s reach ALWAYS check water temperature before placing infant into bath tub Sa...

Страница 7: ...PORTANT Ne laissez jamais votre enfant sans surveillance 1 Insérez fermement les quatre 4 tubes inférieurs dans les trous des pieds avant et arrière tel qu illustré à la Fig 1 2 2 Insérez les deux 2 poignées puis les deux 2 tubes de support de la baignoire tel qu illustré à la Fig 3 Alignez les 3 trous et assemblez à l aide de 1 vis X pour chaque patte 3 Installez la tablette inférieure tel qu ill...

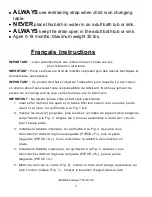
Страница 8: ... sont bien serrées et sans jeu car ceci pourrait causer des blessures à votre enfant ou le mettre sérieusement en danger 2 La table à langer est munie de roulettes verrouillables qui doivent être bloquées en tout temps lorsqu elle est utilisée 3 Laissez la baignoire en place sur le cadre de la table à langer en tout temps même lorsque vous n utilisez ce produit que pour langer votre enfant 4 Ne la...

Страница 9: ...Utilisez toujours la sangle de sécurité lorsque l enfant se trouve sur la table à langer 0 à 18 mois poids maximal 13 kg Español Instrucciones IMPORTANTE Lea estas instrucciones detenidamente y guárdelas para poder consultarlas más adelante IMPORTANTE Primo se reserva el derecho a modificar el producto por razones técnicas o comerciales sin previo aviso IMPORTANTE Este producto debe utilizarse con...

Страница 10: ... taladrados para los tornillos debajo de la tela 7 Coloque la mesa con las bisagras sobre el baño y luego atornille la parte fija de las bisagras a través del armazón usando 4 tornillos tipo X figura 9 8 Coloque las bandejas de accesorios en los dos estantes como se muestra en la figura 10 deslícelas hasta que queden en la posición deseada 9 Para cerrar la almohadilla de cambio levante y se soltar...

Страница 11: ... agua no debe sobrepasar los 100 F 37 8 C Nunca utilice más de 1 de agua 2 54 cm en la bañera cuando bañe al bebé Nunca se aparte de la bañera o de la mesa de cambio mientras un niño la esté usando No permita que otro niño sustituya a un adulto en la supervisión del bebé Descontinúe el uso del producto si se daña o se rompe Este producto no es un juguete No permita que los niños jueguen con él Uti...

Страница 12: ...0 day limited warranty period from the original date of purchase When authorization is issued for replacement or parts send postage prepaid to PRIMO 149 Shaw Avenue Irvington NJ 07111 USA The warranty details above shall be in lieu of any and all other warranties ALL OTHER WARRANTIES INCLUDING IMPLIED WARRANTIES OF MERCHANTABILITY AND FITNESS FOR A PARTICULAR PURPOSE ARE HEREBY EXPRESSLY DISCLAIME...

Отзывы: