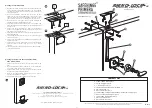
A) Installing Tubular Bolt
1) On the edge of the door (top or bottom accordingly) mark a
pencil line 80±100mm from the edge of the door
representing the centre line for the tubular bolt. (Diagram 1).
2) Carefully drill a 25mm diameter hole through the core of
the door 300mm deep. Take great care to ensure the drill
is kept straight in both planes throughout the drilling
process to prevent damaging the door.
3) Ensure all debris is removed and check the bolt sits
comfortably in the hole all the way to the back of the
fore-end without force.
4) Mark a pencil line around the face-plate and remove the
bolt (Diagram 2).
5) Using a chisel remove 3mm of timber inside the
guide-lines to enable the front of the bolt to sit flush with
the surface of the timber when face-plate is fitted
(Diagram 3).
6) Withdraw the bolt and set aside.
B) Fitting the Escutcheon Assembly
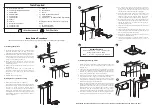
1) Mark 270mm backset distance. (Diagram 4).
Using a 22mm flat bit, drill the hole to receive the spindle
and key-drive housing. Re-fit the Tubular Mortise Bolt
and check to ensure the hole is perfectly aligned
centrally to the square follower. Offer the escutcheon
assembly up to the door and mark the position of the
protruding machine screws. Drill two appropriate holes
that will enable the plate to sit flat against the surface of
the door. (Diagram 4).
2) It is important to ensure the lock is fitted the correct way
round in the mortise. Please ensure that the coloured spot on
the side of the tube faces the side of the door that the
escutcheon assembly will be fastened to (Diagram 3).
3) Using the spindle formula in figure (5) cut the spindle to the
required length. Secure the spindle in the escutcheon
assembly using grub screw supplied. Ensure that the grub
screw is fully tightened using 1.5mm Allen Key (Diagram 6).
4) With the key indent at the 12.00 o’clock position and with the
bolt withdrawn, offer the escutcheon assembly on to the door
aligning the spindle in to the tubular bolt. Test the key to
ensure bolt works properly.
5) Using the 2mm drill, carefully drill four pilot holes for the plate
fixings (Diagram 4).
6) Fasten the Escutcheon Plate to the door using 4 x 5/8” No 6
screws. The plate must be sat firmly back to the surface of the
door to prevent any potential ligature risk.
7) Using the key, operate the lock again to ensure the bolt can
be thrown and withdrawn easily.
8) Using the bolt fore-end as a guide pilot drill two holes and
secure bolt and faceplate in position using 2 x 1”¼ No. 8
screws.
44
80±100
44
80±100
44
80±100
44
C) Installing Reinforcing Plates
1) Mark a vertical line on the surface of the door representing the centre
line of the bolt and mark 2 parallel lines 35mm on either side
(Diagram 7a).
2) If fitting at the head of the door mark a horizontal line on the surface
of the door 3mm below the rebate (if applicable) at the top of the door
(Diagram 7b). If fitting to the bottom of the door mark a horizontal line
on the surface of the door 3mm from the bottom edge.
3) With the reinforcing plate centred and outside edge aligned with the
horizontal line mark the 4 fixing points in preparation for drilling.
4) Using the 6mm drill bit drill through the door ensuring correct
horizontal and vertical alignment and taking measures to prevent the
possibility of spelching on the opposite side.
5) Fasten the reinforcing plates on to the door using the back to back
fixings as illustrated (Diagram 8). Ensure that the screw heads are
positioned on the safest side of the door preferably outside the
patient environment or on the observed side of the door. It may be
necessary to drive the knurled sleeve fixings home using a nylon
faced hammer/mallet to ensure they are seated correctly in the plate.
6) Complete the installation by fitting the remaining four M4 machine
screws and ensure both plates are fitted firmly back to the door.
a) Heavy Duty Drill (Mains)
b) 25mm Auger Bit (350mm-400mm)
c) 6mm Drill Bit
d) 2.0mm Drill Bit
e) 22mm Flat Bit
f) 13mm Flat Bit
g) Chisel 1”
h) Chisel ½”
i) Hex Socket Screwdriver
j) T15 Pin Torx Bit
k) T20 Pin Torx Bit
l) Hammer
m) Tape Measure
n) Pencil
o) Nylon Faced Hammer/Mallet
p) 1.5mm Allen Key
q) Life-Line Key - Pn. PR7320-LLBK (not included)
When fitting the easy-clean socket in a concrete
floor:
r) 7mm Masonary Bit
s) Narrow Cold Chisel
Door Thickness
2 + 7mm = Spindle Lgth
Example where door is 44mm
44mm
2 + 7mm = Spindle Lgth of 29mm
Installation Procedure
(Assumes timber doors without obstacles eg. viewing panels that would affect positioning)
Spindle Formula
22mm
(a)
(b)
80±100
44
270 Backset
1
4
5
6
7
8
2
3
Rhino Bolts should be fitted in pairs, use the same procedure to install the bolt at the foot of the door.
= Mark with pencil
= Drill Pilot Hole
Tools Required


