background image

Hardware and Software Setup

  11

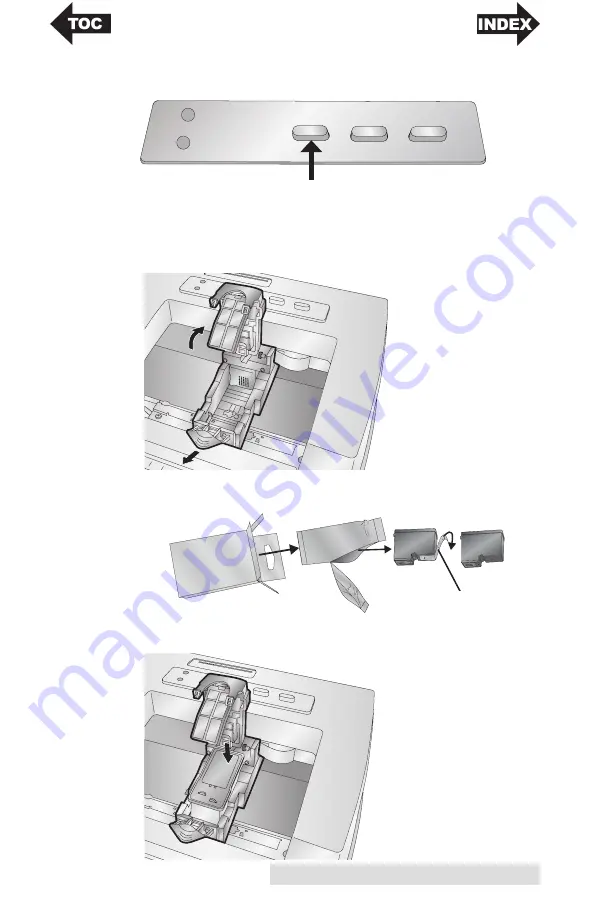
1. Open the Top Cover of the printer.
2. Press the Ink Button on the printer.

3. The Cartridge Carrier will align itself to the center of the

print area.

4. Press the Cartridge Cover Release to open the Cartridge

Holder.  Remove the cartridge (if installed).

5. Remove the new Cartridge from its packaging.  Be sure to

remove the protective tape covering the copper contacts.

6. Replace/install the cartridge copper end first.

Remove tape

Power

Ink

Ink

Load/Feed

Unload

Содержание LX500

Страница 1: ...041116 511441 User s Manual 2016 All rights reserved ...

Страница 2: ...ll not occur in a particular installation If this equipment does cause harmful interference to radio or television reception which can be determined by turning the equipment off and on the user is encouraged to try to correct the interference by one or more of the following measures Re orient or relocate the receiving antenna Increase the separation between the equipment and receiver Connect the e...

Страница 3: ...Sensor Mode 16 C Output or Cut Mode LX500c Only 17 D Adjusting Label Offsets 20 E Using the Cost Estimator 22 F Settings 23 Section 4 Printing Using a PC 24 A Using BarTender 24 B Add Text Barcodes and Graphics to BarTender Label 28 C Printing from BarTender 29 D Printer Driver Settings PC 30 E Printing from other Programs 33 Section 5 Troubleshooting 35 A Solving Offset Alignment Problems 35 B Cr...

Страница 4: ...iv ...

Страница 5: ...r A CHOOSING A GOOD LOCATION Place the printer on a flat surface in a location with adequate air circulation to prevent internal heat build up Do not place the printer near heat sources such as radiators or air ducts or in a place subject to direct sunlight excessive dust mechanical vibration or shock Allow for adequate clearance in front of the printer to accommodate the printed label stock as it...

Страница 6: ...ur unit The following items should be included Printer Power Adapter Separate Power Cord 6 USB Cable If other USB cable is used it must be 6 2 M or less Software Installer CD Color Ink Cartridge Starter roll of high gloss label stock Warranty Statement and Registration Card This manual and other printed information Save the carton and packing materials They will come in handy when transporting the...

Страница 7: ...ridge Once the cartridge is loaded press the ink button again The Load Feed Button is pressed in order to load label stock or form feed the label stock through the printer The Unload Button will unload the installed label stock by reversing it through the printer Make sure to tear off the printed labels before pressing the Unload Button The Label Tear Bar is a serrated edge for conveniently tearin...

Страница 8: ...4 Getting Started This illustration shows the input ports and power switch found on the rear panel of the printer USB Port Power Switch Power Input Port Fan fold Label Slot ...

Страница 9: ...inter 1 Open the Top Cover 2 Pull the spring loaded label stock guide out far enough to fit the label stock 3 Remove any shipping tape from your label stock roll to ensure that it can unroll freely making certain that no adhesive portion is exposed It is important to note that any exposed adhesive surface can attach itself to the inner workings of the print mechanism and cause a media jam Note If ...

Страница 10: ...of the label stock between the throat guide and the side of the printer 6 Quickly continue feeding the label stock further into the printer until you feel resistance from the feed rollers The printer will sense the label and automatically feed it through the printer If the printer fails to feed the label stock press the Load Feed button to manually engage the feed roller while continuing to guide ...

Страница 11: ...The stock gap sensor TOF Sensor sees the gap between label stock by shining light from the top of the label and attempting to read that light from a sensor on the bottom By default this sensor is set to read the gap 5 from the left side of the label stock If the gap in your label stock intersects with gap position as shown on the slide bar you do not need to adjust this and you can skip this secti...

Страница 12: ...ing at the wrong position If you are using stock that has multiple labels across make sure the sensor corresponds to a place on the stock that has a label and not a vertical gap The Sensor Bar has a guide in inches and millimeters that will help you identify where to set the bar to align the sensor over any identifying mark or top of a circular shape To do this measure the distance from the edge o...

Страница 13: ...a hole punch or a notch to identify a transition from backing to label you can adjust the Sensor Bar to position it over the identifying mark To adjust the sensor position use a pen to move the slide bar to the correct postion Center of Circle 1 1 8 1 2 Center of Hole Through Hole Labels Circular Labels ...

Страница 14: ...eable stock guide to the out locked position D INSTALLING THE INK CARTRIDGE When the cartridge reaches 10 remaining you will be prompted via the Status Monitor to replace the cartridge If quality still looks acceptable you can choose to ignore this warning However you may waste labels if the cartridge runs out of ink before the next warning at 0 If you choose to replace the cartridges follow the p...

Страница 15: ...itself to the center of the print area 4 Press the Cartridge Cover Release to open the Cartridge Holder Remove the cartridge if installed 5 Remove the new Cartridge from its packaging Be sure to remove the protective tape covering the copper contacts 6 Replace install the cartridge copper end first Remove tape Power Ink Ink Load Feed Unload ...

Страница 16: ...ning spits as a percentage In other words there is no real time sensor that shows the actual amount of ink in the cartridge 8 Press the Ink button on the printer to indicate the new cartridge is now installed You will be prompted to align the cartridge A warning will appear stating that you must have installed label stock that is equal to or larger than 4 x 2 101 6 mm x 50 8 mm If your label stock...

Страница 17: ...8 mm If your stock does not meet this requirement you can use the sample roll that came with the printer for this purpose You may also choose to disable alignment via the settings area of the status monitor Disable Alignment If you would like to enable smooth transitions between ink cartridge changes you may choose to disable alignment print warnings Alignment improves print quality if Bidirection...

Страница 18: ...uses from the printer itself so the printer must be turned on and communicating for the program to open 2 Go to Start Programs Primera Technology LX500 Status Monitor The Status Monitor consists of five tabs that are arranged on the left side of the window Each tab opens a screen that has various similar functions The tabs will only be displayed if the printer is idle not printing Ink Tab First Ta...

Страница 19: ...open and display the ink levels The print status will also be displayed on the top bar If a print job is currently printing you may click the cancel button on this screen to stop it Note Ink Cartridge Levels are estimates based on analysis of the printed images by the driver during spooling This analysis estimates the number of ink droplets spits required to print the image and subtracts that amou...

Страница 20: ...er as all other programs Important Note Set the Stock Sensor Mode BEFORE loading label stock 1 Connect the printer via USB and turn on the power The Stock Sensor Mode setting is stored on the printer main board so you will not be able to access it unless the printer is turned on and properly communicating with the computer 2 Go to Start Programs Primera Technology The LX500 Status Monitor 3 Click ...

Страница 21: ...sor type to Continuous This will turn off the stock sensor In this mode there is no way to set the print starting position The printer will simply start printing the first label and print each subsequent label immediately after that previous one To produce a gap between prints simply add the desired amount of white space to the end of the label being printed Important Note You must also set the St...

Страница 22: ...t receive another print job within one second of the last print job in the queue You can use this feature to present at the end of multi copy job multi page job or multiple individual jobs in queue Present after button press This setting will present after you press the Load Feed button on the printer This can be used after one label or an entire job Present after every label This setting will cau...

Страница 23: ... page job or multiple individual jobs in the queue Cut after button press This setting will cut after you press the Load Feed button on the printer This can be used after one label or an entire job This feature is useful if you will not be present at the end of the print to catch the cut label Cut every label This setting will cut after every label Cut after specified number of labels This option ...

Страница 24: ...fsets The LX500 senses the beginning of the label with an optical sensor and is capable of printing to top bottom left and right edge Because of this it is necessary to align the printer to work with specific types of label stock The LX500 comes factory calibrated to print exactly to the edge of Primera label stock However due to variations in the left margins and other variables it may be necessa...

Страница 25: ...r Note Before adjusting this value make sure the label stock is properly load ed so that there is no gap between the edge of the liner and the fixed throat guide Any gap at this point will greatly affect the Left mar gin offset value needed to align the label Also if you adjust the value with improperly loaded label stock you will have to adjust it again if you load the label stock correctly the n...

Страница 26: ...e last printed label cost is displayed Adjust the cartridge costs according to the actual price paid for them The estimate does not take currency into account so you can assume that whatever value you entered is displayed in your currency Save a screen capture of the cost by clicking the disk icon Print a screen capture of the cost by clicking the printer icon Important Note The cost per label rep...

Страница 27: ...between ink cartridges changes you may choose to uncheck this setting If the setting is checked you will be required to cancel the print job and run an alignment print every time you change a cartridge Language Choose the display language of the LX500 Status Monitor by using the drop down menu on this tab Log Files Click Save Log files to save a zip file with all relevant log files to your desktop...

Страница 28: ...nter Other programs can be used to print If printing from other programs please follow the guidelines in Section 3D When you open BarTender you will be given the choice to select an existing label or create a new one using a wizard Use the following instructions as a general guide for standard labels 1 Choose Start a new BarTender document ...

Страница 29: ...Printing Using a PC 25 2 Select Blank Template Click Next 3 Select Color Label 500 Click Next 4 Select Specify Custom Settings Click Next ...

Страница 30: ...h and height to match labels installed in the printer Click Next 6 Check the Picture box to add a background photo or graphic to your label Click Next If you click Finish the remaining default wizard options will be set and no picture will be added ...

Страница 31: ...to the right Click Next if you are satisfied with the layout of the photo or graphic 8 Review the label setup summary If it is correct click Finish Your blank label will be displayed After you click Finish you can always go back and change any of these settings by going to the File Menu and selecting Page Setup Basic and advanced settings are available on the various tabs ...

Страница 32: ...ble click it to open up image settings and browse to the image graphic that you would like to insert Add Barcode Click the Barcode button Now click anywhere on your label A barcode settings window will appear Here you can choose any type of barcode and enter the value Lines Click the Line button to add a horizontal or vertical line Print Click the Print button to start printing Page Setup Click th...

Страница 33: ...e Print button or go to the File Menu and select Print The Print Dialog window will appear 2 Select the Color Label 500 3 Set the number of copies 4 Click Document Properties to adjust print quality settings These settings are explained in the next section 5 Click Print ...

Страница 34: ...ender will not be affected since the preferences are saved with the label To change these preferences you will have to change printer preferences through BarTender before printing by clicking the Document Properties button To find Driver Settings Click the Start button choose Printers and Faxes Right click on the Color Label 500 Icon and select Printing Preferences from the drop down menu The pref...

Страница 35: ...mensions are always relative to the width and height of the actual label in the printer Orientation of an image on the label should not change this setting See Section 6 for minimum and maximum label sizes Orientation There are two settings for orientation Portrait and Landscape If your text and graphics print left to right or as shown on the screen select portrait If you wish your printing to rot...

Страница 36: ...s printed in this mode will look lighter than those printed in Photo mode Skin tones especially will look more natural in this mode NOTE Exact color matching of the printed labels to the screen may never be possible since there are factors that affect this out of the drivers control The surface of the label reacts with the ink in the cartridge to produce the color For this reason when printing the...

Страница 37: ... to zero E PRINTING FROM OTHER PROGRAMS Since this printer uses a standard Windows printer driver you can print from any application you would like There are just a few things to remember that will make it much easier 1 Set the Page Label Size in the Driver BarTender automatically prompts you for the size of the label that you are using When printing from any other program you must do this manuall...

Страница 38: ...e size in the driver and image size in the printing application to match the label size installed in the printer 3 Choose the right printing program There are many different applications that are capable of printing to the LX500 However there are only a few that are ideal printing applications For example Adobe Illustrator is an excellent design program but is not always the best printing program ...

Страница 39: ...s to the start of the label The following items can cause the label sensor to improperly detect the start of a label 1 TOF Offset TOF stands for Top of Form and this setting allows you to fine tune the alignment of your printing on your label stock This will be factory calibrated If fine tuning is needed increase this setting to move the image down on the label decrease this setting to move the im...

Страница 40: ...l be printed on the gaps and the sensor will start looking for a gap too late This can cause label skipping or inconsistent print starting points 5 Portrait Landscape If the Portrait Landscape setting does not correspond to the label stock installed this will also cause the printer to print over the gap and onto the next label Make sure this is set correctly 6 Sensor Position Circular nonstandard ...

Страница 41: ...arger margin around the label will cause a right side space Page Size Often the page size is not large enough for the label If this is the case you may see white space on the right side of the the label and no image overlap on the opposite side This indicates that the page size needs to be increased Increase the page size through the printer preferences enough to cover the label ...

Страница 42: ...sing BarTender simply change the size under the File Menu Label Setup Increase the size of the image to fit the new larger page size If you are using other graphics programs you will need to change the page size in the application and in the printer driver preferences Left Margin Offset Decrease the Left margin offset by half the increase of the page size width In this case you would decrease the ...

Страница 43: ...w to release the tabs on the sides To prevent future jams use rubbing alcohol to remove any adhesive left in the printer feed area D CLEANING THE PRINTER The case of the printer can be cleaned with an ammonia based window cleaner and a lint free cloth Over time ink overspray may gather at the base of the printer The printer is designed using a vacuum system to gather most of this ink on a series o...

Страница 44: ...les for three seconds This will wick some additional ink onto the damp cloth 4 Wipe in one direction only 5 Repeat the process F TECHNICAL SUPPORT If you have difficulties operating your Printer contact technical support using one of the methods listed below Source Location Primera Knowledge Base www primera com kb BarTender Software Help files Open the software Click on the Help Menu BarTender He...

Страница 45: ...ock ordered from Primera Label Width Liner Width Distance from edge of Media to edge of Label Width of Opening Black Mark Width Gap Between Labels Label Height Distance from edge of Media Label Sensing Methods Method 1 Label Gap Sensing Method 2 Width of thru hole opening Sensing Method 3 Reflective Black Mark Sensing Black Mark must be printed on back side of label stock Note See table below for ...

Страница 46: ...correspond with the beginning of the next label This is the recommended maximum There are two factors that determine whether the printer will accept any particular stock thickness 1 The ability for the printer to pull the paper through the print area 2 The ability for the sensor to read through the backing if the sensor is set to die cut If you are printing in continuous or reflective label sensin...

Страница 47: ...2 Turret glue or 1 2 wide 3M 928 double sided removable tape must be used to attach stock to core Removable tape must be positioned across full width of core Other types of tape are not allowed 3 End face of liner must align with end of core on both sides within 0 030 Core width should be the same as liner width 4 Masking tape or equivalent may be used to secure label stock to outside of roll 2 5 ...

Страница 48: ...k usage of graphics being printed patent pending Indicator Lights Power Ink Controls Ink Load Feed Unload Operating Systems Windows 7 8 10 Macintosh OS X Data Interface USB 1 1 Minimum System Pentium IV computer or better 512MB RAM 5GB free hard drive space USB 1 1 2 0 port Label Design BarTender Ultralite Edition Software Can also be used with most other popular Windows and Macintosh label design...

Страница 49: ... 10 Installing Label Stock 5 Label Size 28 33 Label Tear Bar 3 Left Margin Offset 21 36 38 Load Feed Button 3 Offsets 20 Orientation 31 Power LED 3 Print Counter 33 Print Quality 32 Printer Driver Settings 30 Printing 24 29 Sensor Type 17 36 Roll Specifications 43 Tear Off Position 21 TOF Offset 35 Troubleshooting 35 Unload Button 3 Using BarTender 24 ...

Страница 50: ......

Страница 51: ......

Страница 52: ...Printed in the United States of America P N 511441 ...

Отзывы: