9
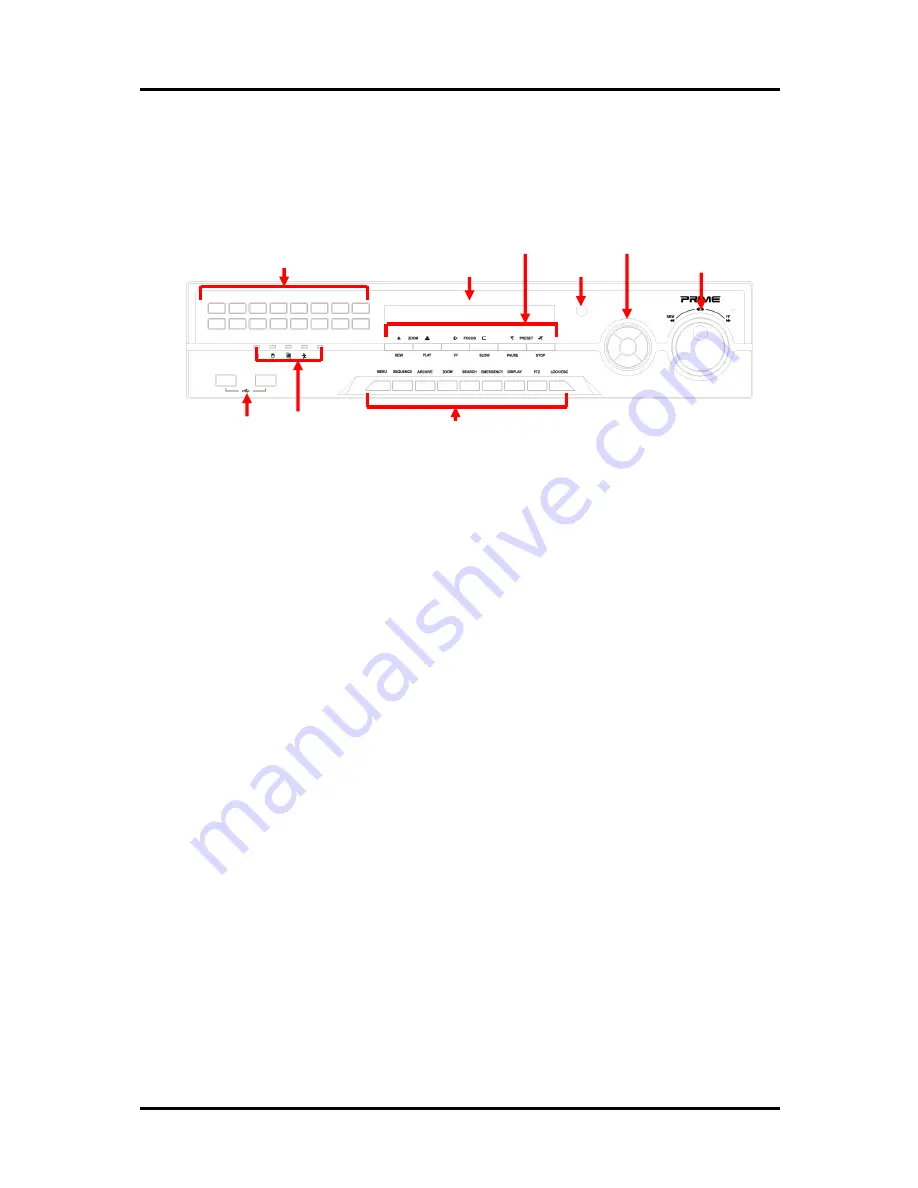
1-4. Name of Each Part
[Front Panel]
1. Playback buttons
: It will be used on playback. If you press these buttons in live
mode, it will be automatically changed to the Instant Play mode. ‘Stop’ button
changes from the play mode to the live mode.
2. ARROW, ENTER
: This button is used to change settings for the product in
MENU Mode or used in Search Mode. Also right arrow
button is used for ‘Hold’ while Jog Shuttle action.
3. Number buttons
: If you press this button, it will be changed to full screen in live
viewing or playback If you want to go to 20ch, push the 10+ button twice. (
※
In
menu and password setting, it is automatically converted to number buttons)
4. Backup device
: You can use the versatile backup devices such as CD-RW and
DVD-RW.
5. IR Window
: the window for remote controller
6. Jog Shuttle
: You can use this wheel for fast retrieving and playback back and pro.
If you hold the shuttle, push the right arrow button while grabbing the
shuttle.
7. Status lamps
POWER : Blue color back light. Power indicator.
RECORD : Red. Indicate the recording.
NETWORK : Green. Lit on connecting the network
ALARM : Red. It will be lit on when the events happen
8. USB ports
: These USB ports are for mouse and USB devices.
9. Function keys
1) MENU : It will move to the setup screen from the live mode.
2) SEARCH : It will change to the playback mode from the live mode.
3) BACKUP : It will move to the backup screen from the live or play mode.
4) DISPLAY : It will change the screen splitting sequentially from 1 to 20. It can be
adapted both live and play mode.
5) SWITCHING : It will change to switching mode except 20 splitting.
CH 1 Product Introduction
5. IR Window
8. USB
7. Status Ramps
1. Playback Buttons
4. Backup Device
6. Jog Shuttle
2. Enter & Arrow Keys
9. Function Keys
3. Number Buttons
Содержание DVST ULTIMA96H-16
Страница 1: ...1 Digital Video Recorder User s Manual DVST ULTIMA96H 16 20 32 ...
Страница 54: ...54 Click the Close after done with all installation tasks CMS installation is completed Appendix A ...
Страница 56: ...56 Type your password to install CMS program Appendix A Configuring the installation ...
Страница 57: ...57 After the installation click the close button Appendix A ...
Страница 60: ...60 After done with Plug in installation close the internet browser and open it again Appendix A ...
Страница 65: ...65 Click Restart to finish installing the software Appendix A ...
Страница 67: ...67 The initial screen of CMS Live view The initial screen of CMS Search view Appendix A ...
Страница 68: ...68 CMS Composition Widget Tab Toolbar View Screen Status bar Appendix A ...
Страница 101: ...101 Appendix D 3 This is the whole diagram ...


