


KidWalk
II
Owner’s Manual
7
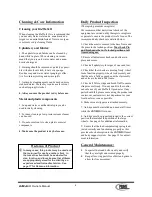
ASSEMBLY INSTRUCTIONS
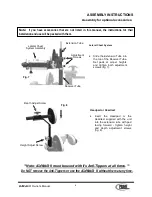
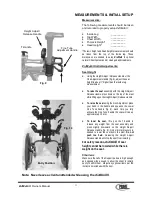
Fig. 1
Fig. 3
Recessed side
of wheel
Axle Pin
(Button End)
Set-up and assembly on your
KidWalk
II
is
easy when these directions are followed.
First:
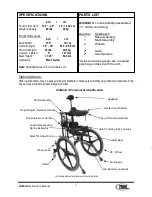
Open carton, remove and identify the following
assemblies and components.
A
Base frame assembly
B
Anti-tippers
C
Mast assembly
D
Wheels (2)
E
Bag containing axles and spacers
Any optional accessories (if ordered)
Assembly Procedure:
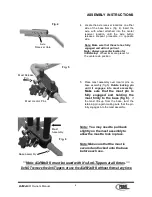
1. Place base frame on flat surface and install
anti-tippers into frame, as shown in Fig 1.
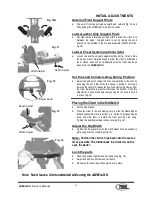
2. Install the anti-tippers to the base frame
by depressing the retaining push button
“A” (fig. 2) and sliding the anti-tippers
into the receiver as far as possible. Press
the position setting push button “B” and
slide until locking button is in the middle
position as shown.
Install the Wheels
3.
Mag Wheels (Standard)
Remove axles from plastic bag. Insert
an axle into a wheel from the recessed
bearing side (fig. 3), push in button at
end of axle to allow the axle to slide
through the wheel bearings and insert
….
axle into wheel.
Assemble 1 spacer onto
each axle on the back of the wheel after the
axle is inserted.
Go to step 4
Spoke Wheels (Optional)
Remove axles and axles spacers from plastic bag.
Insert one spacer onto an axle before inserting
it into the wheel and then insert the axle into
the wheel hub from the recessed bearing side (fig.
3). Push in the button at end of axle to allow the axle
to slide through the wheel bearings and add one
spacer onto the back of the axle after the axle is
inserted into the wheel.
Spoke wheels must be
used with both spacers in place on each
axle
. Go to step 4
Button “B”
Slide
Fig. 2
Button “A”
D
E
A
C
B
**Note:
KidWalk
II must be used with it’s Anti-Tippers at all times. **
Do NOT remove the Anti-Tippers or use the
KidWalk
II
without them at any time.


