background image

JAZZY 1122/REV D/FEB 03

WWW.PRIDEMOBILITY.COM

51

X .   C A R E   A N D   M A I N T E N A N C E

WARNING!  To  avoid  possible  injury,  be  sure  that  the

controller’s power is turned off and the power chair is not

in freewheel mode before performing this procedure.

WARNING! Completely deflate the tire before attempting

repair.

Follow these easy steps for a quick and safe repair:

1. Completely deflate the tire if pneumatic.

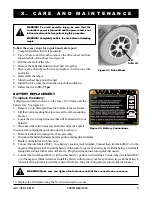
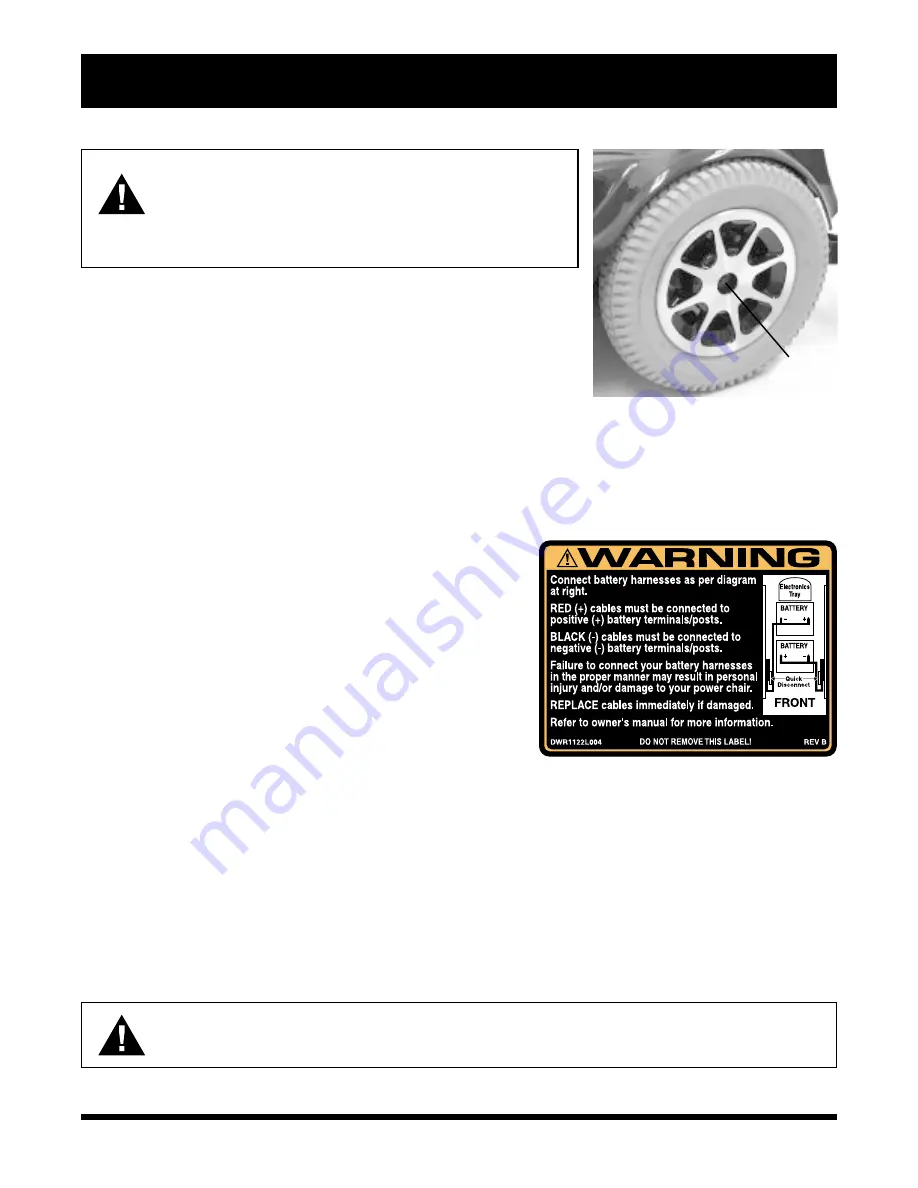
2. Use a 3/4-in. socket wrench to remove the drive wheel nut from

the center hub of the wheel. See figure 41.

3. Pull the wheel off of the axle.

4. Remove the bolts that hold the wheel halves together.

5. Remove the old tube and/or tire and replace it with a new tube

and/or tire.

6. Reassemble the wheel.

7. Slide the wheel back onto the shaft.

8. Install the drive wheel bolt into the center hub and tighten.

9. Inflate the tire to 

30 – 35 psi

.

BATTERY REPLACEMENT

To replace the battery:

A diagram is printed on a decal on the Jazzy 1122 frame near the

battery tray.  See figure 42.

1. Remove 1/4-in.detent pin from the bottom of the foot frame.

2. Lift the foot frame straight up to remove it from the mounting

bracket.

3. Locate the two wiring harnesses that will be attached to your

batteries.

4. Disconnect these two harnesses from their respective quick

disconnects by pulling the quick disconnects toward you.

5. Remove batteries from the power base assembly.

6. Disconnect the battery harnesses from the positive and negative terminals.

7. Replace old batteries with new ones.

8. Connect the wire labeled BAT (+) to a battery’s positive (red) terminal.  Connect the wire labeled BAT (-) to the

negative (black) terminal.  Install the battery in the rear of your Jazzy’s battery tray with the battery’s terminals

facing inward, toward the center of the Jazzy.  Plug the wiring harness into a quick disconnect.

9. Connect the wire labeled BAT (+) to the other battery’s positive (red) terminal.  Connect the wire labeled BAT

(-) to the negative (black) terminal.  Install the battery in the front of your Jazzy’s battery tray with the battery’s

terminals facing inward, toward the center of the Jazzy.  Plug the wiring harness into a quick disconnect.

WARNING! Make sure you tighten the fasteners so that the connections are secure.

10. Replace the foot frame using the 5/16-in. detent pin to secure.

Figure 41. Drive Wheel

DRIVE

WHEEL NUT

Figure 42.  Battery Connections

Содержание Jazzy 1122

Страница 1: ...Exeter PA St Catharines ON 1 800 800 8586 www pridemobility com Owner s Manual ATTENTION Please read the content of your owner s manual before operating your power chair ...

Страница 2: ... depends upon your own good judgement and or commonsense aswellasthatofyourprovider caregiver and orhealthcareprofessional Prideisnotresponsible forinjuriesand ordamageresultingfromanyperson sfailuretofollowthewarnings cautions andinstructionsin this owner s manual Pride is not responsible for injuries and or damage resulting from any person s failure to exercise good judgement and or common sense...

Страница 3: ...NTRODUCTION 4 II SAFETY 6 III EMI RFI 14 IV THE JAZZY 1122 16 V ASSEMBLY 22 VI COMFORT ADJUSTMENTS 24 VII DISASSEMBLY 30 VIII OPERATION 31 IX BATTERIES AND CHARGING 43 X CARE AND MAINTENANCE 48 XI OPTIONAL ACCESSORIES 52 XII WARRANTY 54 C O N T E N T S ...

Страница 4: ... Pride or contained on the power chair itself This owner s manual is compiled from the latest specifications and product information available at the time of publication We reserve the right to make changes as they become necessary Any changes to our products may cause slight variations between the illustrations and explanations in this manual and the product you had purchased Ifyouexperienceanypr...

Страница 5: ...gain access to interviews stories recreation ideas daily living tips product and funding information and interactive message boards On these message boards you are invited to speak with other Pride customers as well as Pride representatives who are available to assist you with any ques tions or concerns you may have My Authorized Pride Provider is Name _____________________________________________...

Страница 6: ...dailyactivities youwillprobablyencountersituationsinwhichyouwill need some practice Simply take your time and you will soon be in full and confident control as you maneuver through doorways on and off of elevators up and down ramps and over moderate terrain Below are some precautions tips and other safety considerations that will help the user become accustomed to operating the power chair safely ...

Страница 7: ...or wheel failure causing serious per sonal injury and or damage to your Jazzy WARNING Inflate your power chair drive tires from a regulated air source with an avail able pressure gauge Inflating your tires from an unregulated air source could overinflate them resulting in a burst tire and or personal injury Incline Information More and more buildings have ramps with specified degrees of inclinatio...

Страница 8: ...ceed 5 See figure 1 WARNING Any attempt to climb or descend a slope steeper than 5 may put your power chair in an unstable position and cause it to tip resulting in personal injury Braking Information Your power chair is equipped with two powerful brake systems 1 Regenerative useselectricitytorapidlyslowthevehiclewhenthejoystickreturnstothecenter stopposition 2 Disc Park Brake activates mechanical...

Страница 9: ...oidtallgrassthatcanentangletherunninggear n Avoid loosely packed gravel and sand n If you feel unsure about a driving surface avoid that surface Freewheel Mode Your power chair is equipped with a manual freewheel lever to allow for manual maneuverability by a trained attendant For more information about how to place your power chair into and out of freewheel mode see IV TheJazzy1122 WARNING Do not...

Страница 10: ...our power chair gently and slowly forward to push the door open Or drive your power chair gently and slowly backward to pull the door open Elevators Modern elevators have a door edge safety mechanism that when pushed reopens the elevator door s n If you are in the doorway of an elevator when the door s begin to close push on the rubber door edge or allow the rubber door edge to contact the power c...

Страница 11: ...ck as possible in the power chair seat to prevent the power chair from tipping forward during transfer and causing injury WARNING Avoid using your armrests for weight bearing purposes Such use may cause the power chair to tip and cause personal injury WARNING Avoid putting all of your weight on the footrest Such use may cause the power chair to tip and cause personal injury Positioning Belts Your ...

Страница 12: ...down between your knees Movements such as these may change your center of gravity and the weight distribution of the power chair This may cause your power chair to tip possibly resulting in personal injury Keep your hands away from the tires when driving Batteries In addition to following the warnings below be sure to comply with all other battery handling information For more information about yo...

Страница 13: ...al limitations Some medications and limitations may impair your ability to operate your power chair in a safe manner Alcohol The power chair user must exercise care and common sense when operating his her power chair This includes awarenessofsafetyissueswhileundertheinfluenceofalcohol WARNING Do not operate your power chair while you are under the influence of alcohol as this may impair your abili...

Страница 14: ...ffected by EMI RFI what kind of motion should I expect This is hard to predict It would depend on a number of factors n Strength of the radio waves n Construction of the power chair n Position of the power chair whether it is on level ground or on an incline n Whether or not the power chair is in motion An affected wheelchair s movement can be erratic It may move by itself or come to a sudden stop...

Страница 15: ...ted with EMI RFI and the actions they can take to minimize the risk What can I do to find out if my power chair is likely to be affected by EMI RFI Ifyou vehadyourpowerchairforalongtimeandhaven texperiencedanyunintendedmotion itisnotlikelythat youwillhaveproblemsinthefuture Butitisalwayspossiblethatproblemscouldariseifyouareclosetoasource of radio waves Therefore it is very important to be alert t...

Страница 16: ...ome optional accessories attached to it such as a basket a cane crutch holder a cup holder or a power seat switch See XI OptionalAccessories The power base assembly is the heart of your Jazzy The power base assembly includes two drive wheels two anti tip wheels two rear caster wheels a power seat connector optional harness connectors and a body shroud See figures 1b through 5 SEATBACK CONTROLLER A...

Страница 17: ...OM 17 I V T H E J A Z Z Y 1 1 2 2 Figure 2 The Jazzy 1122 Rear View ARMREST WIDTH ADJUSTMENT KNOBS Figure 4 Pilot Controller Harness Connector Figure 5 Europa Remote Controller Harness Connector Figure 3 Remote Plus Controller Harness Connector ...

Страница 18: ...nt damagetothemotorsandtheelectronics Ifthecircuittrips allowyourJazzyto rest forapproximatelyone minute Next pushinthecircuitbreakerbutton turnonthejoystickcontroller andcontinuenormaloperation If the main circuit breaker continues to trip repeatedly contact your authorized Pride provider n AccessoryConnector Optional Thisiswheretheoptionalharnessconnectstothecontroller powerseat lighting n Contr...

Страница 19: ...is on an incline The chair could roll down on its own causing injury To operate the manual freewheel lever 1 Pullthemanualfreewheelleveroutandrotateclockwiseforfreewheelmode drivedisengaged Seefigure7 2 Rotate the manual freewheel lever counterclockwise for drive mode drive motors engaged See figure 8 CAUTION It is important to remember that when your Jazzy is in freewheel mode the braking system ...

Страница 20: ...also helps in day to day operating conditions For instance when you release the joystick your Jazzy begins toslowdown Asthechairslowsdown thefrontanti tipwheelswillautomaticallydroptowardtheground This willreducetheforwardtipthatistypicallyencounteredwithcenter wheeldrivechairs REAR SUSPENSION Your Jazzy 1122 is equipped with Rear Suspension See figure 9 This suspension system works in conjunction...

Страница 21: ...th 25 4 in Seating Options Medium back standard High back with headrest standard Reclining Seat optional Synergy Seat optional Versa Tilt Seat optional Power elevating Seat optional Drivetrain Two motor mid wheel Batteries Two 12 volt Group 24 batteries NF 22 batteries for the power seat option Range Up to 25 miles Battery Charger 5 amp onboard 5 amp off board optional Electronics 70 amp P G Pilot...

Страница 22: ... seat towers See figure 10 3 Plugthecontrollercableintotheconnectorontheelectronics tray See figure 11 4 Plug the power seat switch cable if so equipped into the connector on the electronics tray 5 Secure the controller cable to the armrest receiver with one or more wire ties 6 Route the cable to ensure that the cable cannot be pinched in theseathinge JOYSTICK INSTALLATION Depending on the various...

Страница 23: ...owerbaseisdifferent To install the power seat l Aligntheseatshafttotheholeintheactuator Seefigure13 2 Insert seat into actuator and push the seat lever forward 3 Lock seat into place SYNERGY SEAT OR VERSA TILT OPTION IfyourJazzyisequippedwithaSynergySeatorVersaTilt pleaserefer totheinstructionmanualsuppliedwiththeSynergy Seat VersaTilt Figure 12 Joystick SLIDE JOYSTICK INTO BRACKET SETSCREW Figure...

Страница 24: ...he power base front cover 4 Use a slotted screwdriver to rotate the power base middle cover fas teners one quarter turn and remove the power base middle cover 5 Removetheballdetentpinfromeachofthefourseatposts Seefigure14 6 Raise or lower each seat post to the desired position To change the angle dump set either the front or rear seat posts higher or lower than the other 7 Reinstall the ball deten...

Страница 25: ...ise to raise the front of the armrest 5 Locktheadjustingscrewintoplacebytighteningthejamnut ARMREST HEIGHT OPTIONAL YourJazzymaybeequippedwithheight adjustablearmrests To change the armrest height 1 Loosen the setscrew located underneath the armrest using a 3 16 in hex key 2 Remove the ball detent pin from the armrest 3 Move the armrest up or down to the desired height 4 Aligntheholesandreinsertth...

Страница 26: ...racketandtighten FOOTREST DEPTH To adjust the footrest depth 1 Remove the nuts and bolts from the bracket See figure 21 2 Move the footrest in or out to the desired depth 3 Reinstallthenutsandboltsintothebracketandtighten FOOTREST ANGLE You can adjust the angle of the footrest with a 3 16 in hex key See figure 22 To adjust the footrest angle 1 Turn the setscrew clockwise to raise the front of the ...

Страница 27: ...1 Press down on the seatback release lever See figure 27 2 Move the seatback down or up to the desired position 3 Release the seatback release lever To adjust the armrest angle Referto ArmrestAngle earlierinthissection POWER ELEVATING SEAT OPTION IfyourJazzyisequippedwithapowerelevatingseat youcanchange theseatheightautomatically Theseatheightswitchislocatedeither on the armrest Pilot or Europa co...

Страница 28: ...ng over and causing in jury WARNING Never raise the power elevating seat while your Jazzy is in the freewheel mode CAUTION Always fasten the positioning belt when operating the power elevating seat The power elevating seat option is equipped with a system that reducesyourJazzy sspeedbyonehalfwhentheseat is elevated more than 1 2 inches Always check to besurethissystemisoperatingproperlybeforeusing...

Страница 29: ... Place a 1 2 in wrench on the inner locknut of the anti tip bracket located right after your shock strut See figure 29 2 Turnthelocknutcounterclockwisetoloosen 3 Place your 1 2 in wrench on the adjustable cam located on the other side of the locknut See figure 30 4 To adjust the anti tip upward turn the cam counterclockwise To adjust the anti tip downward turn the cam clockwise WARNING Consult you...

Страница 30: ... Pull the seat forward and lift it off of the rear seat towers To remove a power seat 1 Release the seat by moving the seat release lever rearward 2 Lift up the power seat plate 3 Lift the seat off of the actuator FOOT FRAME REMOVAL ThefootframehelpsprotecttheJazzycomponentsfromtheenvi ronment Seefigure32 Youmustremovethefootframeinorder tochangethebatteriesandcheckthecableconnections To remove th...

Страница 31: ...e motors bat teries and the onboard charger at the elec tronicstray Joystick The joystick controls the direction and speed of your power chair When you move the joystick from the neutral center position theelectromagneticbrakesreleaseandallowyourpowerchairtomove Thefurtheryoupushthe joystickfromitsneutralposition thefasteryourpowerchairmoves Whenyoureleasethejoystickandallowitto return to the netu...

Страница 32: ...iately Speed Control Knob Sets the maximum speed of the power chair clockwise to increase counterclockwise to decrease NOTE We recommend that the first few times you operate your power chair you turn the speed control to the slowest setting until you become familiar with your new power chair Off board Charger Programming Socket Youmayuseanoff boardchargertochargethepowerchairbatteriesthroughthe3 p...

Страница 33: ...ouble Codes In addition to indicating the current state of battery charge the battery condition meter can also indicate possible problemswithyourpowerchair Thebatteryconditionmeterhastenlights Thelightsprovideinformationbythe number of lights that are flashing If any of the meter lights are flashing rapidly the controller may be indicating a fault Forinstance ifthefirstlightisflashingrapidly theba...

Страница 34: ...on the end of an armrest The other components are located inside the power base Remote Plus Master Remote TheRemotePlusmasterremoteconsistsofthefol lowing seefigure34 1 joystick 2 keypad 3 controllercommunicationscable 4 off boardcharger programmingsocket Joystick The joystick controls the direction and speed of your power chair When you move the joystick from the neutral center position theelectr...

Страница 35: ...gleeithertheleftorrightturnindicators Pressoncetoturnonandpressagaintoturn off You can also turn off the selected indicator by pressing the opposite indicator key or the hazard key Light Key Thelightkeyturnsheadlights taillightsonandoffindependentofotherindicators Hazard Key The hazard key toggles both right and left indicators at the same time You can only cancel this by pressing the hazard key a...

Страница 36: ... remote 2 Press the mode key once 3 To increase chair speed push the joystick to the right Each time you push the joystick you will increase the speedsetting 4 To decrease chair speed push the joystick to the left Each time you push the joystick you decrease the speed setting 5 Once you select the desired speed setting press the mode key once to keep the setting or push the joystick in the forward...

Страница 37: ...oduleprovidesacontroland power interface between the power module the lights and or the power seat actuator Sleep Mode YourRemotePluscontrollerhasasleepmodefeature Sleepmodeisabuilt incircuitthatautomaticallyshutsoff themainpowerifthejoystickisnotmovedinanydirectionforapproximatelyfiveminutes Thebatterycondition meter lights on the keypad indicate sleep mode by blinking once every five seconds To ...

Страница 38: ...epleted Thefollowingisalistof the possible errors signified by the rapidly flashing meter When you get a trouble code contact your authorized Pride provider FLASHING DIAGNOSIS SOLUTION LIGHTS 10 High Battery Voltage Check batteries 9 Solenoid Brake Fault Check motor brake wiring 8 Possible Controller Fault See authorized Pride provider 7 Possible Joystick Fault See authorized Pride provider 6 Inhi...

Страница 39: ...ick from the neutral center position theelectromagneticbrakewill release and allow the power chair to move The fur ther you push the joystick from its neutral position the faster your power chair will move When you release the joystick and allow it to return to the neutral position you engage the electromagnetic brake This helps the power chair decelerate and come to a complete stop You can also u...

Страница 40: ...eddown It will also flash trouble codes when the system detects a fault See Trouble Codes Magnetic Locking Area Your power chair is equipped with a feature that enables you to lockout unauthorized users For this function youwillneedthemagnetickeysuppliedwithyourpowerchair If you lose this key contactyourauthorizedPride provider To enable the lockout system 1 Hold the magnetic key on or near the ke...

Страница 41: ... provider changes these settings please make note of these changes To change the drive mode program 1 Press the drive mode select key 2 Move the joystick right to increase the drive mode program 3 Move the joystick left to decrease the drive mode program 4 Press the drive mode select key Drive Mode and Actuator Display also Remote Status Display Thisisaseven segmentlightthatdisplaysthedriveprogram...

Страница 42: ...module fault See your authorized Pride provider DX accessory fault See your authorized Pride provider Left motor or connection fault Check left motor wiring Right motor or connection fault Check right motor wiring Left park brake fault Check motor brake wiring Right park brake fault Check motor brake wiring Low battery fault Check that the battery wiring is secure Over voltage fault Check that the...

Страница 43: ...ly quickly andeasily The chargingsystemcon sists of the battery charger the charger fuse and the ammeter The onboard charger is located underneath the electronics tray Theammeterandchargerfusearelocatedontheelectronicstrayforeasyviewing Seefigures38 and39 Theammeterindicatestherateofchargebeingadministeredtofullyrechargethebatteries Itisalsoagood indication of whether or not the charger is working...

Страница 44: ... fully charged you can unplug the power cord from the wall outlet wind it up using the hook and loop strap and place the cord back into the rear tray 8 Replace the rear cover To charge the batteries using the off board charger 1 Position your Jazzy next to a standard wall outlet 2 Be certain the controller power is turned off 3 Remove the run plug located on the electronics tray 4 Plug the 3 pin e...

Страница 45: ...explains why the ammeter drops as it approaches a full charge When the battery is fully charged the amperage from the charger is nearly at zero This is how the charger maintains a charge but does not overcharge the battery Your Jazzy s charger will not operate after the batteries have been discharged to nearly zero voltage If this hap pens call your authorized Pride provider for assistance Can I u...

Страница 46: ...chnologythanthatusedincarbatteries nickel cadmium batteries nicads or in other common battery types Deep cycle batteries are specifically designed to provide power drain down their charge and then accept a relatively quick recharge Sealed lead acid batteries should be charged as often as possible They do not have a memory like nickel cadmium batteries We work closely with our battery manufacturer ...

Страница 47: ...ely hot conditions and never attempt to charge a frozen battery Acold or frozen battery should be warmed for several days prior to recharging NOTE If you are storing a Jazzy for an extended period of time you may wish to block the unit up with several boards under the frame This keeps the tires off the ground and prevents the possibility of flat spots developing in the tires What about public tran...

Страница 48: ...e susceptible to extreme changes in temperature Always keep your Jazzy between the temperatures of 18 F 8 C and 122 F 50 C n In extremely cold temperatures the batteries may freeze The specific temperature at which they freeze de pends on a number of factors such as battery charge usage and composition of the batteries e g sealed lead acid or gel cell n Temperatures above 122 F 50 C may cause your...

Страница 49: ...ovider if there is a problem n Visuallyinspectthecontrollerharnesses Makesurethattheyarenotfrayedorcutorhaveanywiresexposed See your authorized Pride provider if there is a problem with any of these harnesses WEEKLY CHECKS n Disconnectandinspectthecontrollerandthecharger harnesses from the electronics tray Lookforcorrosion Contact your authorized Pride provider if necessary n Ensurethatallpartsoft...

Страница 50: ... adjusted or have the bearings replaced See an authorized Pride provider for repair n Keep your Jazzy clean and free of foreign material such as mud dirt hair food drink etc YEARLY CHECKS Take your Jazzy to an authorized Pride provider for yearly maintenance This helps ensure that your Jazzy is functioningproperlyandhelpspreventfuturecomplications STORAGE Your power chair should be stored in a dry...

Страница 51: ... of the foot frame 2 Liftthefootframestraightuptoremoveitfromthemounting bracket 3 Locate the two wiring harnesses that will be attached to your batteries 4 Disconnect these two harnesses from their respective quick disconnectsbypullingthequickdisconnectstowardyou 5 Remove batteries from the power base assembly 6 Disconnectthebatteryharnessesfromthepositiveandnegativeterminals 7 Replace old batter...

Страница 52: ...ar 5 Replace brushes if necessary Contact your authorized Pride provider for replacement brushes CORRECTIVE MAINTENANCE If the battery condition meter does not light up when you turn on the power n Check the harness connections Make sure they are tight n Check the circuit breaker Reset it if necessary n Check the battery connections If the above conditions prove normal you can load test the batter...

Страница 53: ...itable for use as a seat in any vehicle Anyone traveling in a vehicle should be properly belted into seats approved by the vehicle manufacturer OXYGEN TANK HOLDER The removable oxygen tank holder is mounted to the back of the seat by means of the accessory bracket CANE AND CRUTCH HOLDER The removable cane and crutch holder is mounted to the back of the seat by means of the accessory bracket WALKER...

Страница 54: ... purchaser free of charge any of the following parts found upon examination by an authorized representative of Pridetobedefectiveinmaterialand orworkmanship n Motor gearboxassembly WARRANTY EXCEPTIONS Motor If damage occurs to the commutator of a motor as a result of not replacing the motor brushes after heavy wear to brushes Motor brushes are wear items and are not warranted Brake One year warran...

Страница 55: ...rized by Pride Damage caused by n Batteryfluidspillageorleakage n Abuse misuse accident ornegligence n Improper operation maintenance or storage n Commercial use or use other than normal There is no other express warranty Implied warranties including those of merchantability and fitness for a particular purpose are limited to one 1 year from the date of purchase and to the extent permitted by law ...

Страница 56: ...ur Jazzy The following checkmarks indicate that it has been test driven and inspected FitandFinish Performance Inclusion of all Parts Model ______________ Serial ______________ Pride keeps a more detailed report on file at the factory Date Inspected Inspector 1 In Quality Control Controller Controller Serial Joystick Serial ...

Отзывы: