28
www.pridemobility.com Pathrider 140 XL
I V . B A T T E R I E S A N D C H A R G I N G
NOTE: If you encounter a damaged or cracked battery, immediately enclose it in a plastic bag. Contact
your local waste disposal agency or your authorised Pride Provider for instructions on disposal and
battery recycling, which is our recommended course of action.
Why do my new batteries seem weak?
Deep-cycle batteries employ a different chemical technology than that used in car batteries, nickel-cad-
mium batteries (nicads), and other common battery types. Deep-cycle batteries are specifically designed
to provide power, drain down their charge, and then accept a relatively quick recharge.
We work closely with our battery manufacturer to provide batteries that best suit your scooter’s specific
electrical demands. Fresh batteries are shipped fully charged to our customers. During shipping, the batteries
may encounter temperature extremes that can influence their initial performance. Heat diminishes the charge
on the battery; cold slows the available power and extends the time needed to recharge the battery.
It may take a few days for the temperature of your scooter’s batteries to stabilize and adjust to their new
room or ambient temperature. More importantly, it takes a few charging cycles (partial draining followed
by full recharging) to establish the critical chemical balance that is essential to a deep-cycle battery’s peak
performance and long life.
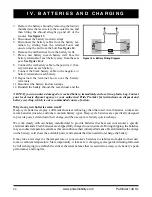
Figure 14A. Battery Wiring Diagram
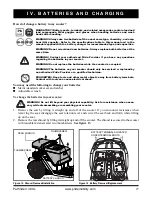
3. Remove the battery shroud by removing the four (4)
thumbscrews that secure it to the scooter frame, and
then lifting the shroud straight up and off of the
scooter.
See figure 13
.
4. Disconnect the battery tie-down straps.
5. Disconnect the battery cables from the battery ter-
minals by sliding back the terminal boots and
unscrewing the nut from the bolt.
See figure 14
.
6. Remove the old batteries from the battery wells.
7. Place a new battery in each battery well. Face the
battery terminals of each battery away from the seat
post.
See figure 14A
.
8. Connect the red battery cable to the positive (+) bat-
tery terminal on each battery.
9. Connect the black battery cable to the negative (-)
battery terminal on each battery.
10. Reposition the terminal boots over the battery
terminals.
11. Reconnect the battery tie-down straps.
12. Reinstall the battery shroud, the rear shroud, and the
Содержание PATHRIDER 140 XL
Страница 1: ...PATHRIDER 140 XL...
Страница 44: ...44 www pridemobility com Pathrider 140 XL N O T E S...
Страница 45: ...45 Pathrider 140 XL www pridemobility com N O T E S...
Страница 46: ...46 www pridemobility com Pathrider 140 XL N O T E S...
Страница 47: ...INFMANU3939...

