background image

20

www.pridemobility.com

      Jazzy 1100/RevJ/Feb03

I V .   T H E   J A Z Z Y   1 1 0 0

Specifications

Suspension:

Limited suspension

Drive Wheels:

14 in., pneumatic (solid tires are optional)

Rear Casters:

8 in., solid, rear articulating

Anti-tip:

6 in., solid, front mounted

Maximum Speed:

4.5 mph

Brakes:

“Intelligent Braking,” electronic regenerative, disc park brake

Ground Clearance:

3.5 in.

Turning Radius:

19.5 in.

Overall Size:

Length: 39.5 in.
Width: 25.4 in.

Seating Options:

Medium-back
High-back with headrest
Reclining Seat
Versa Seat/Versa Tilt
Power Elevating Option

Drive Train:

Two motor, mid wheel

Batteries:

Two 12-volt, Group 24 batteries (NF-22 batteries for the power seat option)

Range:

Up to 25 miles

Battery Charger:

Onboard
Off-board (optional)

Electronics:

50-amp P & G Pilot Controller

70-amp P & G Remote Plus Controller
70-amp Dynamic Europa Controller

Weight Capacity:

300 lbs.

Jazzy Weights:

Base: 81 lbs.

Seat: 29 lbs.

Batteries: 44 lbs.

Warranty:

Lifetime limited warranty on frame
Two-year warranty on electronics
Eighteen-month warranty on drive motor

Содержание Jazzy 1100

Страница 1: ...Exeter PA St Catharines ON 1 800 800 8586 www pridemobility com Owner s Manual ATTENTION Please read the content of your owner s manual before operating your power chair...

Страница 2: ...ment and or common sense as well as that of your provider caregiver and or healthcare professional Pride is not responsible for injuries and or damage resulting from any person s failure to follow the...

Страница 3: ...T E N T S I INTRODUCTION 4 II SAFETY 6 III EMI RFI 14 IV THE JAZZY 1100 16 V ASSEMBLY 21 VI COMFORT ADJUSTMENTS 23 VII DISASSEMBLY 28 VIII OPERATION 29 IX BATTERIES AND CHARGING 42 X CARE AND MAINTEN...

Страница 4: ...elf This owner s manual is compiled from the latest specifications and product information available at the time of publication We reserve the right to make changes as they become necessary Any change...

Страница 5: ...will gain access to interviews stories recreation ideas daily living tips product and funding information and interactive message boards These message boards invited you to communicate with other Prid...

Страница 6: ...as a family member or care professional specially trained in assisting a power chair user in various daily living activities As you begin using your power chair during daily activities you will proba...

Страница 7: ...l injury and or damage to your Jazzy WARNING Inflate your power chair drive tires from a regulated air source with an avail able pressure gauge Inflating your tires from an unregulated air source coul...

Страница 8: ...abilities Act of 1990 all handicap public access ramps are required to have a maximum slope of 5 Therefore Pride recommends that the maximum slope of an incline you attempt to safely ascend or descend...

Страница 9: ...ur power chair in freewheel mode without an attendant present Personal injury may result WARNING Do not attempt to personally place your power chair in freewheel mode while seated on it Personal injur...

Страница 10: ...lic streets and roadways Be aware that it may be difficult for traffic to see you when you are seated on your power chair Obey all local pedestrian traffic rules Wait until your path is clear of traff...

Страница 11: ...sonal injury WARNING Avoid putting all of your weight on the footrest Such use may cause the power chair to tip and cause personal injury Elevators Modern elevators have a door edge safety mechanism t...

Страница 12: ...i e walks or roads Such use may adversely affect the performance and safety of your power chair resulting in an accident and personal injury WARNING Do not expose your power chair to any type of mois...

Страница 13: ...ands after handling WARNING Always protect the batteries from freezing and never charge a frozen battery Charging a frozen battery may result in personal injury and or damage to the battery Preventing...

Страница 14: ...s affected by EMI RFI what kind of motion should I expect This is hard to predict It would depend on a number of factors n Strength of the radio waves n Construction of the powered wheelchair n Positi...

Страница 15: ...DA requested that powered wheelchair manufacturers have these actions implemented by December 2 1994 What can I do to find out if my powered wheelchair is likely to be affected by EMI RFI If you ve ha...

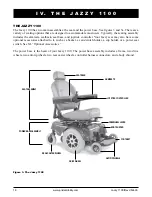
Страница 16: ...There are a variety of seating options that are designed to accommodate most users Typically the seating assembly includes the armrests seatback seat base and joystick controller Your Jazzy seat may...

Страница 17: ...ARMRESTWIDTH ADJUSTMENTKNOBS I V T H E J A Z Z Y 1 1 0 0 Figure 4 Utility Tray AMMETER POWER SEAT CONNECTOR OPTIONAL PILOT CONTROLLER HARNESSCONNECTORS BATTERYCHARGERCORD Figure 5 Remote Plus Control...

Страница 18: ...harging See figure 4 n Main circuit breaker The main circuit breaker is a safety feature built into your Jazzy 1100 See figure 7 When the batteries and the motors are heavily strained e g from excessi...

Страница 19: ...your Jazzy 1100 is on an incline The chair could roll down on its own causing injury To engage or disengage the freewheel feature 1 Turn the freewheel levers outward to disengage the drive motors See...

Страница 20: ...in Width 25 4 in Seating Options Medium back High back with headrest Reclining Seat Versa Seat Versa Tilt Power Elevating Option Drive Train Two motor mid wheel Batteries Two 12 volt Group 24 batteri...

Страница 21: ...seatback 3 Tighten the four screws SEATINSTALLATION SEATWITHH FRAME The standard seat installation method incorporates the seat frame H frame and four 4 adjustable seatposts located on the powerbase...

Страница 22: ...e equipped with the power seat option While the seat itself may be any one of the styles offered for this model the way the seat base attaches to the Jazzy power base is different To install the power...

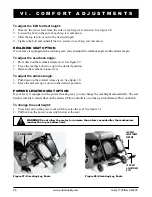
Страница 23: ...one of two ways either manu ally or automatically If equipped with the optional Power El evating Seat see Power Elevating Seat Option To change the seat height 1 Remove the seat See VII Disassembly in...

Страница 24: ...adjustable armrests To change the armrest height 1 Loosen the setscrew located underneath the armrest using a 3 16 in hex wrench 2 Remove the ball detent pin from the armrest 3 Move the armrest up or...

Страница 25: ...and tighten FOOTREST ANGLE You can adjust the angle of the footrest with a 3 16 in hex wrench See figure 25 To adjust the footrest angle 1 Turn the setscrew clockwise to raise the front of the footres...

Страница 26: ...angle To adjust the seat back angle 1 Press down on the seatback release lever See figure 29 2 Move the seatback down or up to the desired position 3 Release the seatback release lever To adjust the a...

Страница 27: ...nd causing injury WARNING Never raisetheseat fromitslowest position when operating your Jazzy on bumpy or uneven surfaces Failure to heed this warning can result in your Jazzy tipping over and causing...

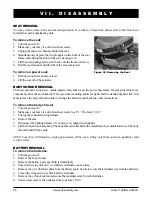
Страница 28: ...must remove the body shroud in order to change the batteries and check the cable connections To remove the body shroud 1 Turn the power off 2 Make sure your Jazzy is not in freewheel mode See IV The J...

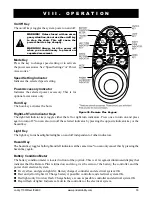
Страница 29: ...he motors batteries and the onboard charger at the electronics tray Joystick The joystick controls the direction and speed of your power chair When you move the joystick from the neutral center positi...

Страница 30: ...ome familiar with your new power chair Off board Charger Programming Socket You may use an off board charger to charge the power chair batteries through the 3 pin socket located on the front of the Pi...

Страница 31: ...teries 9 Solenoid Brake Fault Check motor brake wiring 8 Possible Controller Fault See authorized Pride provider 7 Possible Joystick Fault See authorized Pride provider 6 Inhibit Active Unplug charger...

Страница 32: ...lly on the end of an armrest The other components are located inside the power base Remote Plus Master Remote The Remote Plus master remote consists of the following see figure 34 1 joystick 2 keypad...

Страница 33: ...press again to turn off You can also turn off the selected indicator by pressing the opposite indicator key or the hazard key Light Key The light key turns headlights taillights on and off independen...

Страница 34: ...ill increase the speed setting 4 To decrease chair speed push the joystick to the left Each time you push the joystick you decrease the speed setting 5 Once you select the desired speed setting press...

Страница 35: ...indicate sleep mode by blinking once every five seconds To restore power and continue push the on off key twice Thermal Rollback The Remote Plus is equipped with a thermal rollback circuit This circu...

Страница 36: ...ontroller Fault See authorized Pride provider 7 Possible Joystick Fault See authorized Pride provider 6 Inhibit Active Unplug charger Check connections 5 Right Motor Wiring Fault Check right motor wir...

Страница 37: ...llow the power chair to move The further you push the joystick from its neutral position the faster your power chair will move When you release the joystick and allow it to return to the neutral posit...

Страница 38: ...e the lockout system 1 Hold the magnetic key on or near the key symbol The system will beep and automatically turn off NOTE None of the remote lights should be lit 2 Press the on off key to turn on th...

Страница 39: ...e if applicable when they occur Actuator Select Keys with Lights If your power chair is equipped with power accessories such as a power seat or power elevating leg rests you can operate them through t...

Страница 40: ...The table below identifies the individual fault codes If your keypad displays one of these codes contact your authorized Pride provider NOTE You must turn the controller off and then on again to reset...

Страница 41: ...otor wiring Right motor or connection fault Check right motor wiring Left park brake fault Check motor brake wiring Right park brake fault Check motor brake wiring Low battery fault Check that the bat...

Страница 42: ...er See figures 38 and 39 The onboard charger is located underneath the utility tray The ammeter is located on the utility tray for easy viewing The charger has an in line fuse that protects the system...

Страница 43: ...unction 4 Plug the 3 pin extension cable into the charger then into the utility tray connector 5 Plug the charger into the wall outlet 6 The ammeter indicates how much charge is needed to fully charge...

Страница 44: ...the batteries Many factors come into play when deciding how often to charge the batteries You may use your Jazzy 1100 all day on a daily basis or you may not use it for weeks at a time n Daily Use If...

Страница 45: ...Pride and are promptly shipped with a full charge During shipping the batteries encounter temperature extremes that may influence initial performance Heat robs the charge from the battery and cold slo...

Страница 46: ...r attempt to charge a frozen bat tery A cold or frozen battery should be warmed for several days prior to recharging NOTE If you are storing a Jazzy 1100 for an extended period of time you may wish to...

Страница 47: ...of the batter ies e g sealed lead acid or gel cell n Temperatures above 122 F may cause your Jazzy 1100 to operate at a reduced speed This reduced speed is a safety feature built into the controller t...

Страница 48: ...uire no subsequent lubrication DAILY CHECKS n With the controller turned off check the joystick Make sure it is not bent or damaged and that it returns to the center when you release it Check the rubb...

Страница 49: ...inks once and then it blinks continuously 6 Turn off the controller Now the joystick and controller are set up to function properly together MONTHLY CHECKS n Check that the anti tip wheels do not rub...

Страница 50: ...s prolongs the life of your tires and helps ensure the perfect operation of your chair If you should have a flat tire replace the tube Replacement tires and tubes are readily available at the pro vide...

Страница 51: ...other battery 13 Connect one circuit breaker harness to the empty positive terminal of one battery and connect the other circuit breaker harness to the empty negative terminal of the other battery WA...

Страница 52: ...n you turn on the power n Check the harness connections Make sure they are tight n Check the circuit breaker Reset it if necessary n Check the battery connections If the above conditions prove normal...

Страница 53: ...ck of the seat by means of the accessory bracket It can hold a standard size walker REAR BASKET The rear basket is mounted to the accessory bracket It has a handle that you can use when you remove the...

Страница 54: ...ghting Package Figure 46 Standard Lighting Package Light Switch TAILLIGHT LIGHT SWITCH Figure 44 Standard Lighting Package HEADLIGHT STANDARD LIGHTING PACKAGE The standard lighting package consists of...

Страница 55: ...Full Lighting Package Rear LIGHT SWITCH X I O P T I O N A L A C C E S S O R I E S FULL LIGHTING PACKAGE Thefulllightingpackageconsistsofheadlights taillights and turn signals See figures 47 and 48 Th...

Страница 56: ...in material and or workmanship n Motor gearbox assembly WARRANTY EXCEPTIONS n Motor If damage occurs to the commutator of a motor as a result of not replacing the motor brushes after heavy wear to br...

Страница 57: ...storage n Commercial use or use other than normal There is no other express warranty Implied warranties including those of merchantability and fitness for a particular purpose are limited to one 1 ye...

Страница 58: ...58 www pridemobility com Jazzy 1100 RevJ Feb03 N O T E S...

Страница 59: ...N O T E S...

Страница 60: ...g checkmarks indicate that it has been test driven and inspected Quality Control Model 1100 Fit and Finish Performance Inclusion of all Parts Model ______________ Serial ______________ Pride keeps a m...

Отзывы: