background image


Prestigio Nobile 1522E 

ENG 


Prestigio Nobile 1522E 

User’s Manual 


Notice  
The information in this user’s manual is subject to change without notice.   


THE MANUFACTURER OR RESELLER SHALL NOT BE LIABLE FOR ERRORS OR OMISSIONS CONTAINED IN THIS MANUAL 
AND SHALL NOT BE LIABLE FOR ANY CONSEQUENTIAL DAMAGES, WHICH MAY RESULT FROM THE PERFORMANCE OR 
USE OF THIS MANUAL.   


The information in this user’s manual is protected by copyright laws. No part of this manual may be photocopied or 
reproduced in any form without prior written authorization from the copyright owners.   
   
Copyright 6/2006   
All rights reserved.   
   
Microsoft and Windows are registered trademarks of Microsoft Corporation. DOS, Windows 95/98/ME/2000/NT/XP 
are trademarks of Microsoft Corporation.   
   
Product names mentioned herein may be trademarks and/or registered trademarks of their respective 
owners/companies.  
   
The software described in this manual is delivered under a license agreement. The software may be used or copied 
only in accordance with the terms of the agreement.   
   
This product incorporates copyright protection technology that is protected by U.S. patents and other intellectual 
property rights. Use of this copyright protection technology must be authorized by Macrovision, and is intended for 
home and other limited viewing uses only unless otherwise authorized by Macrovision. Reverse engineering or 
disassembly is prohibited. 
 
Rev 1.0 

Содержание Nobile 1522E

Страница 1: ...d Microsoft and Windows are registered trademarks of Microsoft Corporation DOS Windows 95 98 ME 2000 NT XP are trademarks of Microsoft Corporation Product names mentioned herein may be trademarks and...

Страница 2: ...s specific instructions commentary sidelights or any additional information or notes that you should be aware of Warning Text in this format and symbol means that failures to comply with the given ins...

Страница 3: ...r aerosol cleaners Contact your dealer or see your service technician if any of the following occurs Computer has been dropped orthe body has been damaged Liquid has been spilled into the product The...

Страница 4: ...d type II 54mm is the next generation of the PC Card standard The bus interface is based on the two standards PCI Express for high performance I O and USB2 0 for variety of devices Expandability The s...

Страница 5: ...NG System At A Glance Top View 1 LCD Latch The LCD latches lock unlock the LCD panel 2 LCD Display The panel is where the system content is displayed 3 Built in Stereo Speakers The built in speakers o...

Страница 6: ...8 Power Suspend Button The power suspend button turns the notebook on and off and it also acts as a system suspend key Press momentarily to turn on the system Press and hold for at least 4 seconds to...

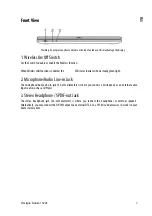
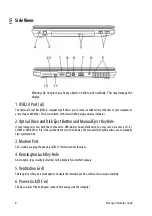
Страница 7: ...indicator shows steady green light 2 Microphone Audio Line in Jack The microphone Audio Line in jack 3 5 mm diameter is where you connect a microphone or an external audio input source such as a CD Pl...

Страница 8: ...er comes with the Combo drive DVD Dual or Super Multi drive you may save data onto a CD R CD RW or DVD RW disc Press the eject button to eject the disk tray The manual eject keyhole allows you to manu...

Страница 9: ...9 Ethernet LAN Port The port connects to a network hub via the RJ 45 cable and also conforms to 10 100Base TX transmission protocol 10 ExpressCard Slot The slot is where ExpressCard Type II 54mm is in...

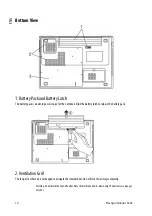
Страница 10: ...urce for the notebook Slide the battery latch to release the battery pack 2 Ventilation Grill The fan grill is where air is exchanged to dissipate the internal heat Do not block this airway completely...

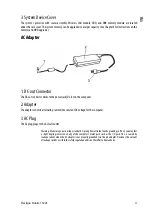
Страница 11: ...jack DC in on the computer 2 Adapter The adapter converts alternating current into constant DC voltage for the computer 3 AC Plug The AC plug plugs to the AC wall outlet Warning Make sure you are usin...

Страница 12: ...ng orange light indicates the battery is being charged Blinking red light indicates the battery power is low when the system is turned ON Persistent green light indicates the battery is Full and the A...

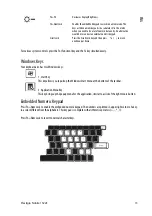
Страница 13: ...rols press the Fn Function key and the Fx key simultaneously Windows Keys Your keyboard also has two Windows keys 1 Start Key This key allows you to pull up the WindowsStart Menu at the bottom of the...

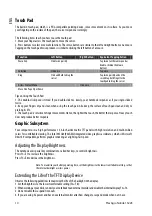
Страница 14: ...ouch pad Also keep the surface of touch pad clean and dry to prolong its life 3 The touch pad is sensitive to finger movements Hence the lighter the touch the better the response Heavy touch does not...

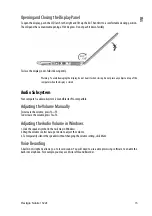
Страница 15: ...e display is closed Audio Subsystem Your computer s audio subsystem is Sound Blaster Pro compatible Adjusting the Volume Manually To increase the volume press Fn F5 To decrease the volume press Fn F6...

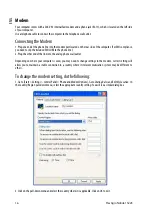
Страница 16: ...the other end of the line into the analog phone wall outlet Depending on where your computer is used you may need to change settings in the modem Correct setting will allow you to maintain a stable c...

Страница 17: ...only 1 Insert one end of the UTP cable into the network connector until the connector snaps securely into the receptacle 2 Either connect the other end of the cable to an RJ 45 jack wall outlet or to...

Страница 18: ...ent than what is shown in this manual because your notebook may have newer BIOS version installed Entering the BIOS Setup Screen First turn on the power When the BIOS performs the POST Power On Self T...

Страница 19: ...mory size for the graphic engine Otherwise you may choose a fixed size Security Setup Item Selection Sub menu Description Set Supervisor Password Exit Install or Change the Password Set User Password...

Страница 20: ...Network Note When the BIOS performs POST you may also press Enter Key to enable the Boot Device selection menu You may choose CD DVD Hard Drive or PCI BEV Realtek Boot Agent as the first storage devi...

Страница 21: ...ck that provides power when you don t have access to an AC outlet Note It is necessary that you charge the battery pack for at least 6 hours before using it for the first time Note In the Standby Susp...

Страница 22: ...the notebook bottom side up on a flat and secured surface 2 Push the latch andpull the battery s hard case away from the notebook To Install the Battery Pack 1 Place the notebook bottom side up on a...

Страница 23: ...pter wherever AC wall outlet is available This willensure uninterrupted computing Purchase additional battery pack Store the battery pack in room temperature Higher temperature tends to deplete the ba...

Страница 24: ...no power saving The other schemes control processor performance based on demand For example Max Battery mode lowers the processor s speed and voltage to conserve power as much as possible In this dial...

Страница 25: ...how much RAM that have been installed on your computer the amount of time the system requires to restore all its previous contents can range from 5 to 20seconds For Windows XP users hibernation is han...

Страница 26: ...Advanced tab In the pull down menu select how you wish the power button to work as Note Actual dialogue box shown above may appear slightly different Warning In the When I close the lid of my portabl...

Страница 27: ...tly different Power Menu Quick Access Instead of making specific selections in the Power Options Properties box you can quickly and easily specify which pre set power saving function you desire by cli...

Страница 28: ...ty can increase the hard drive capacity of your computer The computer uses a 9 5mm height 2 5 inch Serial ATA type hard disk Be sure to make a backup copy of all your data before attempting this opera...

Страница 29: ...owing 1 Turn OFF the computer Unhook the AC cord and all cables devices attached to the notebook Remove the battery 2 Place your hand on a large metal object momentarily to discharge any static electr...

Страница 30: ...restigio Nobile 1522E ENG 6 Push the HDD module to the right and separate it from the connector Lift the module away from the bay 7 Locate and remove 4 Screw C s from the HDD module Remove the metal c...

Страница 31: ...to the HDD connector And re attach 2 Screw B s 10 Put the System Device Cover back and re attach 9 Screw A s Congratulations You have now completed the hard drive upgrade When you boot up the PC you m...

Страница 32: ...ling of this procedure are NOT covered by the manufacture s warranty Warning Changing memory while your computer is in suspend or power saving mode may cause permanent damage to the hardware Make sure...

Страница 33: ...the future use 6 Install the new DIMM module into the memory socket The DIMM will only fit in one orientation Insert the DIMM at an angle of approximately 30 degrees into the empty memory socket Then...

Страница 34: ...eyboard The latch is spring loaded It will retract when pressed and revert back to its original position when released Use a small blade to press the latch inward The keyboard tray should pop up sligh...

Страница 35: ...e DDR DIMM Socket is revealed 4 If you need to remove an old DIMM from the socket press out on the latches located on both edges of the socket at the same time The DIMM should pop up to an angle of 30...

Страница 36: ...the receiving socket 6 Pivot the DIMM until the latches on bothsides of the socket snap into place Note Notice the notch on the DIMM The notches should fit nicely with the socket 7 Put the keyboard ba...

Страница 37: ...use permanent damage to the hardware Make sure you turn off the power and unplug the AC cord before proceeding with a memory upgrade Installing a Mini PCI E Card into the System To install a new Mini...

Страница 38: ...mpleted the mini PCI E card installation During the next time the system boots to Windows the system will prompt for driver location Insert the Factory CD ROM and point to the directory where the Wire...

Страница 39: ...of the changes you made try to restore all the settings to factory defaults Be sure all the device drivers are installed properly For example without the audio driver properly installed the speakers...

Страница 40: ...ached its capacity Run Disk Cleanup utility in Windows Start All Programs Accessories System Tools Disk Cleanup The system will prompt you for what to do Archive files or programs that you had no long...

Страница 41: ...up Keyboard and Mouse Problems The built in touch pad performs erratically Make sure there is no excess perspiration or humidity on your hand when using the touch pad Keep the surface of the touch pad...

Страница 42: ...orrect country setting where your computer is used Go to Start Settings Control Panel Phone and Modem Options Go to Dialing Rules and Edit My Location In the Country Region pull down menu select the a...

Страница 43: ...applications Try to close some applications or increase system memory for higher performance The processor may have been overheated due to the system s inability to regulate its internal heat Make sur...

Страница 44: ...ies DirectSound 3D EAX 1 0 2 0 compatible A3D I3DL2 compatible AC97 V2 3 compatible Azalia compatible 2 Stereo Speakers Modem Optional Chipset Intel ICH7 integrated Modem Controller with MDC card supp...

Страница 45: ...er One 4 in 1 Card Reader slot NewCard Slot One NewCard Slot type II 54mm Battery Pack AC Adapter Primary Battery Pack Li ion 4 Cell pack 14 4V 14 8 V x 2000 mAH or Li ion 6 Cell pack 10 8V 11 1V x 40...

Страница 46: ...otified that any changes or modifications made to this device that are not expressly approved by the Manufacture may void the user s authority to operate the equipment Connections to Peripheral Device...

Страница 47: ...this equipment users should ensure that it is permissible to be connected to the facilities of the local telecommunications company The equipment must also be installed using an acceptable method of c...

Страница 48: ...r Countries The cord set fittings must bear the certification mark of the agency responsible for evaluation in a specific country Acceptable agencies are BSI UK OVE Australia CEBEC Belgium SEMKO Swede...

Страница 49: ...ger of explosion if battery is incorrectly replaced Replace only with same or equivalent type recommended by the manufacturer Discard used batteries according to the manufacturer s instructions or loc...

Страница 50: ...x instructions du fabricant VORSICHT Explosionsgefahr bei unsachgemBen Austausch der Batterie Ersatz nur durch denselben oder einem vom Hersteller empfohlenem ahnlichen Typ Entsorgung gebrauchter Batt...

Отзывы: