background image


4.


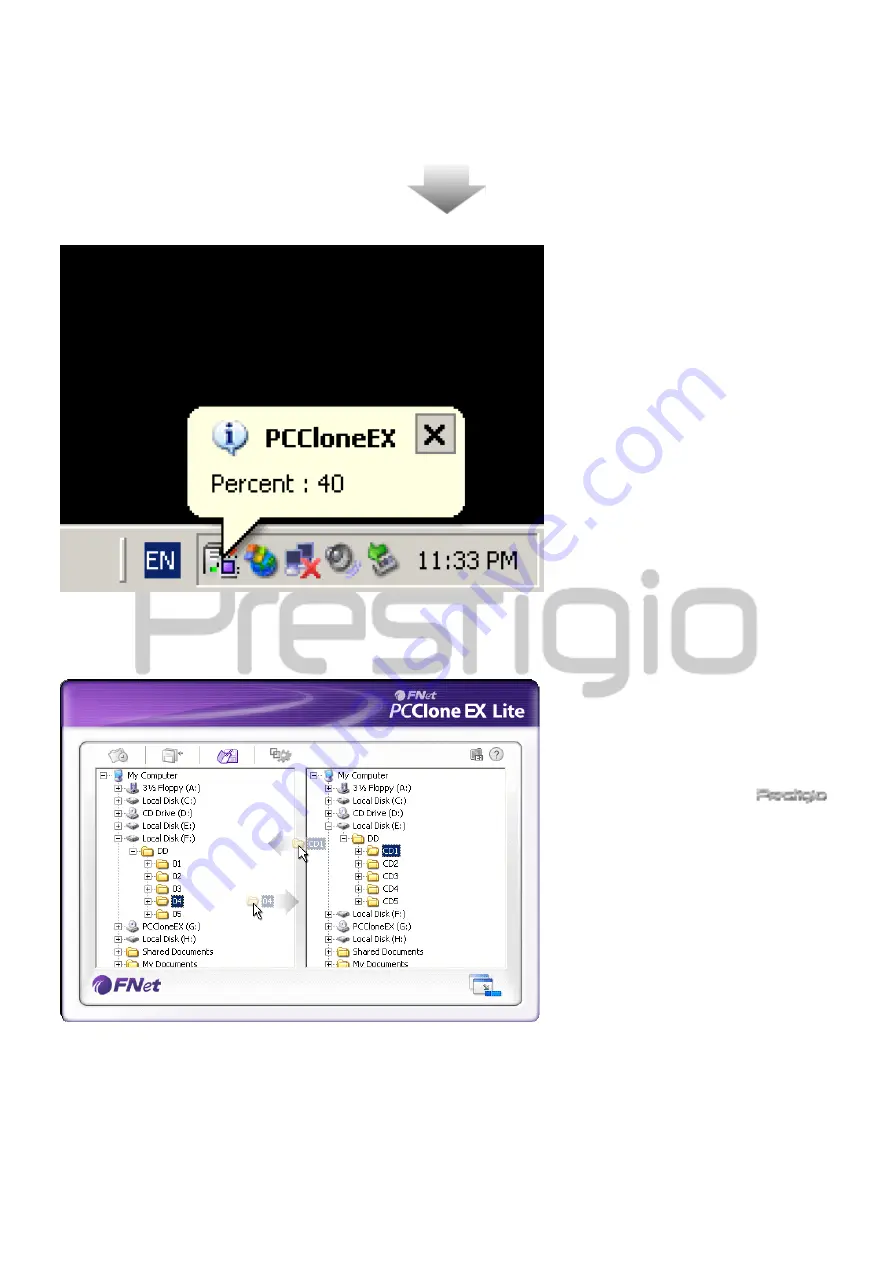
When the backup is in progress, 
PCClone EX icon will be flashing 
at the desktop notification area. 
A balloon box will pop up every 
time when the overall progress 
gains 10%. 

5.


After the backup is completed, 
another balloon box from 
PCClone EX icon will pop up 
indicating backup completion. 


2.3.5


 File Manager 


PCClone EX File Manager functions 
similar to Windows Explorer. PC 
Users is free to drag folder(s)/file(s) 
back and forth between the host 

computer hard drive and 


Data Safe III. It is a feature designed 
for users to manage their 
folder(s)/file(s) without having to 
use “Windows Explorer” or “My 
Computer”. 


Содержание Data Safe III

Страница 1: ...Data Safe III USB2 0 External HDD User Manual Version 1 0...

Страница 2: ...ecurity Section 2 2 3 1 To Lock Security Section 2 2 3 2 To Unlock Security Section 2 2 4 To Safely Remove Data Safe III 2 2 5 Setup Options 2 2 6 To Uninstall SecureDrive EX 2 2 7 Other Functions 2 3...

Страница 3: ...Group of Products Data Storage External Hard Drives Data Safe III File Names SecureDriveEX_1_01_XXX_Prestigio xxx PCClonEX_Lite_2_01_XX_Prestigio xxx SecureDrive EX Serial Key Please refer to Yellow...

Страница 4: ...Below are minimum hardware and software requirements that must be satisfied to ensure the device function properly z Computer IBM PC AT Compatible Personal computers z Supported OS IBM PC Compatible...

Страница 5: ...your device into Public and Security sections Public Section Public Section does not support password protection You can still perform every basic function described in the Basic Functions section Se...

Страница 6: ...the device into the USB port In Linux OS you can mount the device executing the following instructions Execute cd etc sysconfig cat etc sysconfig hwconf more Check the device information in hwconf wr...

Страница 7: ...on the Unplug or Eject Hardware window will pop up You can select the device you want to remove Then click the Stop button You can safely unplug the device from the USB port of your computer after War...

Страница 8: ...evice 2 2 Using SecureDrive Ex Software With SecureDrive EX application software you can protect your device with password and partition your device into Public and Security sections Warning The Parti...

Страница 9: ...nstallation 3 Please click on the SecureDrive EX License Agreement and read through the agreement for legal usage 4 Place a check in the box and then click Next 5 A dialog box will pop asking for firm...

Страница 10: ...nnect Data Safe III to the host computer and turn on its power to proceed 9 As shown in the diagram Data Safe III storage will be divided into two sections namely security section and public section 1...

Страница 11: ...ll data will be deleted permanently if executed Click Yes to continue partitioning process or No to cancel action 13 Partitioning process should not exceed 3 minutes depending on the computer capabili...

Страница 12: ...rogram option and click OK to continue installation process 16 A SecureDrive EX window will pop up for authentication Please refer to yellow sticker at the last page of quick guide for serial key Ente...

Страница 13: ...nd store it at a safe place where you can always remember Please connect Data Safe III to the host computer and turn on its power for further actions 1 A window will pop up requesting for further inst...

Страница 14: ...lank for first time use 9 Please type in a new password and type again to confirm new password entry Refer to the beginning of the section for password criteria 10 Click Save to save the password sett...

Страница 15: ...r section a blue Unlock icon indicates an open security section 4 To lock up click on blue Unlock icon or the HDD graphic to initiate locking sequence 5 A small window will pop up indicating locking s...

Страница 16: ...word input request will also be displayed 5 Click on My Computer 6 Security Section is now replaced by AP drive indicating it is locked up for data input output 1 Click on My Computer 2 AP drive is di...

Страница 17: ...the security section is locked up 4 To unlock simply type in your password in the text field and either click on return icon or click on the red Lock icon to initiate unlocking sequence 5 A small wind...

Страница 18: ...ence 7 Click on My Computer 8 AP drive is now replaced by Security Section indicating it is unlocked for data input output Warning When performing he lock and unlock actions with the device please mak...

Страница 19: ...unlock Data Safe III can be safely removed from the host computer 2 Click on the transfer cable to remove the Data Safe III 3 A dialog box will pop confirming the removal of Data Safe III 4 Click Yes...

Страница 20: ...lly lock up the security section 7 To access SecureDrive EX again after removal of Data Safe III please disconnect Data Safe III and reconnect it to the host computer 2 2 5 Setup Please make sure that...

Страница 21: ...To Uninstall SecureDrive EX Please make sure that Data Safe III is connected to the host computer and its power is ON Warning After uninstalling SecureDrive Ex all data in Data Safe III will be delet...

Страница 22: ...x will pop up requesting confirmation Click Yes to continue or No to cancel action 5 SecureDrive EX has been removed successfully Click Quit to ext 6 Data Safe III is now restored to a regular externa...

Страница 23: ...tailed software specification Please click on icon at the top right to display Help Center a tutorial tool that helps user to better use SecureDrive EX Right click on the SecureDrive EX icon at the de...

Страница 24: ...in data loss or damage 2 3 1 To Install PCCloneEX 1 Connect Data Safe III to the host computer by the USB cable provided 2 Double click on Setup exe in PCCloneEX folder to start installation 3 Click o...

Страница 25: ...7 A check mark will be placed at Create Desktop Shortcut option by default Remove the check mark if necessary 8 Click on Install to proceed or Quit to cancel action 9 The installation process should...

Страница 26: ...n only be used with the device shipped within the package Any other devices will not work with this program 2 3 2 Regular File Backup Functions Please make sure that Data Safe III is connected to the...

Страница 27: ...column click on the drop down box to select designated back up storage device 5 Click on Backup to start backup process A dialog box will pop up confirming action Please click on OK to continue and pr...

Страница 28: ...ry F FNet in Data Safe III All the backup file s folder s will be kept in the directory Please do not remove the directory 2 3 2 2 To Restore File 1 Click on PCCloneEX desktop shortcut to execute prog...

Страница 29: ...ompleted Please click OK to exit 2 3 2 3 To Delete Backup File 1 Click on PCCloneEX desktop shortcut to execute program 2 Click on File Backup tab to display backup information 3 Under USB Device righ...

Страница 30: ...sion for hotkey setup Please make sure that Data Safe III is connected to the host computer and its power is ON 2 3 3 1 To Backup File using Quick Launch 1 Click on PCCloneEX desktop shortcut to execu...

Страница 31: ...afe III is connected to the host computer and its power is ON Warning PCClone EX icon must be present at the desktop notification area before the COPY button on Data Safe III is pressed 1 Click on PCC...

Страница 32: ...ted another balloon box from PCClone EX icon will pop up indicating backup completion 2 3 5 File Manager PCClone EX File Manager functions similar to Windows Explorer PC Users is free to drag folder s...

Страница 33: ...tions Hold down any two of the following keys Shift Ctrl and Alt and another key to create new Hot Key Click Yes to continue Cancel to cancel System folder backup setting Defining restrictions of back...

Страница 34: ...d automatically when window starts Uncheck if necessary Enable USB Button Click on this option to enable COPY button for quick backup service Uncheck to disable button function 2 3 7 Other Functions P...

Страница 35: ...Safe III USB HDD Enclosure with 1 Botton Backup Security functions and soft touch button control Interface USB2 0 Interface HDD Type 2 5 inches Serial ATA HDD Max HDD Capacity 500 GB Power Supply Dir...

Страница 36: ...ke any changes without further notice to any products herein 3 5 Trademark Acknowledements z IBM is a registered trademark of International Business Machines Corporation z iBook and iMac are trademark...

Отзывы:

Похожие инструкции для Data Safe III