background image

- 90 -

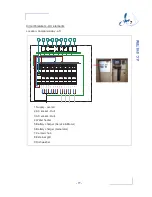
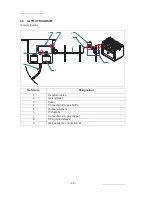
8.2   LAYOUT DIAGRAM

Version: Europe

Reference

Designation

1

Regulator valve

2

Gas cylinder

3

Drain

4

Connection kit - gas bottle

5

Rubber washers

6

Pictogram

7

Connection kit - gas copper

8

PVC girdled sleeve

9

Gas appliance connection kit

gaz

GA

Z

8

3

2

4

1

6

9

7

5

Содержание 420

Страница 1: ...PRESTIGE 420 OWNER S MANUAL 161873 Index A ...

Страница 2: ......

Страница 3: ... 23 4 1 4 Deck searchlight 23 4 1 5 Horn 24 4 1 6 Navigation lights 24 5 SAFETY 25 5 1 PREVENTING MAN OVERBOARD SITUATIONS AND THE MEANS OF GETTING SOMEONE BACK ONBOARD 25 5 1 1 Prevention of man overboard 25 5 1 2 Getting back onboard 27 5 2 STORING THE LIFE RAFT 28 5 3 SECURING MOVEABLE ITEMS 28 5 4 INFORMATION ABOUT THE RISKS OF FLOODING AND ABOUT THE BOAT S STABILITY 29 5 4 1 Openings in hull ...

Страница 4: ...t 56 7 2 8 Diagram of flying bridge wiring looms DC circuit 57 7 2 9 Switches Circuit breakers 58 7 2 10 Circuit breakers 59 7 2 11 Fuses 60 7 2 12 Touch screen 61 7 3 AC SYSTEM 110 V OR 220 V 72 7 3 1 AC shore socket 73 7 3 2 Layout diagram 74 7 3 3 DC AC converter 79 7 3 4 Layout of the wiring looms in the hull AC circuit 81 7 3 5 Layout of the deck wiring looms AC circuit 82 7 3 6 Anodes 83 7 3...

Страница 5: ...132 12 6 1 Location diagram of black water system 133 12 7 WASTE WATER SYSTEM 138 13 ENGINE 143 13 1 INFORMATION ABOUT THE RISKS OF FIRE AND OF EXPLOSION OF ENGINES 143 13 2 DANGER FROM MOVING MECHANICAL PARTS 144 13 3 GENERAL POINTS 144 13 4 STARTING THE ENGINE 145 13 5 ENGINE WATER INTAKE VALVE 147 13 6 FUEL FILTER 148 13 7 ENGINE INSTALLATION 149 13 8 ENGINE CONTROL 151 13 9 ACCESS TO THE ENGIN...

Страница 6: ... OF THE CHAIN LOCKER 175 15 5 ELECTRIC WINDLASS 176 16 HULL FITTINGS 181 16 1 UPHOLSTERY 181 16 2 INTERIOR WOODWORK 184 16 3 INTERIOR MAINTENANCE 184 17 HANDLING TRANSPORT 185 17 1 LIFTING PLAN 185 17 2 LIFTING 186 17 3 UPPER LIMIT OF ANTIFOUL 187 17 4 SETTING UP CRADLES 188 17 5 LAUNCH LIFT OUT 189 17 6 WINTER STORAGE 190 17 7 TRANSPORT 191 18 ENVIRONMENT 193 ...

Страница 7: ...n this manual may be optional Your PRESTIGE YACHTS dealer will be able to help and advise you in the use and maintenance of your boat The initial commissioning of your boat will require a lot of skill and care The proper working of all your boat s equipment is the result of the quality of the commissioning operations This is why the initial launch must be overseen by your dealer Read this Owner s ...

Страница 8: ...rise please contact your dealer If a maintenance manual is provided please use it Always use the services of an experienced professional for the maintenance of your boat for fitting accessories and for any modifications Any alterations which may affect the safety specifications of the boat must be assessed carried out and recorded by persons qualified to do so The boat manufacturer cannot be held ...

Страница 9: ... NF EN ISO 10240 of February 2005 This owner s manual is written in several languages French is the authentic reference language This owner s manual was written and made up into pages by SPBI S A Any reproduction of this manual direct or indirect provisional or permanent by whatever means this may be whether in whole or in part and any modification of this manual by a third party for commercial re...

Страница 10: ......

Страница 11: ...cture of the boat Hull length Lh 11 32 m Excluding removable parts that can be dismantled without affecting the structure of the boat Overall width Bmax 3 97 m Including removable parts that can be dismantled without affecting the structure of the boat Beam Bh 3 93 m Excluding removable parts that can be dismantled without affecting the structure of the boat Air draught Empty vessel with bimini 5 ...

Страница 12: ...ank 1 206 l Tank 2 200 l Black water capacity WC Tank 1 120 l Waste water capacity Washbasin Shower Domestic appliances 200 l It may not be possible to use these capacities fully depending on the trim and load of the boat It is recommended to keep a reserve of 20 in the fuel tanks Refer to the corresponding chapter to locate the position of the tank relationship between the tank number and its pos...

Страница 13: ...ay be increased provided that The total weight of the children does not exceed 37 5 kg AND THAT the total weight of all allowed onboard based on about 75 kg per adult is not exceeded Design category B C D Maximum number of people to be allowed onboard 9 11 11 Maximum number of people to be allowed on the flybridge 5 5 5 Light displacement 9 527 kg Recommended maximum load 3 600 kg Displacement wit...

Страница 14: ...onding seas waves of a significant height of less than or equal to 2 metres You may meet with such conditions in exposed inland waters in estuaries and in coastal waters with moderate weather conditions Category D In sheltered waters The boat is designed to sail in winds that may exceed Beaufort force 4 and in waves of a significant height of 0 5 metres and more Such conditions may be encountered ...

Страница 15: ...boat s stability trim and its performance It is important to keep water in the bilges to a minimum The boat s stability is affected by adding to the weight of the superstructure In heavy weather it is important to close all the hatches lockers and doors to minimise the risk of water pouring in The boat s stability can be reduced when towing a boat or when using a davit or boom to lift a heavy load...

Страница 16: ... 16 3 2 ACCESS TO THE BOAT Access to the cockpit Access to the engine compartment Access to the saloon Holding ...

Страница 17: ... 17 Access to the flybridge Access to the machinery compartment 3 STABILITY AND BUOYANCY ...

Страница 18: ...h gently and carefully Do not allow children to open or close the hatches unsupervised It is imperative that the access doors to the saloon are kept closed when at sea Close the deck hatches and portholes before each trip Close all access doors and hatches in heavy weather or when the sea is rough ADVICE RECOMMENDATION Keep the sea cocks discharge and drainage points closed to minimise the risk of...

Страница 19: ...in choppy seas applicable to boats equipped with a system for directing the propeller thrust Do not drive at top speed in areas of heavy boat traffic or in situations of reduced visibility strong winds or heavy seas Reduce the boat s speed and wake out of courtesy and for your own safety and the safety of others Observe speed limits and NO WASH signs Observe the rules of priority as defined in the...

Страница 20: ...load distribution Speed Rapid acceleration Transition from displacement mode to planing mode Sea conditions Rain and mist Darkness and fog Lights on inside the boat Position of the upper and side awnings Persons and removable equipment in the helmsman s field of visibility The international rules for preventing collisions at sea COLREG and the navigation rules demand constant vigilance and observa...

Страница 21: ...the port engine cooling circuit exchanger The demister operates only when the engine is warm and running A valve on the engine allows the demister to be isolated from the engine cooling system for maintenance or to isolate a faulty circuit Location Aft washroom Control Steering station Supply valve Cooling system Motor Demister 4 MANOEUVRABILITY ...

Страница 22: ... 22 4 1 2 Wiper The windscreen wipers run on DC power 4 1 3 Windscreen washer Control Steering station Engine access Deckhead Forward cabin Reservoir location Aft washroom Control Steering station ...

Страница 23: ...light runs on DC power A fuse protects the electrical circuit Deck searchlight aft Control Galley Deck searchlight forward Control Steering station 1 Deck searchlight on off 2 Deck searchlight directional switch Location Roof 4 MANOEUVRABILITY ...

Страница 24: ... 1 6 Navigation lights The navigation lights run on DC power The only function of the samson post is to support the navigation light Any other use is dangerous and forbidden Location Flying bridge Control Steering station Control Steering station ...

Страница 25: ...ND THE MEANS OF GETTING SOMEONE BACK ONBOARD 5 1 1 Prevention of man overboard The zones outside the working deck area are the hatched areas below The working deck means those areas outside where people stand or walk during normal use of the boat 5 SAFETY ...

Страница 26: ...ard rails watch for corrosion particularly at connecting points With synthetic guard rails change them as soon as they show signs of wear due to chafing or UV Ref 1 1 Fitting a means of climbing back onboard Ref 2 Mooring cleats Use the seats provided ...

Страница 27: ... back onboard Ref 1 Ref 1 Some types of equipment for getting back onboard have a locking device when folded up It is important to keep the means for getting back onboard deployed and ready to use once the boat is in use at anchor moored or at sea Make sure that the means for getting back onboard are readily accessible and easy to use by someone alone in the water 5 SAFETY ...

Страница 28: ...lps to locate it easily 5 3 SECURING MOVEABLE ITEMS Before putting to sea carefully read the launching instructions shown on the liferaft When at sea never padlock or lock the stowage locker for the life raft Ensure that movable items are firmly secured when the boat is under way Don t store anything below the floorboards ...

Страница 29: ...View above Reference Designation Valve 1 Sea water intake Air conditioning Yes 2 Generator earthing plate Not 2 Earthing plate DC AC converter Not 3 Sea water intake Generator Yes 4 Drainage Collector Waste water Yes 5 Sea water intake Deck wash pump Yes 6 Sensor Not 7 WC evacuation to sea Yes 5 SAFETY ...

Страница 30: ...nt Not 2 Aft water tank vent Not 3 Vent hole Collector Waste water Not 4 Black water tank WC Not 5 Vent hole Fuel tank Port side Not 6 Heating exhaust Not 7 Bilge pump draining Yes 8 Drainage Air conditioning Yes 9 Scuppers Gangway Flying bridge Not 10 Cockpit scupper Not ...

Страница 31: ...exhaust Not 3 Vent hole Fuel tank Starboard Not 4 Dishwasher drainage Yes 5 Bilge pump draining Yes 6 Galley sink drain Yes 7 Cockpit scupper Not 8 Scuppers Gangway Flying bridge Not 9 Seawater discharge Generator Not 10 Generator exhaust Not 11 Drainage Air conditioning x4 Yes 5 SAFETY ...

Страница 32: ...rainage channels allow the water to drain down to the lowest point in the boat where it can be discharged So it is important to allow the water to flow freely down to this lowest point of the boat which includes Regularly cleaning the lowest point of the boat and the drainage channels Diagram of the layout Drainage channels ...

Страница 33: ...ut Bilge pumps Reference Designation Rate 1 Manual bilge pump 32p minute 2 Manual bilge pump lever 3 3 Electric bilge pump 54p minute 4 Electric bilge pump switch 45 strokes minute If 70 stroke minute rate 35p minute 5 SAFETY ...

Страница 34: ... on the manual bilge pump II Repeatedly work the lever up and down to its fullest extent The manual bilge pump lever must remain accessible at all times The manual bilge pump is in the cockpit Ref 1 The bilge pump lever is located close to it Ref 2 ...

Страница 35: ...electric bilge pump switch is situated inside the wheelhouse Ref 4 The electric bilge pump must only be used to discharge stagnant water at the bottom of the bilge It must not be used to pump out any oil based products petrol oil or inflammable liquids Ref 3 Engine compartment Ref 3 Aft cabin 5 SAFETY ...

Страница 36: ... is not designed to deal with water coming in through breaches in the hull Keep the water level in the bilges to the minimum Never store anything right at the bottom of the boat Allow bilge water to flow freely down to the lowest point of the boat SAFETY PRECAUTIONS Check that each bilge pump is working at regular intervals Clear the bilge pump points or strainers of any debris that could clog the...

Страница 37: ...ystem 20 mm diameter Pipe Bilge pump system 25 mm diameter Reference Designation 1 Electric bilge pump Engine compartment 2 Manual bilge pump 3 Non return valve 4 Intake strainer 5 Thru hull fitting Bilge pump draining 6 Connector 5 3 1 2 1 4 3 5 5 6 5 E M E SAFETY ...

Страница 38: ...Procedure for aligning the motor bases manually Picture 1 Remove the screw Ref 1 Disconnect the cable Ref 2 Picture 2 Connect the connector Ref 3 Put the handle arm in position Ref 4 Picture 3 Press the button Ref 5 and keep it pressed whilst turning the handle arm Ref 6 until it comes to a stop Do not force it once it has reached the stop Picture 4 Turn the handle arm about 75 turns The base is n...

Страница 39: ...orisation are described in the MOTORISATION chapter The risks associated with other fuel burning equipment are described in the OTHER FUEL BURNING EQUIPMENT chapter The risks associated with the electrical systems are described in the ELECTRICITY chapter The risks associated with the gas system are described in the GAS chapter 6 INFORMATION RELATING TO FIRE RISKS AND RISKS OF EXPLOSION ...

Страница 40: ... fire extinguishers is shown by the pictogram below When in use this boat must be equipped wih a fire blanket to protect the cooking equipment and or the galley installed in the following place near the cooking equipment Reference Designation Location Minimum extinguishing capacity 1 Portable fire extinguisher Aft cabin closet 5A 34B 2 Portable fire extinguisher Forward cabin closet 5A 34B 3 Porta...

Страница 41: ...uipment Location of discharge ports in engine compartment The location of evacuation routes and fire exits Notes for the attention of the boat user General points Check that the bilges are clean and frequently check that there are no fuel gas vapours or fuel leaks In the case of replacement of components of the fire fighting equipment use only the appropriate components of the same code designatio...

Страница 42: ...ngine compartment Procedure to follow in the event of fire in the engine compartment Stop the engine and fan Switch off power and stop fuel supply Close access to the compartment Pull the extinguisher remote control for 20 seconds Wait Ventilate the compartment after the fire has been extinguished Open the access hatches and repair ...

Страница 43: ...tation To enable functioning of the fixed fire extinguishers the safety pins on each extinguisher must all be removed completely To avoid suffocation leave the area before discharge After discharge ventilate before entering After discharge ventilate before entering Refer to the manufacturer s instructions for use and maintenance 6 INFORMATION RELATING TO FIRE RISKS AND RISKS OF EXPLOSION ...

Страница 44: ...gas taps electrical system circuit breakers Obstruct the access to the portable extinguishers stored in lockers Leave the boat unsupervised when cooking equipment and or heating equipment is in use Modify any of the boat s installations especially the electrical fuel or gas installations or allow unqualified personnel to proceed with modifying these installations Fill the fuel tanks or replace gas...

Страница 45: ...Service batteries 2 Switches DC breakers 3 Power unit Power distributor Fuses Relay box Battery switch 4 Bow thruster batteries 5 Batteries Generator Motor 6 Battery charger The risks of fire or explosion may result from careless use of the DC and AC systems The risks of electrocution may result from careless use of the AC system 7 DC INSTALLATION ...

Страница 46: ...imperative that when the boat is first launched a professional engineer connects the batteries Always check the condition of the batteries and charge system before putting to sea The battery banks are isolated from one another by a charge divider see below NEVER work on a live electrical system modify the elecrical system of the vessel or the relevant diagrams It is important that the installation...

Страница 47: ... 47 Battery set Engine battery 2 x 110A Generator battery 80A Service batteries 3 x 80A Spare service batteries 1 x 80A Propeller battery 2 x 50A 7 DC INSTALLATION ...

Страница 48: ... No ventilation is needed The optimum temperature for use is between 10 degree C and 30 degrees C Lower temperatures will reduce the available capacity Higher temperatures will increase the batteries self discharge rate Never open watertight batteries Never add acid or distilled water The pressure valves are used to seal the batteries and cannot be opened without being destroyed If the batteries o...

Страница 49: ...ure it is possible to press down the button on top of the battery breaker manually to activate it The electrically controlled battery breakers use very little electricity when they are on It is imperative to turn off all the battery breakers during lengthy absences to prevent the batteries from slowly and irreversibly discharging Positive battery isolator switch Battery switch of negative terminal...

Страница 50: ... Control Battery breaker positive terminal engine Starboard Control Battery breaker positive terminal engine Port side Turn off all battery breakers before leaving the vessel risk of complete discharging of whole battery bank Avoid touching the battery breakers when they are live Never switch off the battery breakers when the boat s engine is running risk of serious damage to the charging circuit ...

Страница 51: ...d on all the battery breaker control switches This indicates that control of the battery breakers is enabled Activate the push button of the battery breaker you wish to operate the red light on the switch illuminates This means that the battery isolator is ON actuated To turn off the battery breaker press the push button again When the red light goes out the battery breaker is OFF turned off 7 v D...

Страница 52: ...ltage drop between the battery banks engine and service batteries It prevents the current from circulating from one battery to another When the voltage of the charger or alternator is available the charge divider s green indicator comes on 7 2 4 Connection of battery set If one of the engine batteries is low on power use the battery link function by actuating the linking system Linking switch Hold...

Страница 53: ...in permanently connected to the batteries and does not need to be disconnected when starting the engine In some electrical circuits there may be battery chargers coupled in parallel Maintenance Before doing any maintenance cut the AC supply Regularly vacuum out any dust particles which may accumulate in the charger An annual check of the tightness of the nuts and bolts is necessary to ensure the c...

Страница 54: ...1 BA22 BA21 G1 G1 DM2 DM1 BA1 BA2 BA3 BA1 BM20 BM10 BM10 8 8 8 8 8 8 8 8 8 8 8 8 8 8 8 8 8 8 8 8 8 8 8 8 8 8 8 8 8 8 8 8 8 8 8 8 8 8 10 10 10 10 10 10 10 10 10 10 10 10 10 10 10 10 10 10 10 10 10 10 10 10 10 8 6 6 6 8 6 6 6 8 8 8 8 8 8 10 8 8 8 8 r 95 r 95 r 95 r 95 r 95 r 95 r 95 r 95 r 95 n 95 n 95 n 95 n 95 r 95 r 95 r 35 r 35 n 95 n 95 8 PE1 PE1 PE1 CHARGE PROPULSEUR r 35 n 35 r 70 r 50 r 50 n...

Страница 55: ... Relais 2L4 2L4 HP1 1JE 2PE100 2G200 2L22 3HF1 3L12 1TV 3L10 3L100 3L31 3L3 3L2 GE 1AN1 3L3 3L2 2PC1 2WC1 4WC1 4WC2 2WC10 2L11 2L21 2L3 HP22 2L21 2L11 LG 3WC1 2JE 4WC2 1WC1 PU2 1WC1 HP22 2L3 1PC2 DV1 2AN100 3L4 Bornier Disjoncteurs R1 Coffret P Barre Neg 1VHF2 AIS ES1A LG N 1TO2 PL 5L1 AG2 1CB1 1CCB2 DC INSTALLATION ...

Страница 56: ...eck wiring looms DC circuit 2L41 2L40 PAC10 2L16 ES2 2L220 2G303 CC1 ES1 2L15 2L10 2L12 2L14 2L13 2L30 2L31 1PDC1 1VHF1 1RC1 Poste Timo 1L1 3G301 2L11 GE 2L220 1HF1 HP61 HP5 3L21 3L20 3L22 3L23 PTE 1L30 PTE 3L26 3L27 1L30 1L30 ...

Страница 57: ... bridge wiring looms DC circuit 7 Poste Pilotage 1N8 3K100 1N6 1N3 SB 5L10 5L11 1N2 HP8E HP10E HP7E HP9E 1L501 1L504 1L51 1L502 1L505 1L11 1L12 1L10 1L13 1L15 1N7 1L14 1L16 1L203 HP5B HP6B HP5 HP6 1L500 1L503 1L40 DC INSTALLATION ...

Страница 58: ...eference Designation 1 Aft electric bilge pump 2 Forward electrical bilge pump 3 Water unit 4 Demister 5 Navigation electronics 6 Windlass 7 Navigation lights 8 Windscreen washer 9 Port windscreen wiper 10 Starboard windscreen wiper 11 Horn 1 2 3 4 5 6 7 8 9 10 11 ...

Страница 59: ...to sea Black water tank gauge WC Hifi saloon TV Antenna Hifi Forward cabin Drainage pump Waste water tank Location Companionway aft 120A Windlass circuit breaker 80A Breaker DC AC converter 700VA 200A Breaker DC AC converter 2000VA 7 15 08 10 PU2 r 2 5 DV3 2 r 4 2PC1 r 2 5 DV4 r 4 10 10 L 0 25 r 16 2PC2 r 2 5 2L4 r 1 5 2L3 r 2 5 3L2 r 4 3L1 r 1 5 10 10 25 15 2WC1 3WC1 1HF1 HIFI 1 WC 2 r 6 r 4 r 2 ...

Страница 60: ...you must replace it with another fuse of the same rating Location Technical room Location Engine compartment Power unit Element Rating HUB 1A Radar 15A System 5A Auto pilot 5A When replacing fuses circuit breakers always ensure replacements are of the right capacity see the colour codes ...

Страница 61: ...anagement of boat s AC supply sources Source selectors Location Cockpit locker A handle allows the selector to be engaged manually Location Companionway aft 1 Source selector House is fitted if the boat is fitted with a generator 2 Source selector Air conditioning is fitted if the boat is fitted with air conditioning Handle 7 DC INSTALLATION ...

Страница 62: ...isplay Controller Area Network Parameterization of lighting Configuration of the gauge pack Configuration of source selectors Return to preceding page The green indicator shows the presence of an AC current coming from the shore supply or generator Presence of a fault relating to the absence of a module or its configuration on the CAN network Direct access to water level page Direct access to home...

Страница 63: ...charge voltage display Access to starboard engine battery voltage display Access to port engine battery voltage display Access to bow thruster battery voltage display Access to bow thruster battery voltage display if fitted on board Service battery voltage Current charge green or discharge red measurement DC INSTALLATION ON OFF button ...

Страница 64: ... PORT ENGINE BATTERY MENU STARBOARD ENGINE BATTERY MENU STERN THRUSTER BATTERY MENU BOW THRUSTER Battery voltage Port engine Battery voltage Starboard engine Battery voltage Stern thruster Battery voltage Bow thruster ...

Страница 65: ... 65 MENU ACCESS WATER GAUGE MENU WATER GAUGE 7 Access to the 2 tank gauge Access to the 1 tank gauge Tank No Number of tanks in the boat Tank level DC INSTALLATION ...

Страница 66: ...pply voltage display Reversal of polarity only for the 110V Padlocks Indicates that the handle on the source selector is engaged Menu access Power supply air conditioning Menu access Supply to on board circuit Grey Non current carrying Blue On board circuit live Orange On board circuit live but locked by setting the handle on the source selector Access the generator start menu by pressing the GE b...

Страница 67: ...l Generator One press on the GE button sets the air conditioning selector switch to the generator The orange circle indicates that the switch is made One press on the shore supply button sets the air conditioning selector switch to shore supply The orange circle indicates that the switch is made DC INSTALLATION ...

Страница 68: ...alled in the engine room also have a removable handle to alter the source origin manually On board circuit Voltage Frequency The orange circle indicates the source selector position Neutral Generator One press on the shore supply button sets the on board selector switch to shore supply The orange circle indicates that the switch is made One press on the GE button sets the on board selector switch ...

Страница 69: ...frequency 1 Shore power supply Air conditioning shore supply voltage Air conditioning supply frequency 2 Air conditioning shore power supply Voltage provided by the generator for on board supply On board supply frequency 1 On board AC Starting or stopping the generator DC INSTALLATION ...

Страница 70: ...erator to air conditioning Air conditioning supply frequency 2 AC air conditioning Starting or stopping the generator Access to settings for network maintenance boatyard access only Error lighting module has no coding resistance ...

Страница 71: ...H SCREEN 7 Error several lighting modules with the same coding n Error the on board source selector configuration is not up to date Confirm or cancel up date The touch screen is clipped to an aluminium support DC INSTALLATION ...

Страница 72: ...at shore supply cable hang in the water The result may be an electric field liable to hurt or kill the swimmers nearby There may be danger of electrocution if alternating current systems are incorrectly used Do not work on a live AC system To reduce the risks of electric shock and of fire Turn off the shore supply with the onboard cut off switch before connecting or disconnecting the vessel shore ...

Страница 73: ...AC socket on the boat then into the socket onshore First unplug the extension cable from the socket onshore then from the AC socket on the boat Bipolar circuit breaker Location Technical room Ref 3 AC shore socket Location Aft quarterdeck Ref 1 AC breakers Location Companionway aft Ref 2 7 AC SYSTEM ...

Страница 74: ...pe 3X2 5 3X4 3X2 5 3X2 5 3X2 5 3X2 5 3X2 5 3X2 5 3X2 5 3 10 3 10 3 10 3x10 3X2 5 3X2 5 230V 50Hz 3X2 5 3X2 5 3X2 5 3X2 5 32A 230v 50Hz 32A 230v 50Hz 32A 230v 50Hz 32A 230v 50Hz 7 5 Kva 230v 50Hz 230V 50Hz 3X2 5 3X2 5 Inverter 12v 230v 50Hz 700VA ou 2000VA CVM ...

Страница 75: ...2A 230V 50hz en europe 3X2 5 3X2 5 115V 60Hz 3X2 5 3X2 5 3X2 5 3X2 5 50A 115v 60Hz 50A 115v 60Hz 50A 115v 60Hz 50A 115v 60Hz 7 5 Kva 110v 60Hz 115V 60Hz 3X2 5 3X2 5 Inverter 12v 115v 60Hz 800VA ou 2000VA CVM 4 16 X Y G W phase 1 phase 2 neutre terre 110V 110V 220V 50A 50A AC SYSTEM ...

Страница 76: ...azil 3X2 5 3X4 3X2 5 3X2 5 3X2 5 3X2 5 3X2 5 230V 60Hz 3X2 5 3X2 5 3X2 5 3X2 5 32A 230v 60Hz 32A 115v 60Hz 32A 230v 60Hz 32A 115v 60Hz 7 5Kva 230v 60Hz 230V 60Hz 3X2 5 3X2 5 Inverter 12v 230v 60Hz 700VA ou 2000VA CVM ...

Страница 77: ...rger Service Motor 6 Battery charger Generator 7 Ceramic hob 8 External grill 9 Dishwasher 7 C 16 C 16 C 10 C 10 C 16 C 16 C 16 C 16 m 10 j v 10 PQ11 b 2 5 CE m 2 5 CE b 1 5 1CB m 1 5 1CB 3CB 3CB PV PV b 2 5 PAC20A m 2 5 PAC20A GL GL LV LV j v LPG 230AC 12DC 230AC 12DC b 10 b 2 5 PAC10A m 2 5 PAC10A b 1 5 m 1 5 1 2 3 4 5 6 7 8 9 AC SYSTEM ...

Страница 78: ...ing Location Companionway aft 1 Supply overall 2 Pump sea water 3 Compressor Aft cabin 4 Compressor Forward cabin 5 Compressor Wheelhouse Mediterranean 6 Compressor Wheelhouse Tropical C 10 C 10 C16 C 6 C 10 C 16 C 16 C 20 C32 110V 220V ...

Страница 79: ...self being supplied by the service battery bank Be careful to disconnect the inverter circuit to prevent the AC power supply automatic switching over and to prevent the accidental discharge of the service battery bank either by putting the inverter s circuit breaker in the OFF position or by putting the switch located on the inverter in the OFF position Simply cutting the AC power supply at the sw...

Страница 80: ... on the equipment Remote control Inverter 700 W The control located on the equipment Location Aft cabin Remote control Location Companionway The power to the inverter must only be supplied by lead batteries Refer to the manufacturer s instructions for use and maintenance NEVER connect the invertor AC lead to an AC terminal or to the generator onboard disconnect the wiring from the inverter when in...

Страница 81: ... 81 7 3 4 Layout of the wiring looms in the hull AC circuit 7 PAC22 PAC10 Bornier STD Clim 2G200 PQ11 2CB CE 1CB PQ10 PAC11 PAC12 PAC13 PAC14 PAC21 PAC21 PAC20 AC SYSTEM ...

Страница 82: ...7 3 5 Layout of the deck wiring looms AC circuit PAC23 PAC24 PAC10 PAC10 PAC23 ...

Страница 83: ...50 of its weight Use the appropriate anodes for the cruising area fresh water magnesium anodes Sea water zinc anodes When the boat is stored at a dry dock the corrosion protection is not as effective due to oxidation of the anodes even the new anodes oxidize the surface Before returning the boat into the water clean the anodes Cleaning anodes Use sandpaper Do not use metal brushes or steel tools t...

Страница 84: ... 84 Location Aft quarterdeck 1 Anode Port engine 2 Anode General 3 Anode Starboard engine Anode Tenderlift Anode Flaps Anode Bow thruster ...

Страница 85: ...earths this equipment The earthing plate is not an anode it must not be allowed to deteriorate If it deteriorates consult a professional immediately to determine the cause As the earthing plate is mounted across the hull below the waterline if the earthing plate deteriorates the boat is at risk of sinking Location 1 Earth Generator 2 Earth DC AC converter Outside view Inside view Never antifoul ov...

Страница 86: ......

Страница 87: ...ottles only in the lockers or storage places provided for these It is recommended that you ensure good ventilation when using gas powered equipment to prevent asphyxiation Reference Designation 1 Gas cylinder locker 2 Gas locker outlet 3 Drain 4 Gas system 5 Gas supply valve 8 1 5 4 2 3 LIQUEFIED PETROLEUM GAS LPG SYSTEM LPG ...

Страница 88: ...is one or Carry out a manual search by applying a foaming solution or soapy water or a detergent with the taps of the burners closed and those of the installation and of the gas bottle staying open The foaming solutions for detecting leaks in the gas installations conforming to the EN 14291 meet these requirements If there is a leak close the tap on the bottle and get the installation repaired bef...

Страница 89: ... provided for this when using this equipment Do not use a hotplate or an oven to heat the living areas Never obstruct the vents provided for ventilation Never leave the boat unsupervised when equipment using LPG with a naked flame is on Do not smoke or use a naked flame when replacing LPG bottles Close the tap on the empty bottle before detaching it to replace it To ensure sufficient ventilation m...

Страница 90: ...Europe Reference Designation 1 Regulator valve 2 Gas cylinder 3 Drain 4 Connection kit gas bottle 5 Rubber washers 6 Pictogram 7 Connection kit gas copper 8 PVC girdled sleeve 9 Gas appliance connection kit gaz GAZ 8 3 2 4 1 6 9 7 5 ...

Страница 91: ...US Reference Designation 1 Regulator valve 12 V 2 Gas cylinder 3 Drain 4 Stuffing box 5 PVC girdled sleeve 6 Electromagnetic valve 12 V 7 Plastic propane pipe 8 6 7 4 5 3 2 1 LIQUEFIED PETROLEUM GAS LPG SYSTEM LPG ...

Страница 92: ......

Страница 93: ... power can be affected by The ambient temperature The quantity of food to chill The frequency of opening the door Maintenance Clean the evaporator with a damp cloth at least once a year Never use cleaners which are abrasive acid or which contain solvents for cleaning the evaporator Regularly clean the fridge icebox door seal with a damp cloth Regularly defrost the fridge When winterising the boat ...

Страница 94: ... 94 Fridge Location Galley Fridge Location Flying bridge ...

Страница 95: ...move all foil or metallic elements of the packaging before putting food in the microwave Remove hermetic coverings from the packaging before putting food in the microwave Starting up Use the switch on the chart table to select the power source shore power or generator Put the microwave circuit breaker in the ON position Maintenance Regularly check the door seals Regularly clean the inside of the f...

Страница 96: ... Starting up Use the switch on the chart table to select the power source shore power or generator Turn the hob circuit breaker to ON Location Galley Never allow children to use the domestic electrical equipment unsupervised ADVICE RECOMMENDATION Refer to the manufacturer s instructions for use and maintenance ...

Страница 97: ... switch is mounted on the lid the act of shutting the lid automatically turns the grill off immediately Location Flying bridge Refer to the manufacturer s instructions for use and maintenance It is forbidden to use the grill when at sea Check the temperature of the grill before reclosing the cover 9 DOMESTIC APPLIANCES ...

Страница 98: ......
Страница 99: ...he DC AC invertor which is powered by the service batteries The inverter has an ON OFF button A circuit breaker protects the circuit Pre cabling for the aerial is already installed on the boat Starting up Start the AC DC inverter Switch on the television Layout of components Saloon 10 AUDIO VISUAL EQUIPMENT ...

Страница 100: ... is selected on the DVD player The sound from the DVD player comes from the speakers The sound from the radio comes from the inside and outside speakers It is possible to select either outside or inside speakers by adjusting the balance control ADVICE RECOMMENDATION Refer to the manufacturer s instructions for use and maintenance Radio Base box Bass speaker Access Pilot seat USB socket Location St...

Отзывы: