background image

4K Video Conference CameraUser Manual


7


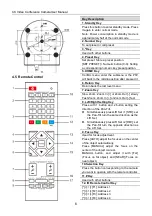
13. Reset Key 

Clear preset: Erase a preset position. 
[CLEAR PRESET] + Numeric button (0-9) 
Or:  [*]+[#]+[CLEAR PRESET]: Erase all the 
presetindividually. 

14. PTZ Control Key 

Press arrow buttons to perform panning and 
tilting. Press [HOME] button to face the 
camera back to front. 

15. Menu Key 

MENU: enter or exit OSD MENU. 

16. Backlight Key 

BLC ON/OFF: Press this button to enable the 
backlight compensation. Press it again to 
disable the backlight compensation. 
NOTE: 

  Effective only in auto exposure mode. 

  If a light behind the subject, the subject 

will become dark. In this case, press the 
backlight ON/OFF button. To cancel this 
function, press backlight ON/OFF button. 

17. PTZ Reset Key 

Preset Pan/Tilt self-test. 

18. Image Freezing Function 

Manually freeze: Open the freezing function 
after press the remote control [F4], display 
“Freeze” on the left upper corner character, 
after 

five 

seconds display disappear 

automatically. If you want to cancel the freeze, 
press [F4] key and then can return to normal, 
display “Unfreeze” on the left upper corner, 
after  five  seconds display will  disappear 
automatically. 
Recalling the Preset image Freeze:  By the 
OSD Menu “Image Freeze” to setrecalling the 
preset image freeze function. After the function 
is  opened, the screen will stay in before 
Recalling the Preset when Recalling the 
Preset, the screen can be switched to the 
preset position screen until the camera points 
to the preset position. 

19. Shortcut Set 

[*]+[

]+[1]: OSD menu default English 

[*]+[

]+[3]: OSD menu default Chinese 

[*]+[

]+[4]: Display currentIP address 

[*]+[

]+[6]: Quickly recover the default 

[*]+[

]+[8]: View the camera version 

[*]+[

]+[9]: Quickly set up inversion 

[*]+[

]+[MANUAL]: Restore default IP   

address 

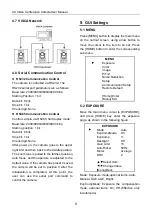
4.6  RS232 Interface 


No. 

Function 

DTR 

DSR 

TXD 

GND 

RXD 

GND 

IR OUT 

NC 

The correspondence between the camera and 

Windows DB-9 pin: 

Camera 

Windows DB-9 

1.DTR 

1.CD 

2.DSR 

2.RXD 

3.TXD 

3.TXD 

4.GND 

4.DTR 

5.RXD 

5.GND 

6.GND 

6.DSR 

7.IR OUT 

7.RTS 

8.NC 

8.CTS 


9.RI 

The correspondence between the camera and 

the Mini DIN pin: 

Camera 

Mini DIN 

1.DTR 

1.DTR 

2.DSR 

2.DSR 

3.TXD 

3.TXD 

4.GND 

4.GND 

5.RXD 

5.RXD 

6.GND 

6.GND 

7.IR OUT 

7.NC 

8.NC 

8.NC 

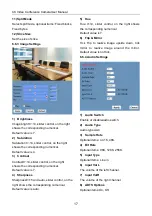
Содержание 4K-PTZ412A

Страница 1: ...t be cloned copied or translated without the permission of the company Product specifications and information which were referred to in this document are for reference only We may change delete or update any content at any time and without prior notice This is class A production Electromagnetic radiation at specific frequencies may affect the image quality of TV in home environment ...

Страница 2: ... VISCA Network 8 4 8 Serial Communication Control 8 5 GUI Settings 8 5 1 MENU 8 5 2 EXPOSURE 8 5 3 COLOR 9 5 4 IMAGE 9 5 5 P T Z 10 5 6 NOISE REDUCTION 10 5 7 SETUP 10 5 8 COMMUNICATION SETUP 10 5 9 RESTORE DEFAULT 11 6 Network Function 11 6 1 Operating Environment 11 6 2 Equipment Installation 11 6 3 Internet Connection 11 6 4 Camera Controlled by LAN 11 6 4 1 Setup IP Address 11 6 4 2 Visit Acce...

Страница 3: ...3 VLC Stream Media Player Monitor 13 6 6 Camera Parameter Setup 14 6 6 1 Homepage Introduction 14 6 6 2 Video Settings 16 6 6 3 Image Settings 17 6 6 4 Audio Settings 17 6 6 5 System Settings 18 6 6 6 Network Settings 18 6 6 7 Device Information 19 6 7 Download the Upgrade Program 19 7 Maintenance and Troubleshooting 19 ...

Страница 4: ...Mechanical damage may be caused by doing so Do not use in corrosive liquid gas or solid environment to avoid any cover plastic material damage Make sure there is no obstacle within rotation range Please never power on before installation is completed Do not Dismantle the Camera We are not responsible for any unauthorized modification or dismantling Specific frequencies of electromagnetic field may...

Страница 5: ...4K Video Conference CameraUser Manual ...

Страница 6: ...t U disk local storage local recording directly without NVR LowLight The application of 2D and 3D noise reduction algorithm greatly reduces image noise Even under the condition of ultra low illumination it still keep the picture clean and clear and the SNR of image is as high as 55dB Multiple Interfaces It supports HDMI2 0 HD output and also equipped with 3G SDI interface the effective transmissio...

Страница 7: ...res Video Compression H 264 MJPEG Video Stream First Stream Second Stream First Stream Resolution 3840x2160 1920x1080 1280x720 1024x576 960x540 640x480 640x360 Second Stream Resolution 1920x1080 1280x720 1024x576 720x576 50Hz support 720x480 60Hz support 720x408 640x360 480x270 320x240 320x180 Video Bit Rate 32Kbps 20480Kbps Bit Rate Type Variable Rate Fixed Rate Frame Rate 50Hz 1fps 50fps 60Hz 1f...

Страница 8: ...t Consumption 1 0A Max Operating Temperature 10 C 40 C Storage Temperature 40 C 60 C Power Consumption 12W Max MTBF 30000h Size 168 4 x 141 5 x 164 5mm Net Weight 1 35Kg 4 3 Interfaces and Buttons Item Name 1 AUDIO INInterface 2 LINE OUTInterface 3 System Select Switch 4 RS485 Interface 5 RS232 IN Interface 6 RS232 OUT Interface 7 Network Interface 8 HDMI Interface 9 USB 3 0 Interface 10 3G SDI In...

Страница 9: ...oom In or Zoom Out slowly Fast Zoom Zoom In or Zoom Out fast 8 Left Right Setting Key Press with 1 button and 2 button setting the direction of the Pan Tilt Simultaneously pressL R Set 1 STD set the Pan Tilt turn the same direction as the L R Set Simultaneously pressL R Set 2 REV set the Pan Tilt turn the opposite direction as the L R Set 9 Focus Key Used for focus adjustment Press AUTO adjust the...

Страница 10: ...o cancel the freeze press F4 key and then can return to normal display Unfreeze on the left upper corner after five seconds display will disappear automatically Recalling the Preset image Freeze By the OSD Menu Image Freeze to setrecalling the preset image freeze function After the function is opened the screen will stay in before Recalling the Preset when Recalling the Preset the screen can be sw...

Страница 11: ...as preset 0 saved the camera will be set to position 0 after the initialization is completed At this point the user can use the serial port command to control the camera 5 GUI Settings 5 1 MENU Press MENU button to display the main menu on the normal screen using arrow button to move the cursor to the item to be set Press the HOME button to enter the corresponding sub menu MENU Exposure Color Imag...

Страница 12: ...ress HOME key enter the color page as shown in the following figure COLOR WB Mode Auto RG Tuning 2 BG Tuning 1 Saturation 100 Hue 7 AWB Sens High Select Item Change Value Menu Back WB Mode White balance mode optional items Auto Indoor Outdoor One Push Manual VAR RG Tuning Red gain fine tuning optional items 10 10 Effective only in Auto One Push VAR mode BG Tuning Blue gain fine tuning optional ite...

Страница 13: ... items On Off Image Freeze Optional items On Off Digital Zoom Optional items Off 2x 4x 8x 16x Call Preset Speed Optional items 1 24 Pre Zoom Speed Optional items 0 7 5 6 NOISE REDUCTION Move the main menu cursor to NOISE REDUCTION and press HOME key enter the noise reduction page as shown in the following figure NOISE REDUCTION NR2D Level Auto NR3D Level Auto Select Item Change Value Menu Back NR2...

Страница 14: ...figure RESTORE DEFAULT Restore No Change Value Home OK Menu Back Restore Confirm restore factory settings optional items Yes No Note Press HOME button to confirm all parameter restore default include IR Remote address and VISICA address 6 Network Function 6 1 Operating Environment Operating System Windows 2000 2003 XP vista 7 8 10 Network Protocol TCP IP Client PC P4 128M RAM 40G HDD support scale...

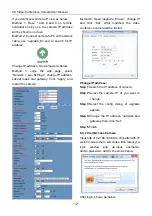
Страница 15: ...d gateway Click Apply and restart the camera Method 2 Open upgrade_En exe change IP and click Set After modified the video conference camerawill be restart Change IP address Step 1 Search the IP address of camera Step 2 Select the camera IP of you want to change Step 3 Select the config dialog of upgrade applets Step 4 Change the IP address netmask and gateway then click Set Step 5 Finish 6 4 2 Vi...

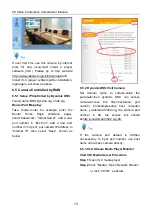
Страница 16: ...Server add a new port number in Ext Port add a new port number in Int port put camera IP address to Internal IP then select Save shown as below 6 5 2 Dynamic DNS Visit Camera Set domain name to camera setup the parameter then dynamic DNS can access camera Access link http hostname port number Forexample setup host computer name youdomain f3322 org the camera port number is 89 the access link shoul...

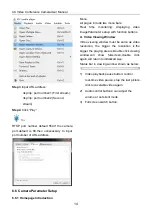
Страница 17: ...al time monitoring displaying video imageParameter setup with function buttons A Video Viewing Window Video viewing window must be same as video resolution the bigger the resolution is the bigger the playing area is Double click viewing window will show full screen double click again will return to initialized size Status bar in viewing window shown as below 1 Video playback pause button control r...

Страница 18: ...recall of these positions Type a number between 0 and 254 into the Preset box Click the Set button to save the current location with that preset number Click the Call button to cause the camera to return to that position This enables smooth quick and convenient control without the need to manually drive the camera You can set up preset that user want as below Method 1 Type a number into the Preset...

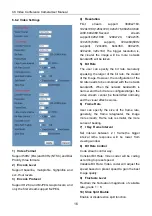
Страница 19: ...it rate the clearer of the image However the configuration of the bit rate needs to be combined with the network bandwidth When the network bandwidth is narrow and the bit rate is configuredlarger the video stream cannot be transmitted normally and the visual effect is worse 6 Frame Rate User can specify the size of the frame rate generally the frame rategreater the image more smooth Frame rate is...

Страница 20: ...value is 7 4 Sharpness Sharpness0 15 and auto slider control on the right shows the corresponding numerical Default value is auto 5 Hue Hue 0 14 slider control on the right shows the corresponding numerical Default value is 7 6 Flip Mirror Tick Flip to realize image upside down tick mirror to realize image around the mirror Default value is not tick 6 6 4 Audio Settings 1 Audio Switch Enable or di...

Страница 21: ...ebserver program using which port to transmit Whenport mapping need to be consistent with the port number default port 80 B RTSP Port The video conference camera support RTSP protocol use the VLC tools broadcast default port 554 C PTZ Port Support TCP connection then control camera default port 5678 D UDP Port Support UDP protocol default port 1259 3 Control Protocol Settings Setting the camera co...

Страница 22: ...uter detergent Do not use any type of solvents which may damage the surface Unqualified Application No shooting extreme brightobjectfor a long period of time such as sunlight light sources etc No operating in unstable lighting conditions otherwise image will be flickering No operating close to powerful electromagnetic radiation such as TV or radio transmitters etc Troubleshooting Image The monitor...

Страница 23: ...sk and gateway settings for video conference camera 4 Check whether the MAC address is conflicts 5 Check whether the web port is occupied by another device Forget the IP address or login password Please remember The default IP address 192 168 100 88 default user name admin default password admin Control Remote control cannot control 1 Check and replace the new battery for the remote controller 2 C...

Отзывы: