background image

37

Packaged and Split Rooftop Ventilator

© 2021 Mitsubishi Electric US, Inc.

Premi

Sys

Sequence of Operation

Optional Economizer

 - The economizer will be locked 

out when: the outside air is below economizer lockout; 
the unit is operating in dehumidification mode; or there 
is a call for heating.
 • 

Stop Wheel:

 When economizer mode is enabled 

and there is a signal for cooling, the wheel will stop 
rotating to allow free cooling.

 • 

Modulate Wheel:

 When economizer mode is 

enabled and there is a signal for cooling, the 
wheel VFD modulates wheel speed to maintain the 
discharge temperature set point.

Optional Frost Control

 - 

Polymer Wheel


The microprocessor controller will output a signal 
when wheel frosting is occurring which is determined 
by a temperature set point (OA <5°F – 2°F hysteresis, 
adjustable) and wheel pressure drop increase.
 • 

Preheat:

 When frosting is occurring, the preheater 

is energized to defrost the wheel. Once the 
pressure drop decreases below the set point, the 
preheater is de-energized.

 • 

Timed Exhaust:

 When frosting is occurring, the 

supply blower is cycled off. The exhaust blower 
shall continue to run, allowing the warm exhaust 
air to defrost the wheel. After the 5 minute cycle, 
the supply fan is re-energized to continue normal 
operation.

• 

Modulating Wheel:

 When frosting is occurring, 

the wheel VFD will reduce wheel speed to prevent 
condensation and frosting. If the outdoor air 
temperature is greater than the frost threshold 
temperature OR the pressure differential is less 
than the set point, the wheel will run at full speed. 
If the outdoor air temperature is less than the frost 
threshold temperature AND the pressure differential 
is greater than the set point, the wheel will run at 
reduced speed until the pressure differential falls 
below the set point. The temperature and pressure 
differential set points are set at the factory, but are 
field-adjustable. The VFD will be fully programmed 
at the factory.

Optional Polymer Energy Wheel

Start-Up

If selected, the energy wheel is installed in the unit with 
one half of the wheel in the outdoor airstream and one 
half in the exhaust airstream. The energy wheel includes 
air seals to minimize leakage between airstreams.

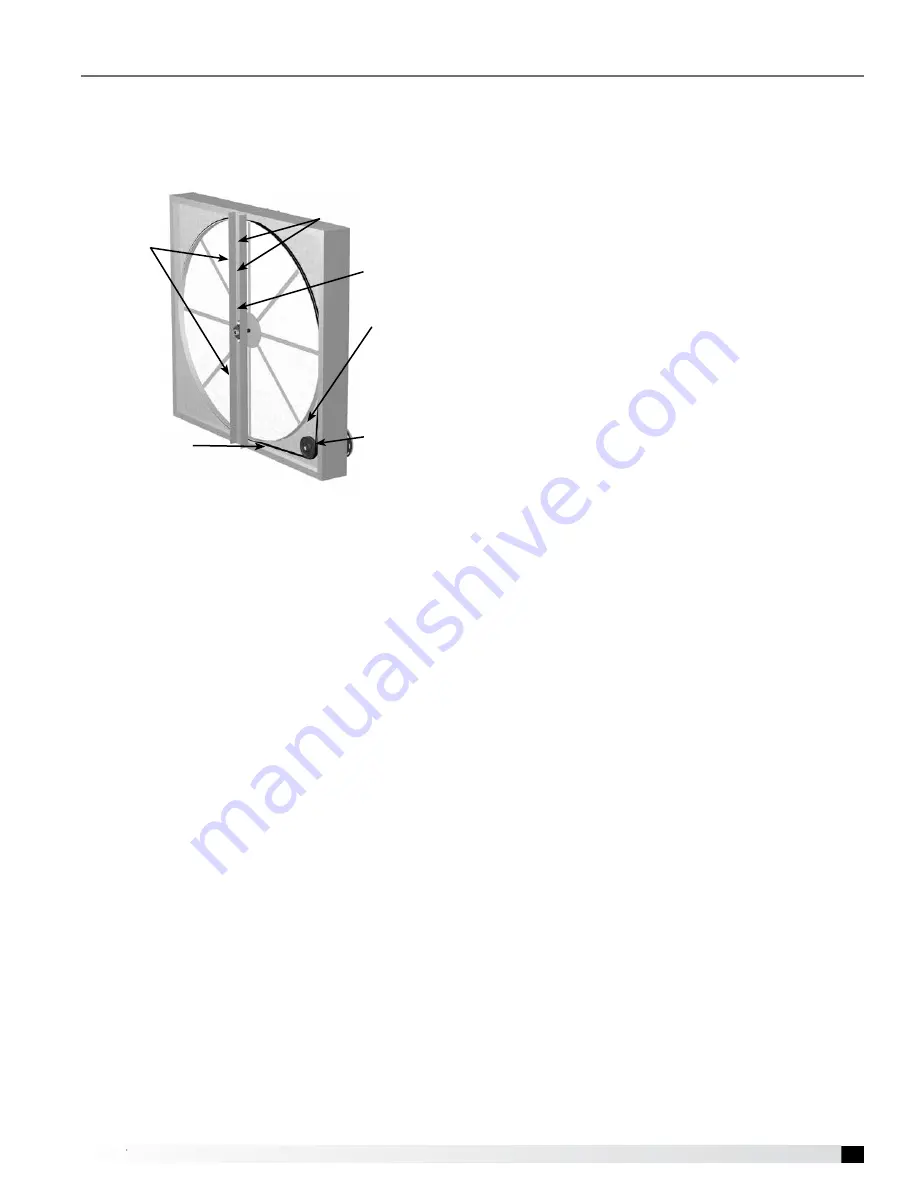
Drive Belt

Inspect the drive belt. Make sure the belt rides smoothly 
in the pulley and around the outside of the wheel. Note 
the directional arrow and data information shown in the 
image.

Adjust the Air Seals 

(Polymer wheels only)

The information below only applies to polymer wheels, 
which require air seal adjustment at the time of start-up 
for proper performance. Aluminum wheel air seals are 
factory-set and do not require field adjustment.
Make sure the unit power supply is locked out. 
Disconnect the wiring to the wheel module and pull 
the wheel cassette out of the cabinet on its tracks. 
Large cassettes are not removable. Then slowly rotate 
the wheel by hand to make sure there is no binding or 
misalignment. 
There is a perimeter seal located around the outside of 
the wheel and a diameter seal across the face of the 
wheel on both sides. Check to make sure that all air 
seals are secure and in good condition.
Adjust the air seals by loosening all the air seal retaining 
screws on the bearing support. Using a piece of paper 
as a feeler gauge, adjust the seals so they almost touch 
the face of the wheel while tugging slightly on the paper. 
When the wheel is rotated, there should be a slight tug 
on the paper. Tighten the screws, repeat the steps on 
the other set of seals.
Push the wheel cassette back into the unit and plug 
in the power connector. Turn the main power supply 
back on and then observe the operation of the wheel by 
opening the wheel access door slightly. Remove filters if 
necessary to observe the wheel.

Drive Belt

Adjustable 

Air Seals

Label 

showing 

cassette 

serial # and 

date code

Bearing 

Support

Drive Pulley

Retaining 

Screws

Содержание MP

Страница 1: ...CAUTION When servicing the unit the internal components may be hot enough to cause pain or injury Allow time for cooling before servicing Only qualified personnel should install and maintain this system Personnel should have a clear understanding of these instructions and should be aware of general safety precautions Improper installation can result in electric shock possible injury due to coming ...

Страница 2: ... Installation 14 Water Coil Piping Installation 15 Split DX Piping Installation 16 Control Center Components 20 Component Operation 21 Optional Component Operation 21 Factory Installed Refrigeration Systems 25 Start Up Unit 30 Start Up Components 35 Optional Polymer Energy Wheel 37 Optional Aluminum Energy Wheel 39 Troubleshooting 40 Routine Maintenance 49 Maintenance Procedure 50 Reference Rated ...

Страница 3: ...Remove any accumulations of dirt water ice or snow and wipe dry before moving to indoor storage To avoid condensation allow cold parts to reach room temperature Leave coverings loose to permit air circulation and to allow for periodic inspection The unit should be stored at least 3 in 89 mm off the floor Clearance should be provided to permit air circulation and space for inspection Outdoor The un...

Страница 4: ... Constant Air Volume CAV Variable Air Volume VAV and 100 Outdoor Air Safety Listing Models are listed per ANSI UL 1995 Heating and Cooling Equipment and are ETL Certified Models and Capacities Product Overview Model Cooling Capacity Packaged DX MP 0 1 3 to 7 tons MP 1 1 MPE 1 1 5 to 15 tons MP 2 1 MPE 2 1 15 to 30 tons MP 4 1 MPE 4 1 25 to 50 tons MP 5 1 MPE 5 1 30 to 70 tons Air Source Heat Pump ...

Страница 5: ...t All MPF models are standard with split DX cooling and the energy wheel Vestibule Some units may be ordered with a factory assembled vestibule that is to be field attached to the side of the unit See lifting instructions Blower Either one or two plenum type fans All units are equipped with a plenum fan for Supply Air and a second may be selected for Exhaust Relief Air Coils Packaged Evaporator co...

Страница 6: ...ical 3 Optional Gas Furnace Optional Electric Heater 4 Electrical 5 Supply Blower 6 Coil 7 Filters 8 Exhaust Blower Optional Electric Preheat 9 Powered Exhaust Blower Section When a powered exhaust fan or MPE is selected door 8 will be to the immediate right of door 7 W L H A 1 2 3 4 5 6 7 Housing size 5 1 1 2 3 4 5 6 7 Housing size 1 1 and 2 1 Housing size 4 1 L W H A 1 3 2 3 4 5 6 7 9 8 Housing ...

Страница 7: ...tom or Side Bottom End2 or Side1 End3 or Side1 MPE 2 1 15 30 72 5 68 2 163 2 197 24 27 1 30 1 5 100 MPE 4 1 25 50 101 3 98 199 65 233 84 47 5 NA 8 000 Bottom or Side End MPE 5 1 30 70 99 5 96 2635 3074 45 3 NA 10 450 Side All dimensions are shown in inches Weight is shown in pounds and includes largest supply and exhaust fans PDX with reheat largest indirect gas fired furnace and all dampers Actua...

Страница 8: ...SING SECTION NA from CS Model ACS Access Side CC Control Cabinet End OAI Outdoor Air Intake NA from Unit NA from Condensing Section NA from Piping Vestibule not shown Other Indoor Mounted with IG Furnace Outdoor Mounted Indoor Mounted MP 0 1 50 42 NA 36 NA 24 NA NA MP 1 1 40 42 72 42 18 24 18 30 MP 2 1 36 58 72 42 18 24 18 30 MP 4 1 48 48 NA 87 NA 48 NA NA MP 5 1 48 48 NA 60 NA 48 NA NA MPE 1 1 40...

Страница 9: ... Qty Supply Final Filters Pre coil Qty Outdoor Air WH Length Width Height MPF 1 1 22 1 149 5 52 5 59 3 2400 20x20x2 4 20x25x2 2 20x20x2 4 MPF 2 1 27 1 163 2 68 2 72 5 5100 25x25x2 16x25x2 4 16x25x2 8 All dimensions are shown in inches Weight shown in pounds Size and quantity is per airstream Based upon a 30 36 in energy wheel 16x25x2 quantity of 3 for 41 in energy wheel Based upon a 52 in energy w...

Страница 10: ...nits Packaged DX units require additional clearance because they must have unrestricted air movement around the condenser coil and condenser fans Hot air is being discharged from the condenser fans during operation Enough clearance must be provided to avoid recirculation or coil starvation When equipped with condenser coils the unit should never be placed under an overhang or inside a building A m...

Страница 11: ...ions Rooftop units require curbs to be mounted first The duct connections must be located so they will be clear of structural members of the building 1 Factory supplied roof curbs Roof curbs are model GKD which are shipped in a knockdown kit includes duct adapters and require field assembly by others on all housing sizes except MP 5 1 which are shipped assembled Assembly instructions are included ...

Страница 12: ... the width of the unit and extend beyond the unit a minimum of 12 inches on each side Set unit on rails Installation Ductwork Configurations NOTE Downblast Discharge Ductwork whenever downblast discharge is used the ductwork directly beneath the unit must be connected with either a T or an L configuration and the area directly beneath the heat source must not have any openings such as louvers or g...

Страница 13: ...ondensing unit with its own disconnect that requires a separate power feed from the unit Determine the Size of Electric Heater Wiring An optional electric heater may require a separate power supply The power connection should be made to the factory provided electric heater disconnect and must be compatible with the ratings on the nameplate supply power voltage phase and amperage Consult ANSI NFPA ...

Страница 14: ...ly Piping Connection Ground Joint Union 8 in Trap Gas to Controls From Gas Supply Bleeder Valve or 1 8 in Plugged Tap Gas Cock Gas Connections If this unit is equipped with an indirect gas fired furnace connection to an appropriate gas supply line will be required For complete information on installation procedures for the optional gas furnace refer the PVF PVG Indirect Gas Fired Heat Module Insta...

Страница 15: ... section of the unit The coil section is downstream of the energy wheel on the supply air side of the unit Optional hot water coil is located downstream of the supply fan on all models Water piping can be routed through the base of this unit if desired Piping vestibule is available for all models Water Coils 1 Piping should be in accordance with accepted industry standards Pipework should be suppo...

Страница 16: ...l thickness column are based on the Japanese standards and are provided only as a reference Use pipes that meet the local standards Split DX Piping Installation Piping Design Refrigerant Line Sizes DOAS Unit Refrigerant Line Connections in MPF 1 96 1 1 2 liquid 11 8 suction 1 MPF 1 144 1 1 2 liquid 11 8 suction MPF 2 144 1 1 2 liquid 11 8 suction MPF 2 192 1 5 8 liquid 13 8 suction 2 MPF 2 240 1 5...

Страница 17: ...e DOAS H OU under DOAS OU DOAS H OU above DOAS H OU under DOAS A S T Outdoor Twinning Kit CMY Y100CBK3 h2 OU Piping Length Item Piping in the figure Max length m ft Max equiv length m ft Max piping length A S T 15 50 1 15 50 1 Height between OU and OU h2 0 1 0 3 Height between OU and DOAS OU above DOAS H 15 50 Height between OU and DOAS OU under DOAS H1 15 50 OU Outdoor Unit DOAS Dedicated Outdoor...

Страница 18: ...f liquid pipe sized 9 52 3 8 in Additional Charge for OD Unit DOAS Charge Outdoor Unit Amount PUHY P96T YKMU 2 kg 71 oz kg oz m x 0 20 kg m ft x 2 16 oz ft m x 0 12 kg m ft x 1 3 oz ft m x 0 06 kg m ft x 0 65 oz ft PUHY P144T YKMU 8 kg 283 oz PUHY P192T YSKMU 8 kg 283 oz PUHY P240T YSKMU 16 kg 566 oz PUHY EP96T YNU 0 kg 0 oz PUHY EP144T YNU 0 kg 0 oz PUHY EP192T Y S NU twinned model 14 kg 494 oz P...

Страница 19: ... x 1 3 oz ft PUHY P144T YKMU 8 kg 283 oz oz PUHY P192T YSKMU 8 kg 283 oz PUHY P240T YSKMU 16 kg 566 oz TOTAL additional refrigerant charge 42 x 1 30 oz ft 55 oz 71 oz 179 oz 305 oz Dimensions mm in Housing Size Coil Size A B C D MPF 1 1 40 x 35 345 13 57 438 17 23 1377 54 21 1369 53 90 MPF 2 1 32 x 45 658 25 91 627 24 68 1636 60 46 1472 57 97 50 x 45 388 15 28 449 17 66 1455 57 27 1445 56 88 Split...

Страница 20: ... 15 Wheel pressure switch 16 Outdoor airflow monitor 17 Exhaust airflow monitor 18 Digital scroll controller Optional Indirect Gas Fired Furnace Note In some models two furnaces are installed to provide greater output When two furnaces are installed they are in parallel and both will operate at the same time and the same output Both furnaces will have identical controls 1 Single stage valve 2 Modu...

Страница 21: ...ered by the fan to maintain room air temp at a desired set point Optional 0 10 VDC by others to VFD Supply fan is modulated by a 0 10 VDC field provided by others Component Operation Exhaust Fan VFD Sequence Optional Building Static Pressure Sensor The exhaust fan is modulated based upon the signal from a building static pressure sensor The microprocessor will modulate the exhaust fan based upon a...

Страница 22: ...complished using two thermal dispersion sensors that accurately measure airflow velocity down to zero feet per minute fpm The airflow controller takes the average measurement for two sensor configurations and determines the outdoor airflow rate based on the effective intake area Field calibration of the outdoor airflow monitoring device determines the effective intake area of the unit For addition...

Страница 23: ...edlepoint Bipolar Ionization NPBI Needlepoint bipolar ionizers are mounted on the fan inlet cone s and provide air disinfection The ionizers are factory powered and are on when there is power to the unit disconnect Frost Control Extremely cold outdoor air temperatures can cause moisture condensation and frosting on the energy recovery wheel Frost control is an optional feature that will prevent co...

Страница 24: ... If the pressure drop across the filters exceeds the set point the sensor will close a set of contacts in the unit control center Field wiring of a light or other alarm to these contacts will notify maintenance personnel when filters need to be replaced The switch has not been set at the factory due to external system losses that will affect the switch This switch will need minor field adjustments...

Страница 25: ...ceiver Optional 9 Liquid Line Filter Drier 10 Sight Glass 11 Fan Cycle Switch es The switch es open or close based on liquid refrigerant pressure to control the condensing fans to maintain liquid pressure 12 Thermostatic Expansion Valve TXV Each unit is equipped with a TXV on each refrigerant circuit The valve controls the flow of liquid refrigerant entering the evaporator coil by maintaining a co...

Страница 26: ...tion System Components Air Source Heat Pump with Three Way Hot Gas Reheat 4WV Outdoor Coil Indoor Coil Outdoor Airflow Hot Gas Reheat Coil Supply Airflow Compressor PT HRV LPS SG SG EXV FDS HPS SV HCV ACC 4WV Outdoor Coil Indoor Coil Outdoor Airflow Supply Airflow Compressor PT LPS SG SG TXV FDS HPS SV ACC PT ...

Страница 27: ...uit is equipped with a reversing valve to reverse the direction of refrigerant flow switching the unit between heating and cooling mode 12 Electronic Expansion Valve EXV or Thermostatic Expansion Valve TXV An expansion valve is provided on each refrigerant circuit This valve controls the flow of liquid refrigerant entering the indoor and outdoor coils by maintaining a constant superheat The TXV is...

Страница 28: ...t DX 1 4a 3 5 2 10 GAS PIPE 7 6 8 9 LIQUID PIPE 1 4a 3 5 2 10 GAS PIPE 7 6 8 9 LIQUID PIPE 4b MPF 2 192 240 1 1 Evaporative Coil 2 Gas Pipe Thermistor 3 Liquid Pipe Thermistor 4a Linear Expansion Valve 4b Linear Expansion Valve 5 Strainer 6 Solenoid Valve 7 Solenoid Valve 8 Reheat Coil 9 Strainer 10 Reheat Pipe Thermistor MPF 1 96 144 MPF 2 144 1 ...

Страница 29: ...pansion Valve LEV3a DC 12V Stepping motor drive port dimension ø6 4 0 1400 pulse at R410A outdoor unit Linear Expansion Valve LEV3b DC 12V Stepping motor drive port dimension ø6 4 0 1400 pulse at R410A outdoor unit M Net Terminal Block TB5 M1 M2 S 250V 20A MODBUS Terminal Block TB485 G 250V 20A Split DX Electrical Parts Specification Refrigeration Control Split DX Component Operation Function of t...

Страница 30: ...oor temperature is below 40ºF Do not short cycle the compressor Allow 5 minutes between on cycles to prevent compressor damage DX system is charged with refrigerant Start up must be performed by EPA Certified Technician Every installation requires a comprehensive start up to ensure proper operation of the unit As part of that process the following checklist must be completed and information record...

Страница 31: ...er for each standard or digital scroll compressor The variable speed compressor uses internal stator heating Each compressor needs power supplied to it 24 hours prior to start up If start up is scheduled in 24 hours unlock the disconnect power and energize unit o Compressor shipping brackets are removed if provided SPECIAL TOOLS REQUIRED Voltage Meter with wire probes Amperage Meter Pressure Gauge...

Страница 32: ...st Fan Yes No Energy Wheel Motor if equipped L1 Amps L2 Amps L3 Amps Condensing Fans PDX only Condensing Fan 1 L1 Amps L2 Amps L3 Amps Condensing Fan 2 L1 Amps L2 Amps L3 Amps Condensing Fan 3 L1 Amps L2 Amps L3 Amps Condensing Fan 4 L1 Amps L2 Amps L3 Amps Condensing Fan 5 L1 Amps L2 Amps L3 Amps Condensing Fan 6 L1 Amps L2 Amps L3 Amps Condensing Fan 7 L1 Amps L2 Amps L3 Amps Condensing Fan 8 L1...

Страница 33: ... Deg F Superheat Housing 5 Should be between 10º and 20ºF 0 reheat or should be between 10º and 30ºF 100 reheat Deg F Deg F Deg F Deg F Subcooling Housing 5 Should be between 10º and 15ºF 0 reheat or should be between 2º and 10ºF 100 reheat Deg F Deg F Deg F Deg F Discharge Pressure Should be between 300 and 500 PSIG PSIG PSIG PSIG PSIG Suction Line Pressure Should be between 100 and 135 PSIG PSIG...

Страница 34: ...Line Temp Deg F Deg F Suction Line Temp Deg F Deg F Moisture Indicating Sight Glass Liquid Visible Yes No Yes No Color of Center Dot Purple Pink Purple Pink Heating Superheat Should be between 10º and 20ºF Deg F Deg F Subcooling Should be between 10º and 20ºF Deg F Deg F Discharge Pressure Should be between 250 and 500 PSIG PSIG PSIG Suction Line Pressure Should be between 96 and 155 PSIG PSIG PSI...

Страница 35: ...n RPM All access doors must be installed except the control center door Vibration Excessive vibration may be experienced during initial start up Left unchecked excessive vibration can cause a multitude of problems including structural and or component failure The most common sources of vibration are listed Many of these conditions can be discovered by careful observation Refer to the Troubleshooti...

Страница 36: ... and press ENTER 7 Set number of flows and press ENTER 8 Set flow and press ENTER 9 Set flow to actual CFM measured by Test and Balance and press ENTER 10 Wait for calibration before cycling power 11 Proceed to Communication Setup Communication Setup 1 Press the UP and DOWN keys at the same time for 3 seconds 2 When SETUP appears on the screen press ENTER 3 Scroll DOWN twice to the NETWORK menu an...

Страница 37: ... points are set at the factory but are field adjustable The VFD will be fully programmed at the factory Optional Polymer Energy Wheel Start Up If selected the energy wheel is installed in the unit with one half of the wheel in the outdoor airstream and one half in the exhaust airstream The energy wheel includes air seals to minimize leakage between airstreams Drive Belt Inspect the drive belt Make...

Страница 38: ... possible If the wheel should rotate when a clip is open the clip will jam against the bearing support bar and could cause damage Cleaning Maintenance or cleaning of the wheel segments should be done with the segments removed from the wheel cassette to avoid splashing liquids or cleaning agents inside the cabinet If the energy wheel appears excessively dirty it should be cleaned to ensure maximum ...

Страница 39: ...l media collects a layer of smoke residue or an oil film the energy transfer efficiency drops The main factor in the frequency of cleaning is the cleanliness of the air If air filters are not changed frequently the wheel will collect contaminants and will then have to be cleaned Cleaning Accumulation of dust or particles on the surface of the wheel can typically be vacuumed purged with compressed ...

Страница 40: ...will not reset until a hard restart is performed See the unit specific manufacturer s manual supplied with the unit VFDs are located in the main control center Optional Digital Scroll Compressor Controller Present only if packaged DX with digital scroll option is selected The controller has three LED indicator lights One is green indicating that it has power one is an alarm indicator that will fla...

Страница 41: ...r linkage or replace damper motor System static pressure too high Improve ductwork to eliminate losses using good duct practices Blower speed too low Check maximum motor RPM and compare with catalog data Verify that external control wiring is in place if required Fan wheels are operating backwards For 3 phase see Direction of Fan Wheel Rotation Direction in Start Up Components section Dirty filter...

Страница 42: ...tripped breaker Check for reason and repair Replace fuse after correcting problem Low line voltage Check line voltage If more than 10 from compressor marking correcting is necessary Compressor motor protector open Motor thermal protector automatically resets Allow time 2 hours for compressor to cool down so protector will reset Restart and check for reason overheat occurred Compressor defective Ch...

Страница 43: ...w compressor to cool for two hours Recheck for open circuit Improper refrigerant charge Check subcooling Improperly wired Review wiring schematics Loose wiring Check all connections Defective start relay Replace relay Motor windings damaged Verify amp draw Compressor hums but will not start Improperly wired Review wiring schematics Low line voltage Check voltage Loose wiring Check all connections ...

Страница 44: ...er clearances and possible air recirculating Clean coil Condenser fan motor defective Check condenser fan motor Too much refrigerant Check subcooling Remove excess refrigerant Non condensable in system Remove non condensable from system Dirty condenser coil Clean condenser coil Condenser fan not running or running backwards Check electrical circuit and fuse Check fan cycling controls High load con...

Страница 45: ...pressure control settings Refrigerant flood back Check thermal expansion valve setting Check for refrigerant overcharge Check crankcase heater operation Reheat flush cycle inadequate Contact factory Not enough capacity or lack of performance Refrigeration undercharged Check subcooling Adjust charge if necessary Dirty filter or evaporating coil Check filter coil and airflow Dirty or clogged condens...

Страница 46: ...5 1 273 t 1 273 0ºC 32ºF 15kΩ 10ºC 50ºF 9 7kΩ 20ºC 68ºF 6 4kΩ 25ºC 77ºF 5 3kΩ 30ºC 86ºF 4 3kΩ 40ºC 104ºF 3 1kΩ Linear Expansion Valve 1 2 3 4 5 6 LEV White Yellow Orange Blue Red Brown CN60 CNLEV2 Disconnect the connector then measure the resistance between terminals with a tester Normal Abnormal 1 5 White Red 2 6 Yellow Brown 3 5 Orange Red 4 6 Blue Brown Open or short 200 kΩ 10 Solenoid valve co...

Страница 47: ...en the LEV opening angle does not change all the output phases will be off 2 When the output is open phase or remains ON the motor cannot run smoothly and rattle and vibrates 3 LEV Valve Closing and Opening Operations Valve opening refrigerant flow rate Valve closed Valve open E B 80 100 pulses Pulses Fully open 1400 pulses A C D When the power is turned on the valve closing signal of 2200 pulses ...

Страница 48: ...tester They are normal if resistance is 200 ohm 10 Replace the LEV coils Faulty wire connections in the connector or faulty contact 1 Check for loose pins on the connector and check the colors of the lead wires visually 2 Disconnect the control board s connector and conduct a continuity check using a tester Check the continuity at the points where an errors occurs Solenoid Valve Judgement methods ...

Страница 49: ...s manual to record each maintenance session and observations and then establish a maintenance schedule that is appropriate for the installation The following is provided as a guideline Maintenance Frequency Monthly 1 External Filter Clean metal mesh filters 2 Internal Filters Replace MERV 8 filters monthly Adjust replacement schedule for MERV 13 and MERV 14 or other filters as inspection requires ...

Страница 50: ...ust be pleated design with integral metal grid Two acceptable filter replacements are Aerostat Series 400 or Farr 30 30 Filters upstream of the coil should be checked regularly If the filters are dirty they should be cleaned or replaced It is important the filters stay clean to maintain desired airflow WARNING REFER TO GENERAL SAFETY INFORMATION Do not operate this unit without the filters and bir...

Страница 51: ...4 20x20 4 row DX coil 6 20x24 6 20x20 MP 5 1 50 60 70 tons 8 20x25x1 NA NA 6 20x24 6 20x20 MPE 1 1 4 20x20x2 2 20x25x2 2 20x25x2 4 20x20 MPE 2 1 4 25x25x2 4 16x25x2 4 16x25x2 8 16x25 MPE 4 1 12 16x20x2 8 20x24 8 20x24 8 20x20 4 16x20 MPE 5 1 30 40 tons 8 20x25x1 9 20x24x2 3 20x20x2 6 20x24x2 2 20x20x2 6 row DX coil 4 20x24 4 20x20x 4 row DX coil 6 20x24 6 20x20 MPE 5 1 50 60 70 tons 8 20x25x1 9 20...

Страница 52: ... 3775 MP 1 1 15D 3775 MP 1 1 15A 4300 MP 2 1 15I 4100 MP 2 1 15D 4100 MP 2 1 15A 4800 MP 2 1 17 5I 4650 MP 2 1 17 5D 4650 MP 2 1 17 5A 5500 MP 2 1 20I 4900 MP 2 1 20D 5100 MP 2 1 20A 6400 Model Airflow SCFM MP 2 1 25I 5750 MP 2 1 25D 5600 MP 2 1 25A 7200 MP 2 1 30I 6000 MP 2 1 30D 6000 MP 2 1 30A 7000 MP 4 0 25D 6500 MP 4 0 30D 7000 MP 4 0 30S 7000 MP 4 0 35D 7000 MP 4 0 43D 8100 MP 4 1 25I 8300 M...

Отзывы: