


Page 20
For technical questions, please call 1-888-866-5797.
ITEM 58169
SAFETY
SETU
p
Op
ERA
TION
M
AINTENANCE
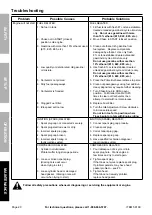
Troubleshooting
problem
possible Causes
probable Solutions
Engine will not start
FUEL RELATED:
1. No fuel in tank.
2. Choke not in START (closed)
position, cold engine.
3. Gasoline with more than 10% ethanol used.
(E15, E20, E85, etc.)
4. Low quality or deteriorated, old gasoline/
oil mixture.
5. Carburetor not primed.
6. Dirty fuel passageways.
7. Carburetor is flooded.
8. Clogged Fuel Filter.
9. Idle speed set too low.
FUEL RELATED:
1. Fill fuel tank with fresh 87+ octane stabilizer-
treated unleaded gasoline/2-cycle oil mixture
only.
Do not use gasoline with more
than 10% ethanol (E15, E20, E85, etc.).
2. Move Choke to START (closed) position.
3. Clean out ethanol rich gasoline from
fuel system. Replace components
damaged by ethanol. Use only fresh
87+ octane stabilizer-treated unleaded
gasoline/2-cycle oil mixture only.
Do not use gasoline with more than
10% ethanol (E15, E20, E85, etc.).
4. Use fresh 87+ octane stabilizer-treated
unleaded gasoline/2-cycle oil mixture only.
Do not use gasoline with more than
10% ethanol (E15, E20, E85, etc.).
5. Press the Prime Bulb several times to prime.
6. Clean out passageways using fuel additive.
Heavy deposits may require further cleaning.
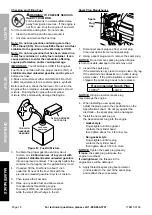
7. Turn Choke Knob to RUN (open)
position. Pull Starter Handle 10-20
times to clear out Carburetor, then
attempt to start with normal process.
8. Replace Fuel Filter.
9. Turn the Idle Adjustment Screw clockwise
to increase idle speed.
Do not turn too far to position where
Tines begin to rotate with Engine idling.
IGNITION (SPARK) RELATED:
1. Spark plug cap not connected securely.
2. Spark plug electrode wet or dirty.
3. Incorrect spark plug gap.
4. Spark plug cap broken.
5. Incorrect spark timing or
faulty ignition system.
IGNITION (SPARK) RELATED:
1. Connect spark plug cap properly.
2. Clean spark plug.
3. Correct spark plug gap.
4. Replace spark plug cap.
5. Have qualified technician diagnose/
repair ignition system.
COMPRESSION RELATED:
1. Cylinder not lubricated.
Problem after long storage periods.
2. Loose or broken spark plug.
(Hissing noise will occur
when trying to start.)
3. Loose cylinder head or damaged
head gasket. (Hissing noise will
occur when trying to start.)
COMPRESSION RELATED:
1. Pour tablespoon of 2-cycle oil into
spark plug hole. Crank engine a
few times and try to start again.
2. Tighten spark plug.
If that does not work, replace spark plug.
If problem persists, may have head
gasket problem — see #3.
3. Tighten head.
If that does not remedy problem,
replace head gasket.
Follow all safety precautions whenever diagnosing or servicing the equipment or engine.


