background image

page 2

Before beginning any fitness program, you should have a complete physical
examination by your personal physician. You should also review this manual
and become familiar with how to use the M9.3s Low-Impact Treadmill.  Read
and observe the following guidelines when using this treadmill:

Read the Owner’s Manual and follow all instructions.

Assemble and operate the M9.3s treadmill on a solid, level surface. Locate
the treadmill at least 4 feet from walls or furniture. Keep the area behind the
treadmill clear.

Never allow children on or near the M9.3s treadmill. Never leave children
unsupervised around the treadmill.

Check the M9.3s treadmill before each use. Do not use the treadmill if it is
not completely assembled or is damaged in any way.

Keep hands away from moving parts.

Do not use the M9.3s treadmill if you weigh over 250 pounds. The M9.3s
treadmill is built to handle persons up to 250 pounds at speeds up to 9
mph.

Wear proper exercise clothing and shoes for your workout—no loose
clothing. Do not wear shoes with heels or leather soles. Check the soles of
your shoes and remove any embedded stones. Tie long hair back.

Keep all loose clothing and towels away from the treadmill running surface.
A treadmill running belt will not stop immediately if an object becomes
caught in the belt or rollers.

Use the clip provided to attach the magnetic safety key to your clothing
before each workout. By pulling on this key, you can easily stop the running
belt if you encounter difficulties or want to end your workout.

Note: You need to place the magnetic safety key on the ACTIVATE posi-
tion of the electronic console before you can turn on the treadmill.

Use care when getting on or off the M9.3s treadmill. Use the handrails
whenever possible. Do not get on or off the treadmill when the running belt
is moving.

Before starting the running belt, straddle the belt by placing your feet firmly
on the right and left staging platforms. You should also step off the belt and
onto the staging platforms after turning off the running belt.

Never turn ON the treadmill when someone is standing on the machine.

Safety Information

Содержание M9.3s

Страница 1: ...page 1 Owner s Manual Low Impact Treadmill R USA R...

Страница 2: ...d shoes for your workout no loose clothing Do not wear shoes with heels or leather soles Check the soles of your shoes and remove any embedded stones Tie long hair back Keep all loose clothing and tow...

Страница 3: ...the running belt to come to a complete stop before adjusting or working near the rear roller Do not make any adjustments to the running belt when someone is standing on the machine This treadmill is...

Страница 4: ...e Tips for Using Interval Mode 13 Working Out on the M9 3s Treadmill 14 Using a Pre Programmed Course 14 Using Interval Mode 17 Selecting the Time or Distance Prompt 19 Adjusting the Stiffness of the...

Страница 5: ...hould encounter a problem during your workout you can stop the treadmill by pulling on the cord attached to the magnetic safety key Built with the highest quality materials the M9 3s Low Impact Treadm...

Страница 6: ...ewalls of the box and slide the running bed assembly from the box rather than lifting the running bed assembly from the box After unpacking the treadmill open the hardware kit and make sure that you h...

Страница 7: ...standard 120 volt household outlet Precor recommends that you plug the treadmill into an outlet with a dedicated 20 amp circuit breaker The treadmill is equipped with a 20 amp circuit breaker to prot...

Страница 8: ...g bolts on the running bed with the four keyholes in the control panel assembly Place the control panel assem bly onto the mounting bolts making sure to feed the excess ribbon cable into the frame rai...

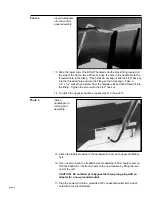
Страница 9: ...e upper handrails use a flathead screwdriver to remove the 1 bolt from the RIGHT side of the upper control panel assembly Note LEFT and RIGHT are determined while standing behind the tread mill facing...

Страница 10: ...socket head screw from the hardware kit and hand thread it into the fitting Tighten the screw with the 5 32 hex key 14 To attach the opposite handrail repeat steps 10 through 13 15 Attach the labels p...

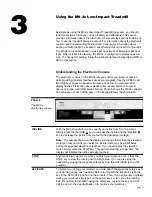
Страница 11: ...ation of each of the keys on the keypad follows the photograph 3 INCLINE With the M9 3s treadmill you can specify an incline from 0 to 10 percent Simply press the INCLINE key to increase the incline a...

Страница 12: ...the speed display returns to the per hour measurement you originally chose mph or kph Pre Programmed Courses The M9 3s treadmill offers a series of ten pre programmed courses These courses are design...

Страница 13: ...decrease your workload using both speed and incline The microprocessor remembers the incline you set for each interval and returns to that incline at the beginning of the next interval At any point d...

Страница 14: ...l you must reset the speed for that inter val In this example you would not need to reset the speed for the Work interval since the microprocessor will remember the previously specified speed Ending Y...

Страница 15: ...Manual MAN L Interval INTV or one of the ten pre programmed courses Press the arrow keys until you see the desired mode or course then press SCAN ENTER Since these instructions explain how to use a p...

Страница 16: ...n the desired distance is shown If you see Select Time scroll across the display specify the length of your workout Press the arrow keys to choose time the display moves in 1 minute increments from 5...

Страница 17: ...d left staging platforms Stand close enough to the electronic console so you can extend your arms and touch the keypad 3 Using the clip provided securely attach the magnetic safety key to your exercis...

Страница 18: ...ed and Incline is shown Then let go of the handrail and continue working out you do not need to press SCAN ENTER You can specify a speed up to 9 miles an hour The microprocessor remembers the specifie...

Страница 19: ...you see Enter Weight scroll across the display press the SPEED key and SCAN ENTER key simultaneously 5 When you see Press for MPH or for KPH press the SPEED key If you are using kilometers press the...

Страница 20: ...n select the level that suits your exercise style the best Important Do not adjust the bed impact reduction level when someone is standing walking or running on the treadmill Be sure to turn OFF the t...

Страница 21: ...he running belt is correctly aligned Correct alignment is critical to the smooth and safe operation of the treadmill For more information see Aligning the Running Belt 1 Place the magnetic safety key...

Страница 22: ...unqualified person will not be able to activate the treadmill Specifying MPH or KPH The M9 3s Low Impact Treadmill can display speed in miles per hour mph or kilometers per hour kph When the M9 3s is...

Страница 23: ...er can provide useful advice on training technique and exercise physiol ogy Your retailer can also recommend good books on these subjects Getting the Most Out of Your Workout 4 Diagram 2 Muscles in th...

Страница 24: ...0 35 30 25 20 80 90 100 110 120 130 150 140 160 170 180 190 200 Advanced Intermediate Beginner HEART RATE TRAINING ZONES To determine your heart rate take your pulse at a place that you can reach easi...

Страница 25: ...el The higher your fitness level the longer your should maintain your heart rate in the training zone between 20 and 30 minutes Beginners should always start slowly and gradually get their sessions up...

Страница 26: ...OFF the treadmill and unplug the power cord before cleaning Before a workout use a damp soft cloth to clean the staging platforms running bed and under the belt as far as you can easily reach This re...

Страница 27: ...ill not stop immediately if any object becomes caught in the belt or rollers The M9 3s Low Impact Treadmill is designed to carry people who weigh up to 250 pounds at speeds from 5 to 9 miles per hour...

Страница 28: ...e result If you overcorrect turn the screw in the opposite direction Refer to Photo 9 7 Once the belt is properly aligned press the STOP key to stop the belt Getting Service Do not attempt to service...

Страница 29: ...ated P O Box 3004 Bothell WA USA 98041 3004 P N 33045 102 6 92 USA R Precor and M registered trademarks of Precor Incorporated 1990 Precor Incorporated Rd 1990 Specifications subject to change without...

Отзывы: