Precor M9.20 Скачать руководство пользователя страница 35

page 35

How Hard Should I Exercise?

Studies show that to achieve the benefits of aerobic exercise, it is necessary to
work out hard enough to raise your heart rate to a certain minimum level, called
the “training zone.” Your training zone depends on your age and level of
fitness.

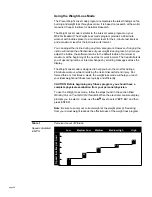
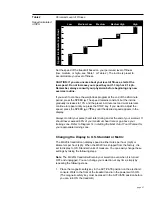
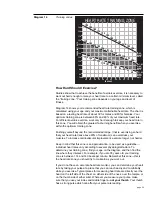
Diagram 14 shows your recommended heart rate training zone, which is
calculated using your age and your maximum attainable heart rate. The chart is
based on a resting heart rate of about 72 for males and 80 for females. Your
optimum training zone is between 65% and 80% of your maximum heart rate.
For efficient aerobic exercise, work only hard enough to keep your heart rate in
this zone. You will obtain the greatest fat-burning benefits when you exercise
within the optimum training zone.

Pushing yourself beyond the recommended range, (that is, exercising so hard
that your heart rate rises above 80% of maximum) can overstress your
muscles. To increase cardiovascular improvement, exercise 

longer, not harder.

Keep in mind that this zone is an approximation, to be used as a guideline—
individual heart rates vary according to several physiological factors. To
determine your training zone, find your age on the diagram, and then find the
line where they intersect. For example, if you are 35 years old, your training
zone is between 114 and 140 beats per minute. Remember this zone—this is
the heart rate zone you should try to maintain as you work out.

If you do not have an accurate heart rate monitor, you can determine your heart
rate by taking your pulse at a place that you can reach easily and comfortably
while you exercise. Typical places for measuring heart rate are directly over the
heart on the left side of the chest, on either side of the neck, over the temple, or
on the thumb side of either wrist. Wherever you measure your pulse, make
sure that you use your index and middle fingers—not your thumb. Your thumb
has a strong pulse which can affect your pulse rate reading.

Diagram 14

Training zones

HEART RATE TRAINING ZONE

70

80

90

100

110

120

130

140

150

160

170

180

190

20

25

30

35

40

45

50

55

60

65

70

75

YOUR AGE

YOUR HEAR

T RA

TE

MAX.
HEART
RATE

80% OF
MAX.
HEART
RATE

65% OF
MAX.
HEART
RATE

124

120

114

110

107

104

101

98

91

152

148

140

136

132

128

124

120

116

112

180

175

170

165

160

155

150

145

140

135

RECOMMENDED TRAINING ZONE

88

117

144

108

94

185

190

Содержание M9.20

Страница 1: ...page 1 0 R Owner s Manual Low Impact Treadmill 0 R USA R...

Страница 2: ...tructions To reduce the risk of burns fire electric shock or injury to persons take the following precautions The M9 20 or M9 20s treadmill should never be left unattended when plugged in Unplug the t...

Страница 3: ...rocess trips a circuit breaker which turns OFF the treadmill and stops the running belt Assemble and operate the M9 20 or M9 20s treadmill on a solid level surface Locate the treadmill at least 4 feet...

Страница 4: ...alled and used in accordance with the owner s manual instructions may cause harmful interference to radio communications However there is no guarantee that interference will not occur in a particular...

Страница 5: ...outlet or power transformer If the treadmill must be reconnected for use on a different type of electrical circuit the reconnection should be made by qualified service personnel Proper grounding plug...

Страница 6: ...20 s Treadmill 22 Using the Manual Course Mode 24 Changing the Interval Course Profile 24 Using the Weight Loss Mode 26 Changing the Display to U S Standard or Metric 27 Selecting the Time or Distanc...

Страница 7: ...body The M9 20 Low Impact Treadmill offers an easy to understand electronic console that gives motivating feedback about your workout Professionally designed exercise options incorporate the latest in...

Страница 8: ...weighs over 160 pounds To avoid injury and to ensure the safety of the unit and yourself get adequate assistance before dropping the sidewalls of the box and sliding the running bed assembly out of t...

Страница 9: ...5 32 hex key upper and lower handrail clamp I one 3 16 hex key frame to base bolts J one 1 4 hex key belt tracking and tension adjustment K two lower handrail clamps L one magnetic safety key If any...

Страница 10: ...readmill on deeply padded plush or shag carpeting due to possible damage to the carpet and machine If the treadmill is installed in a carpeted area place a piece of heavy cardboard plywood or other so...

Страница 11: ...he hood of the treadmill as shown in Diagram 2 helps elevate the treadmill and keep pressure off the hood and side rail during assembly Due to the rounded corners on the side rail one assistant will n...

Страница 12: ...vis pin head of the clevis pin should be toward the rear of the treadmill through both holes and re attach the hitch pin Note The lift is elevated to a 1 percent incline for ease of assembly The funct...

Страница 13: ...nto its receptacle Align the tab on the ribbon cable connector with its counterpart located on the receptacle and plug the connector into the receptacle using your fingers as shown in Diagram 5 The pl...

Страница 14: ...the limited warranty 19 Insert the upper end of a handrail into the upper handrail clamp until the black foam wrap just touches the clamp as shown in Diagram 7 Repeat this step for the other handrail...

Страница 15: ...her E on the lower handrail clamp screw D align the screw holes and finger tighten the screw e To secure the handrail inside the clamp use the hex key H provided Do not overtighten the screw or damage...

Страница 16: ...ted warranty d While maintaining alignment attach the trim by pressing firmly against the lift column until the hook and loop pads fasten securely to each other 24 If you need to move the treadmill as...

Страница 17: ...ual mode and press SCAN ENTER 3 Continue standing next to the treadmill and bring the running belt up to a speed of 2 miles per hour by pressing the SPEED key CAUTION If you hear or notice any chafing...

Страница 18: ...how you what information is being displayed Information from five distinct fields as shown in Diagram 10 can appear DISTANCE TIME SPEED CALORIES and INCLINE Note The M9 20 electronic console is very s...

Страница 19: ...mph or kilometers per hour 8 to 14 kph If you wish to change the display you can follow the instructions found in Changing the Display to U S Standard or Metric When you enter your accurate weight the...

Страница 20: ...PEED CALORIES and INCLINE alternately appear in sequence every few seconds A pair of lights next to the word SCAN indicates that you are in SCAN mode Another pair of lights on the display indicate whi...

Страница 21: ...terval Mode you can cool down before ending your workout by changing to Manual Mode simply press STOP twice in quick succession To reset the displays on your treadmill press and hold the HOLD TO RESET...

Страница 22: ...he magnetic safety key to your clothing before each workout Then if you encounter difficulties or want to end your workout you can easily stop the running belt by pulling on the cord Gently stretch yo...

Страница 23: ...Press the keys until you see the desired mode or course number appear on the display then press ENTER For more information about the different modes read the following pages Once you specify the mode...

Страница 24: ...ss much sooner with less effort Studies also show that people who interval train are more likely to stick with their fitness program The interval course on the M9 20 s treadmill lets you set the cours...

Страница 25: ...r running or walking Press the INCLINE or key to specify an appropriate incline When the desired speed and incline are displayed simply continue working out you do not need to press ENTER Once you rea...

Страница 26: ...you of upcoming incline or interval changes by scrolling messages across the display The Weight Loss mode is designed to help you burn the most fat during a 28 minute workout while minimizing the ris...

Страница 27: ...s the SPEED or key until the desired speed appears in the display Always monitor your pulse heart rate during and at the end of your workout It should never exceed 80 of your maximum heart rate or go...

Страница 28: ...out by distance or time You see the SELECT DISTANCE or SELECT TIME prompt after you enter a course selection The default measurement is distance To change the prompt follow the steps above in Changing...

Страница 29: ...will not interfere with your workout 4 When you see ENTER WEIGHT scroll across the display specify your weight using any key When the correct weight is displayed press ENTER This information allows t...

Страница 30: ...u exercise Weight Loss Course 28 minute program Maximizes calorie and fat burn Running Courses Each segment equals 0 1 miles Walking Courses Each segment equals 0 05 miles Interval Course Alternating...

Страница 31: ...arrow keys to choose distance the display moves in 5 increments from 5 to 50 miles 8 to 80 kilometers Press ENTER when the desired distance appears Note You can change the SELECT TIME prompt to SELEC...

Страница 32: ...At the SELECT COURSE prompt choose your custom course either CUST 1 or CUST 2 Press the or keys until you see the desired course then press ENTER Note After pressing ENTER a prompt scrolls across the...

Страница 33: ...6 If you attempt to program the course profile past the maximum distance of 8 miles the prompt END COURSE appears and scrolls across the display The running belt slows to a gradual stop the incline r...

Страница 34: ...eus Longus Brevis To get the most out of each workout a general understanding of the principles behind aerobic training is invaluable The best source of information is your specialty fitness dealer In...

Страница 35: ...art rates vary according to several physiological factors To determine your training zone find your age on the diagram and then find the line where they intersect For example if you are 35 years old y...

Страница 36: ...ends on your fitness level Exercise physiologists have determined that to attain cardiovascular benefits from exercise you should maintain your heart rate in its training zone for at least 15 minutes...

Страница 37: ...p and water To clean the running belt and the groves on the plastic trim strip use a soft nylon scrub brush Never pour water or spray liquids on the electronic console Allow the treadmill to dry compl...

Страница 38: ...turn counter clockwise this moves the belt to the left Important Do not turn the adjusting bolt more than 1 4 turn at a time Overtightening the bolt can damage the treadmill 3 Turn ON the treadmill an...

Страница 39: ...ause in the belt with each footplant Important Do not turn the adjusting bolts more than 1 4 turn at a time Overtightening the bolts can damage or cause premature failure of the precision bearings in...

Страница 40: ...orporated P O Box 3004 Bothell WA USA 98041 3004 P N 36188 102 9 94 Precor and M are registered trademarks of Precor Incorporated 1989 Precor Incorporated Specifications subject to change without noti...

Отзывы: