C554i Self Powered Elliptical Fitness Crosstrainer
Page 53
Procedure 7.18 - Replacing a Load Resistor
Warning
When the EFX is operated the load resistors get very hot. Be sure to allow the load resistors
enough time to cool before continuing with this procedure.
1.
Remove the rear cover and disconnect the red battery lead from terminal M6 of the lower
PCA.
2.
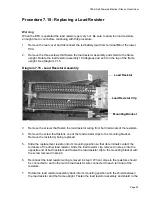
Remove the three screws that fasten the load resistor assembly and shield to the frame
upright. Rotate the load resistor assembly 180 degrees and set it on the top of the frame
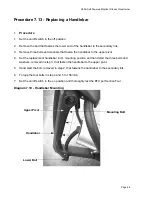
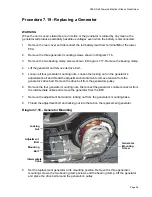
upright. See Diagram 7.15.
Diagram 7.15 - Load Resistor Assembly
3.
Remove the screws that fasten the load resistor wiring from both terminals of the resistors.
4.
Remove the screw that fastens one of the load resistor clips to the mounting bracket.
Remove the resistor(s) being replaced.
5.
Slide the replacement resistor into its mounting position so that its terminals contact the
terminals of the other load resistor. Slide the load resistor clip, removed in step 4 into the
opposite end of both resistors and fasten the load resistor clip to the mounting bracket with
the screw removed in step 4.
6.
Reconnect the load resistor wiring removed in step 3. When compete the resistors should
be connected to each other with a load resistor wire connected to each terminal of the
resistors.
7.
Rotate the load resistor assembly back into its mounting position with the shield between
the load resistor and the frame upright. Fasten the load resistor assembly and shield to the
Load Resistor
Load Resistor Clip
Mounting Bracket

