background image


5 Working with the configuration menu

38

and/or the configuration menu against unintentional changes.
See Chapter 4.7 “Password protection of the menus” and 

Chapter 10.1.4 “Activation of password protection” for further 

information on password protection.

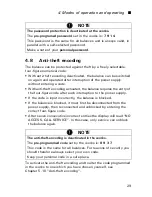
5.10 Anti-theft encoding

To activate the menu see Chapter 4.5 “Activating the two main me-

nus” and Chapter 4.6 “How the menu control operates”.

If the anti-theft encoding is activated, a four-figure code must be 

entered after every interruption of the power supply in order to release 

the balance for use.
For further information on the anti-theft encoding see


Chapter 4.8 

“Anti-theft encoding”.
To activate the anti-theft encoding, proceed as described for pass-

word protection.

5.11 Key tone

To activate the menu see Chapter 4.5 “Activating the two main me-

nus” and Chapter 4.6 “How the menu control operates”.

If the key tone is switched on, a short audio signal sounds each time 

a key is pressed.

5.12 Precisa BUS

To activate the menu see Chapter 4.5 “Activating the two main me-

nus” and Chapter 4.6 “How the menu control operates”.

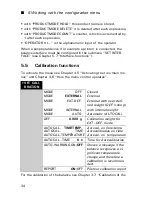
• THEFTCODE

THEFTCODE

––––

THEFT-PROTECTION ON/

OFF

Switch encoding 

on/off

NEW CODE                 ––––

Enter new code 

• KEY  TONE

KEY TONE ON/

OFF

Switch key tone on and off

Содержание 160 BJ

Страница 1: ...Operating Instructions 350 8105 000g1 Precisa Balances Series XB ...

Страница 2: ...LFK GLHVH UNOlUXQJ EH LHKW PLW GHQ QDFKVWHKHQGHQ 1RUPHQ EHUHLQVWLPPW UDQoDLV 1RXV GpFODURQV DYHF FHOD UHVSRQVDELOLWp TXH OH SURGXLW DXTXHO VH UDSSRUWH OD SUpVHQWH GpFODUDWLRQ HVW FRQIRUPH DX QRUPHV FLWpHV FL DSUqV VSDxRO 0DQLIHVWDPRV HQ OD SUHVHQWH TXH HO SURGXFWR DO TXH VH UHILHUH HVWD GHFODUDFLyQ HVW D GH DFXHUGR FRQ ODV QRUPDV VLJXLHQWHV WDOLDQR LFKLDULDPR FRQ FLz FKH LO SURGRWWR DO TXDOH OD SU...

Страница 3: ...t local customer service cen ters and details of their addresses Copyright These operating instructions are protected by copyright All rights reserved No part of the operating instructions may be reproduced processed duplicated or published in any form by photocopying microfilming reprinting or other process in particular electronic means without the written agreement of Precisa Gravimetrics AG Pr...

Страница 4: ... accentuated by printing in semi bold script ON OFF In the explanation of the operating steps the appropriate display for the current operating step is shown for clarity at the left alongside the list of operating steps For the labelling of dangers and advice please see Chapter 1 Safe ty Guarantee card A guarantee card which was filled in by your Precisa dealer before handing over the balance is e...

Страница 5: ...15 2 3 1 Technical data 15 3 Starting up 17 3 1 Unpacking the balance 17 3 2 Scope of delivery 18 3 3 Assembly of the balance 19 3 4 Choice of a suitable location 19 3 5 Checking the mains voltage 20 3 6 Levelling the balance 20 3 7 Calibration of the balance 21 3 8 Dual Range and Floating Range balances 21 3 9 Standardized balance 22 3 10 Under floor weighing 22 4 Modes of operation and operating...

Страница 6: ...ge function 31 5 3 Selecting the weight unit 31 5 4 Print functions 33 5 5 Calibration functions 34 5 6 Weighing mode 35 5 7 Interface functions 36 5 8 Date and time 37 5 9 Password protection 37 5 10 Anti theft encoding 38 5 11 Key tone 38 5 12 Precisa BUS 38 6 Working with the application menu 40 6 1 Structure of the application menu 40 6 2 Selecting a working program 41 6 3 Changing application...

Страница 7: ...ging the configuration menu 59 10 1 1 Setting the choice of language 59 10 1 2 Setting the Weight unit 59 10 1 3 Setting the Print functions 60 10 1 4 Activation of password protection 60 10 2 Selection of an application program 61 10 2 1 Setting for Counting by weighing 61 11 Maintenance and servicing 63 12 Transport storage 64 12 1 Transportation and shipping of the balance 64 12 2 Storage of th...

Страница 8: ... selectable weight 69 14 2 3 Internal calibration 70 14 2 4 Automatic calibration 70 14 3 Notes on density determination 71 14 3 1 Density determination Solid on bottom mode 71 14 3 2 Density determination Solid in air mode 71 14 3 3 Density determination Liquid mode 72 14 3 4 Density determination Solid porous mode 72 15 Configuration menu tree 73 16 Application menu tree 77 17 Configuration menu...

Страница 9: ...Contents 7 ...

Страница 10: ... adaptor make sure that the operating voltage stated on the power adaptor agrees with the mains voltage If not please refer to customer service If the power adaptor or its cable is damaged the balance must immediately be disconnected from the electricity supply pull out the power adaptor The balance may only be operated with a power adaptor in perfect condition DANGER Warning of a possible danger ...

Страница 11: ...The balance must not be operated in an area subject to explosion risks Take care when weighing liquids that no liquid is spilt into the inside of the balance or into connections on the rear of the equipment or the power adaptor If liquid is spilt on the balance the latter must immediately be unplugged from the mains electricity supply pull out power adaptor The balance may be operated after it has...

Страница 12: ...y 1 the scale pan holder 4 and the pan 5 which depending on the model may be square fig 2 1 right or round fig 2 1 left Depending on the model see Chapter 2 3 Data and parameters the balance additionally has a simple windshield fig 2 1 right or a windshield with sliding doors fig 2 1 left 2 and or a protective ring 3 Fig 2 1 Your balance ...

Страница 13: ...rs balan ces protected against water and dust to the international 1P65 stan dard Virtually all models of the XB Series can be delivered in calibratable design to EG OIML specification The most important basic production features of the XB Series inclu de Anti theft encoding with four figure numerical code Multi stage password protection for the program menus ICM Autocalibration intelligent calibr...

Страница 14: ...he device for under floor weighings 2 Nameplate 3 Adjustable feet for levelling 4 Weighing pan 5 Multifunction display 6 5 key control panel 7 Serial No plate 8 Connecting socket for power adaptor 9 RS232 Interface 10 Bubble level 11 Eyelet for attaching a safety chain ...

Страница 15: ...e observed 2 2 2 Conformity The balance has been manufactured and tested in accordance with the standards and recommendations set out in the enclosed declarati on of conformity The power adaptor produced for the operation of the balance and intended exclusively for this application complies with the electrical protection class II 2 2 3 Labelling Label Location of label Manufacturer s name plate 1 ...

Страница 16: ... the first time the serial number as well as the firmware will be showed in the upper display see also Chapter 4 1 Switching on the balan ce and Chapter 4 6 3 Display Display Remark 3146157 Serial number 3146517 04 00 P07 N11 Firmware N11 0400 P07 N11 Hardwarecode Nxx 04 00 Version P07 Release 6 7 XB 2200 C Max 2200 g Min 0 5 g e 0 1g d 0 01g 2HA EI 1 2 3 4 5 PRINT MODE ON OFF REF T ...

Страница 17: ...ented here 2 3 1 Technical data XB A e g XB 120 A with closed glass cover BASIC as standard round weighing pan 80 mm Fluorescent Display XB M e g XB 620 M with windshield simple as standard square weighing pan 135 x 135 mm Fluorescent Display also available as Floating Range version XB C e g XB 1200 C square weighing pan 170 x 170 mm Fluorescent Display also available as Floating Range version als...

Страница 18: ... 115 230V 15 20 50 60Hz Power consumption without peripheral appliances 6 0 VA RS232 V24 Interface Allowable ambient conditions Temperature 5 C 40 C Relative humidity 25 85 non condensing If you have any questions on the technical data or require detailed technical information on your balance please contact your Technical Representative ...

Страница 19: ...ance when unpacking Check the balance immediately after unpacking for externally visible damage If you should find transport damages please inform your services representative immediately If the balance is not to be used immediately after purchase but only at a later time it should be stored in a dry place where fluctuations in temperature are as low as possible see Chapter 12 Transport storage Re...

Страница 20: ...cope of delivery broken down by groups Component delivered present yes no Balance Scale pan support Weighing pan Power adaptor Protection cover for the display Windshield BASIC group A Windshield simple group M Protective ring groups A M and C Operating instructions Guarantee card Tab 3 1 Check list for the scope of delivery ...

Страница 21: ... balance so that the allowable ambient conditions see Chapter 2 3 1 Technical data are maintained and in addition so that the following prerequisites are met Put the balance on a solid firm and preferably vibration proof horizontal base Make sure that the balance cannot be shaken or knocked over Protect from direct solar radiation Avoid drafts and excessive temperature fluctuations NOTE A screwdri...

Страница 22: ...he air bubble is preci sely in the centre of the sight glass of the bubble level see Fig 3 2 Correct levelling with the aid of the bubble level Fig 3 2 Correct levelling with the aid of the bubble level DANGER The balance may only be operated with the power adaptor supplied Check before connecting the power adaptor to the mains supply that the operating voltage stated on the power adaptor agrees w...

Страница 23: ...an itself determine the size of the calibration weight which enables an exact calibration with different size weights in 10 g 50 g 100 g and 500 g steps depending on implementation 3 8 Dual Range and Floating Range balances With the Dual Range balances weighing is always first carried out in the small more exact range Only when the small range is exceeded will the balance switch automatically into...

Страница 24: ... the scale pan support and turn the balan ce around Push the metal cover 1 on the floor of the balance to one side Hang a small hook available as an accessory see Chapter 13 Ac cessories into the aperture 3 of the now visible metal casting 2 Place the balance over an opening Replace the scale pan support and the scale pan Level the balance see Chapter 3 6 Levelling the balance Switch on the balanc...

Страница 25: ...N Take care that the hooks used for the under floor weighing are stable enough to hold the goods which you wish to weigh NOTE Take care that no dirt or moisture can get into the balance with the scale pan carrier removed After completing the under floor weighing the opening in the floor of the balance must be closed again dust protection kg 1 2 3 2 ...

Страница 26: ... Mode The balance is equipped with an Auto Standby mode which can be activated or deactivated in the configuration menu If the Auto Standby mode is activated the balance automatically switches to Standby some time after the last weighing or key operation current saving function The delay before switching to Standby is defined in the configuration menu see Chapter 5 6 Weighing mode Press any button...

Страница 27: ...you can either work with the basic configuration programmed ex works or define and store a user configuration adapted to your specific needs In the application menu you define a working program which is suited to the specific weighing problem 4 5 Activating the two main menus 4 5 1 Activating the configuration menu Press ON OFF to switch on the balance Continue to hold down the MODE button during ...

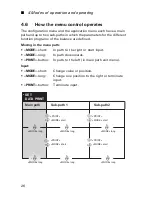
Страница 28: ...which the parameters for the different function programs of the balance are defined Moving in the menu path MODE short In path to the right or start input MODE long In path downwards PRINT button In path to the left in main path exit menu Input MODE short Change value or position MODE long Change one position to the right or terminate input PRINT button Terminate input ...

Страница 29: ... Panel 4 6 2 Operating in the weighing mode Name Function during weighing ON OFF Switching the balance on and off MODE Calling up the configuration menu and the application menu Switches between the Basic program and the chosen application T Initiate Tare Function and or Calibration Function REF Run application see Chapter 6 Working with the application menu PRINT Start print function Exit the men...

Страница 30: ...alance can be protected by a freely selectable four figure password against unintentional changes With password protection deactivated any operator can change the balance configuration and application menus With standard password protection activated only the configura tion menu is protected against unintentional changes With high password protection activated both the configuration menu and the a...

Страница 31: ...our figure code After seven consecutive incorrect entries the display will read NO ACCESS CALL SERVICE In this case only service can unblock the balance again To activate the anti theft encoding and to alter the code programmed in the works to one which you have chosen yourself see Chapter 5 10 Anti theft encoding NOTE The password protection is deactivated at the works The pre programed password ...

Страница 32: ...anguage E G F UNIT 1 Unit in which the results of the weighing are dis played SET DATA PRINT Print formats Type of values to be printed indivi dual values continuous printout time or load change dependent values date time user etc SET CALIBRATION Method of calibration SET WEIGHING MODE Stability mode Quality of the balance location Auto Standby mode zero correction tare method rapid or standard ta...

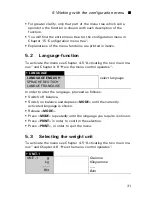
Страница 33: ...s und Chapter 4 6 How the menu control operates In order to alter the language proceed as follows Switch off balance Switch on balance and depress MODE until the currently activated language is shown Release MODE Press MODE repeatedly until the language you require is shown Press PRINT in order to confirm the selection Press PRINT in order to quit the menu 5 3 Selecting the weight unit To activate...

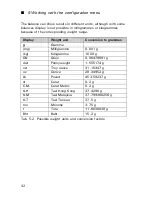
Страница 34: ...sible weight units and conversion factors Display Weight unit Conversion to grammes g Gramme mg Milligramme 0 001 g kg Kilogramme 1000 g GN Grain 0 06479891 g dwt Pennyweight 1 555174 g ozt Troy ounce 31 10347 g oz Ounce 28 34952 g Lb Pound 453 59237 g ct Carat 0 2 g C M Carat Metric 0 2 g tLH Tael Hong Kong 37 4290 g tLM Tael Malaysia 37 799366256 g tLT Tael Taiwan 37 5 g mo Momme 3 75 g t Tola 1...

Страница 35: ...PRINT AUTO START ON OFF Start print automatically on switching on off MODE UNSTABLE Individual print each value MODE STABLE Individual print stable value MODE LOADCHANGE Print after load changes MODE CONTINUOUS Continuous print after every lntegration time MODE TIMEBASE Continuous print with time basis TIMEBASE 2 0 Time basis in seconds freely selectable SET PRINTFORMAT DATE AND TIME ON OFF BALANC...

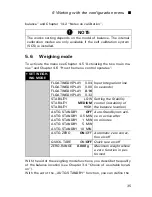
Страница 36: ...5 Activating the two main me nus and Chapter 4 6 How the menu control operates For the calibration of the balance see Chapter 3 7 Calibration of the SET CALI BRATION MODE OFF Closed MODE EXTERNAL External MODE EXT DEF External with user defi ned weight DEF n nnn g MODE INTERNAL with internal weight MODE AUTO Automatic AUTOCAL DEF 0 000 g Calibration weight for EXT DEF mode AUTOCAL TIME TEMP AUTOCA...

Страница 37: ...l of balance The internal calibration modes are only available if the self calibration system SCS is installed SET WEIGH ING MODE FLOATINGDISPLAY 0 04 FLOATINGDISPLAY 0 08 FLOATINGDISPLAY 0 16 FLOATINGDISPLAY 0 32 Input lntegration time in seconds STABILITY LOW STABILITY MEDIUM STABILITY HIGH Setting the Stability control instability of the balance location AUTO STANDBY OFF AUTO STANDBY 0 5 MIN AU...

Страница 38: ...ting the two main me nus and Chapter 4 6 How the menu control operates setting not available for firmware Nxx for firmware Nxx factory setting is 600 for other firmware 9600 NOTE The Auto Standby function only works with the automatic zero correction activated see Chapter 5 6 Weighing mode SET INTERFACE BAUDRATE 300 BAUDRATE 600 BAUDRATE 1200 BAUDRATE 2400 BAUDRATE 4800 BAUDRATE 9600 BAUDRATE 1920...

Страница 39: ...ain me nus and Chapter 4 6 How the menu control operates The password protection permits you to protect the application menu SET DATE AND TIME DATE DD MM YY TIME HH MM SS FORMAT STANDARD US Set date and time NOTE These settings are only available if the clock is installed The date and time display continues in the event of a power failure If this is not the case the balance backup battery is exhau...

Страница 40: ... supply in order to release the balance for use For further information on the anti theft encoding see Chapter 4 8 Anti theft encoding To activate the anti theft encoding proceed as described for pass word protection 5 11 Key tone To activate the menu see Chapter 4 5 Activating the two main me nus and Chapter 4 6 How the menu control operates If the key tone is switched on a short audio signal sou...

Страница 41: ...5 Working with the configuration menu 39 To connect any Precisa BUS accessories switch the BUS to ON else switch it OFF to have a normal RS232 communication BUS BUS ON OFF Switch Precisa BUS on and off ...

Страница 42: ...menu and adapted to the user s needs Printing conventions The settings for the sub menus programmed in works are printed in bold in these operating instructions For a greater clarity only that part of the menu tree which corresponds to this application is shown with each application description You will find the complete menu tree for the application menu in Chapter 16 Application menu tree Explan...

Страница 43: ...application weighing mode To activate an application it must first be selected in the application menu see Chapter 6 2 Selecting a working program Press the MODE button The display will show either the name of the selected application UNITS COUNT or WEIGHING for switching back to weighing mode If SET APP OFF appears immediately no application has yet been selected Release the MODE button The balan...

Страница 44: ...mode Press the REF button until the desired unit appears on the display Release the REF button SETUP APPLICATION UNITS UNIT 2 kg kilogramme UNIT 2 mg milligramme UNIT 2 UNIT 2 OFF not active UNIT 3 GN Grain UNIT 3 UNIT 3 OFF not active UNIT 4 C M Metric carat UNIT 4 UNIT 4 OFF not active NOTE For basic operation Unit 1 is defined in the configuration menu standard unit for all weighings if the wor...

Страница 45: ...s for the regulation of the reference weight Operation Start the application see Chapter 6 3 Changing application weig hing mode Place a number of objects on the weighing pan Press the REF button until the reference quantity appears on the display If the reference quantity is correct release the REF button Otherwise hold down the REF button The pre defined values will appear 1 10 25 50 As soon as ...

Страница 46: ... 3 Changing application weig hing mode Place the reference weight on the weighing pan Press the REF button until REFERENCE 100 appears on the display Release the REF button 6 7 Application NET TOTAL See Chapter 4 5 Activating the two main menus and Chapter 4 6 How the menu control operates for the activation of the application menu There is no Setup menu for this application With the aid of the NE...

Страница 47: ...red function flashes in the dis play Release the REF button 6 8 Application ANIMAL See Chapter 4 5 Activating the two main menus and Chapter 4 6 How the menu control operates for the activation of the Application menu With the aid of the AnIMAL program you can weigh living animals accurately even if they move on the scale pan STO n Take stable value and add to the sum of the components Tare balanc...

Страница 48: ...se the REF button 6 9 Application DENSITY See Chapter 4 5 Activating the two main menus and Chapter 4 6 How the menu control operates for the activation of the Application menu MANUAL Manual release of the measurement AUTO Start automatic release of the measurement with a second delay after each load change STOP Stop automatic measurement SETUP APPLICATION DENSITY MODE SOLID ON BOTTOM MODE SOLID I...

Страница 49: ...further expla nations of density determination TEMPERATURE 20 0 C Temperature of the water used for the measurement DECIMALS 3 Decimal places for density calculation NOTE A Density Measurement Set see Chapter 13 Accessories is available as an optional extra You can also determine the density of solids without this accessory see Chapter 14 3 Notes on density determination OK Accept current referenc...

Страница 50: ...cation weigh ing mode Display Step 0 0000 9 Press REF until REPEATABILITY TEST appears than relase the key Repeatability test 0000 The balance carries out a Zero mea surement 0 000 g is shown flashing measurement 1 EXIt inT The internal weight if available is applied and measured Int is shown flashing measurement 1 EXIt LLLL In case no internal weight SCS is available place a load onto the ba lanc...

Страница 51: ... 0 00008 9 The standard deviation of the mea surement is calculated and display ed and a report is printed STANDARD DEV exit Press REF to exit the repeatability test NOTE The test can be interrupted with the REF key at any time Display Step ...

Страница 52: ...orms a tare operation Effects a calibration Ensure that the balance is in the weighing mode Keep T pressed until CALIBRATION is displayed Release T The balance carries out a calibration in accordance with the set tings in the configuration menu cf Chapter 5 5 Calibration functions and reports these by means of a printout NOTE A calibration can be cancelled with ON OFF ...

Страница 53: ...ntil PRINT STATUS is displayed Release PRINT The balance status will be printed out Print out the application setup Ensure that the balance is in the weighing mode Keep PRINT pressed until PRINT APPLICATIONS is displayed Release PRINT The application setup will be printed out Print out the calibrations information Ensure that the balance is in the weighing mode Keep PRINT pressed until PRINT CALIB...

Страница 54: ...shake XON XOFF or to hardware handshake Baud rate Possible baud rates 300 600 1200 2400 4800 9600 or 19200 baud Parity Possible parity 7 even 1 stop 7 odd 1 stop 7 No 2 stop 8 No 1 stop 8 even 1 stop or 8 odd 1 stop setting not available for firmware Nxx Display Pos 0 1 2 3 4 5 6 7 8 9 10 7 even 1 SB 1 DA 2 DA 3 DA 4 DA 5 DA 6 DA 7 DA PB SP 7 odd 1 SB 1 DA 2 DA 3 DA 4 DA 5 DA 6 DA 7 DA PB SP 7 no ...

Страница 55: ...9 10 11 12 13 14 15 B B B S D7 D6 D5 D4 D3 D2 D1 DP D0 B U CR LF B Blank space S Sign space DP Decimal Point D0 D7 Digits U Unit only when weight is stable else no unit transfered CR Carriage Return LF Line Feed NOTE Unused positions are filled with spaces The decimal point DP can be between D0 and D7 ...

Страница 56: ...ce Pinout of RJ45 socket Balance RJ 45 D25 D9 Peripheral device RS 232 out 2 3 2 RS 232 in RS 232 in 6 2 3 RS 232 out GND 5 7 5 GND CTS 3 20 4 DTR only need for hardware handshake DTR 7 5 8 CTS only need for hardware handshake Balance RJ 45 Remark n c 1 Not connected RS 232 out 2 Out V24 CTS 3 In V24 VDC 4 Out 9 16V GND 5 0V RS 232 in 6 In V24 DTR 7 Out V24 EXTBUS 8 In 5V logic ...

Страница 57: ...nter anti theft code PDT Print out date and time PRT Print function like pressing the Print key PST Print status report Pn ttt t Set print mode n 0 Individually print each value unstable n 1 Individually print each value stable n 2 Print after change of load n 3 Print after each integration period n 4 Print on time basis in s ttt t R k Set current weight 100 with k 0 7 decimal places k A use autom...

Страница 58: ...nutes Seconds T ttt Tare or set tare to a specific value Uxnn Set unit x 1 4 of the balance with nn 0 g 1 mg 2 kg UxS Switch balance to unit x 1 4 ZERO Zero balance provided weight is stable and within the zero position range NOTE Each remote control command must terminate with CR LF The commands are acknowledged if required Input Description of the function executed D Five dashes will be shown DT...

Страница 59: ...r adaptor is interrupted Power supply has failed interruption to cur rent The power adaptor is defective OL is shown in display The weight range has been exceeded Observe information on the maximum weight range UL is shown in display The weight range is below the range of the ba lance Scale pan or scale pan holder missing The weight display fluctuates continuously The draft is too strong at the ba...

Страница 60: ... or only dashes The stability control Balance functions is set too sensitively The time selected for FLOATINGDISPLAY is unsatisfactory Configuration menu cannot be changed The password lock is activated in the configu ration menu The display flashes conti nuously du ring calibration The balance location is not quiet enough Inter rupt calibration with ON OFF and relocate the balance in a better pos...

Страница 61: ... hold down until the currently set language appears Release the MODE button or LANGUE FRANCAISE or LANGUAGE ENGLISH LANGUAGE ENGLISH Press MODE repeatedly until the desired language is displayed the display will flash Hold down MODE until entry is complete display ceases to flash or press PRINT Press PRINT to exit menu unit 1 9 Press MODE and hold down until the currently set unit appears Release ...

Страница 62: ...ection proceed as follows SET DATA PRINT Press MODE and hold down until SET DATA PRINT appears Release the MODE button AUTO START OFF Press MODE briefly AUTO START will appear AUTO START on Press MODE repeatedly until the desired setting is displayed ON or OFF will flash mODE STABLE Press MODE and hold down the button until the next print function appears MODE Release the MODE button MODE TIMEBASE...

Страница 63: ...14 In the same way enter the third and fourth digit of the password Hold down MODE until input is complete no digit flashing DATA PROTECTION OFF Press MODE briefly DATA PROTECTION will appear Press MODE repeatedly until the desired data protection is displayed the setting will flash new PASSWORd 7914 Press MODE and hold down button until NEW PASSWORD 7914 appears Release the MODE button new PASSWO...

Страница 64: ... AP PLICATION appears Release the MODE button Reference 10 pcs Press MODE briefly the cur rently set reference quantity ap pears Release the MODE button Reference 010 pcs Press MODE briefly The first digit of the reference quantity will start to flash Enter the first digit by briefly pres sing MODE repeatedly Reference 020 pcs Press MODE until the second digit flashes Enter the second digit by bri...

Страница 65: ... years and will extend the lifespan of the balance DANGER For maintenance work the balance must be separated from the power supply remove power adaptor plug from socket Also ensure that the balance cannot be reconnected to the power supply during the work by a third party Take care during cleaning that no liquid penetrates into the appliance If liquid is spilt on the balance the latter must immedi...

Страница 66: ...f you would like to take the balance out of service for an extended period disconnect it from the electricity supply clean it thoroughly see Chapter 11 Maintenance and servicing and store it in a place which fulfils the following conditions No violent shaking no vibrations No large temperature fluctuations No direct solar radiation No moisture NOTE The balance should preferably be dispatched and t...

Страница 67: ...rs 350 8511 001 Finished pack control to FPVO 350 8511 002 Signal lamp with 3 bulbs green yellow red 350 8510 Input Output module 6 TTL inputs 8 Relay outputs 350 8509 Multiplexer for up to 7 balances RS232 350 8513 Data cable RJ45 RJ45 0 75 m 350 8525 Data cable RJ45 RJ45 1 5 m 350 8520 Data cable RJ45 RJ45 3 m 350 8521 Data cable RJ45 DB9 female PC 1 5m 350 8557 Data cable RJ45 DB25 male Printer...

Страница 68: ... 13 Accessories 66 Accessory Article number Dust cover for display set of 20 pieces 350 8590 Night cover 350 4097 Hooks for under floor weighing 350 8527 ...

Страница 69: ...al reproducible results Choose HIGH STABILITY at an optimal balance location MEDIUM STABILITY at a good balance location or LOW STABILITY at a critical balance location 14 1 3 Set Weighing mode Auto Standby The Auto Standby mode turns off the balance automatically if the balance is tared and has shown Zero for at least 5 minutes the balance has received no remote control command via the inter Opti...

Страница 70: ...ibration of the balance is fixed in the configuration menu see Chapter 3 7 Calibration of the balance and Chapter 5 5 Calibration functions Possible types of calibration depending on the model of balance External calibration by means of ICM Intelligent Calibration Mode External calibration with freely selectable weight Internal calibration Automatic calibration 14 2 1 External calibration by means...

Страница 71: ...tenfold precision compared with the balance Then proceed as follows Switch to BALANCING with the MODE key cALIBRation Press T until CALIBRATION appears 0000 9 The balance carries out a Zero measurement 0 000 g is shown flashing 2000 9 After the zero measurement the display flashes with the recom mended calibration weight Place the calibration weight on the pan 2000 9 The display continues to flash...

Страница 72: ...n menu see Chapter 5 5 Calibration functions The balance now calibrates itself automatically every 24 hours and or after each temperature change of 3 degrees Celsius depending on the definition in the configuration menu SET CALIBRATION AUTO CAL The time of the automatic calibration is as determined in the configuration menu under SET CALIBRATION AUTOCAL TIME n h e g 6 h for 06 00 o clock in the mo...

Страница 73: ...rmination Solid in air mode With this weighing method the solid is weighed with the aid of under floor weighing see Chapter 3 10 Under floor weighing The solid is then placed in the temperature controlled reference liquid water so that it does not touch the base of the bowl but is neverthe less fully immersed in the water Weighing is again carried out From the weights the balance determines the de...

Страница 74: ...ect with a volume of 10 cm3 or 100 cm3 is used as the solid available as accessories see Chapter 13 Accessories 14 3 4 Density determination Solid porous mode The density of a porous solid is determined with this method of weig hing In order to carry out such measurements you will require the Density Determination Kit see Chapter 13 Accessories The instruction manual supplied with this kit describ...

Страница 75: ...NGUAGE LANGUAGE ENGLISH SPRACHE DEUTSCH LANGUE FRANCAISE UNIT 1 UNIT 1 g mg kg GN dwt ozt oz Lb ct C M tlH tlM tlT mo t Bht SET DATA PRINT AUTO START ON OFF MODE UNSTABLE MODE STABLE MODE LOADCHANGE MODE CONTINUOUS MODE TIMEBASE TIMEBASE 2 0 SET PRINTFORMAT DATE AND TIME ON OFF BALANCE ID ON OFF PRODUCT ID ON OFF GROSS AND TARE ON OFF ...

Страница 76: ... EXT DEF MODE INTERNAL MODE AUTO DEF 0 000 g AUTOCAL TIME TEMP AUTOCAL TEMPERATURE AUTOCAL TIME AUTOCAL TIME 6 h AUTO WARNING ON OFF REPORT ON OFF SET WEIGH ING MODE FLOATINGDISPLAY 0 04 FLOATINGDISPLAY 0 08 FLOATINGDISPLAY 0 16 FLOATINGDISPLAY 0 32 STABILITY LOW STABILITY MEDIUM STABILITY HIGH AUTO STANDBY OFF AUTO STANDBY 0 5 MIN AUTO STANDBY 1 MIN AUTO STANDBY 5 MIN AUTO STANDBY 10 MIN AUTO ZER...

Страница 77: ... firmware PARITY 7 EVEN 1STOP PARITY 7 ODD 1STOP PARITY 7 NO 2STOP PARITY 8 NO 1STOP PARITY 8 EVEN 1STOP PARITY 8 ODD 1STOP HANDSHAKE NO HANDSHAKE XON XOFF HANDSHAKE HARDWARE PC DIRECTMODE ON OFF SET DATE AND TIME DATE DD MM YY TIME HH MM SS FORMAT STANDARD US PASSWORD PASSWORD DATA PROTECTION OFF DATA PROTECTION MED DATA PROTECTION HIGH NEW PASSWORD THEFTCODE THEFTCODE THEFT PROTECTION OFF THEFT ...

Страница 78: ... 15 Configuration menu tree 76 KEY TONE KEY TONE KEY TONE ON OFF BUS BUS BUS ON OFF ...

Страница 79: ...d on switching on SET APP OFF UNITS COUNT PERCENT NET TOTAL ANIMAL DENSITY DIAGNOSTICS SETUP APPLICATION Division depends on the current application see Chapter 6 Wor king with the application menu AUTO START AUTO START ON OFF FACTORY CONFIG Load factory configuration USER CONFIG Load user configuration STORE CONFIG Store present configuration as user con figuration ...

Отзывы: