Operating Instructions and Replacement Parts List
Deckmate 25 Free Fall Pontoon Windlass
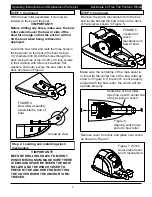
Place the anchor in the bow roller and make
sure the shank of the anchor does not touch
the winch cover when the anchor is seated in
the bow roller. See Figure 8.
6
STEP 2. Continued
Figure 8. Anchor shank
clearance check
Use these 3 holes in the
winch frame as guides
for mounting holes
Once it is certain the anchor will not hit the
cover of the winch, remove the cover. Using a
permanent marker, mark the deck through the
mounting holes in the winch frame. Figure 9
shows which holes in the winch frame should
be used as mounting holes
.
After marking the holes as shown, remove
the winch and drill the holes through the
deck using a 1/4” drill bit.
STEP 2. Continued
Figure 10. Location of mounting fasteners
1/4”-20 Hex
Head Screw
1/4” Flat
Washer
1/4” Flat
Washer
1/4” Lock
Washer
1/4” Hex Nut Cut Away View of Winch on Deck
Step 3. Deciding Location of Switch
The Deckmate 25 has the capability of having the
switch mounted on the winch cover or at the helm of
the boat. Some items to consider about the location
of the switch:
1.
Locating the switch on the helm will allow the boat
to be steered toward the anchor point when the winch
is being used.
2.
Locating the switch on the helm will require extra
wiring for the light to be operational.
3.
Locating the switch on the helm will require a
switch cover plate to be installed on the winch cover
.
This cover plate is included with the winch kit.
Step 4.
Installing the switch and wiring the winch
to the battery
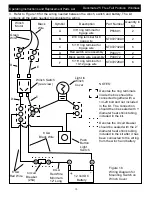
To install the switch on the helm, go to Page 7. To
install the switch on the winch cover, go to Page 9.
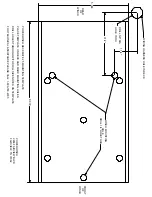
Wiring Harness Hole:
A hole in the deck is needed to pass the wiring
harness from the battery though to the winch. Locate
the template at the end of this manual and place it on
the deck.
Line up the mounting holes on the template
with the mounting holes that were just drilled on the
deck. Find the hole on the template for the wiring
harness and mark it on the deck. Remove the template
and drill the hole with a 5/8” drill bit
.
With all the mounting holes drilled, secure the winch to
the boat deck using the fasteners included in the kit.
Refer to Figure 10 for proper assembly of the
fasteners.
Figure 9. Locating
mounting holes.
MAKE SURE
ANCHOR SHANK FITS
IN THIS AREA AND
DOES NOT TOUCH
THE WINCH COVER
BEFORE DRILLING
MOUNTING HOLES


