Operating Instructions and Replacement Parts List
De
c
kmate 25 Free Fall Pontoon Windlass
Step 5.
Assembling Winch Cover and Unit Test
1.
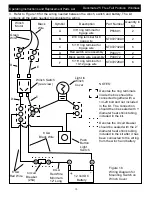
Before securing cover to winch frame, make sure
all wiring from the
switches
, light, and battery are
clear of the winch gears.
Wire ties may be used to
secure these wires to the winch frame.
2.
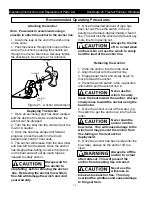
Locate the cover mounting bars (4 total, 2 per
side) and cover mounting screws in the winch parts
pack.
3.
The winch cover screws pass through the cover
and the cover mounting bars to thread into the winch
frame as shown in Figure 19.
Cover
Screws
Cover
Mounting
Bar
Figure 19. Assembling Winch Cover
4. If you are mounting the switch to the winch
cover, locate the four screws that are needed to
secure the switch plate in Figure 17 and assemble
them as shown in Figure 20.
Secure
switch plate
using
screws in kit
Figure 20. Securing switch plate to winch cover
Step 5.
Assembling Winch Cover and Unit Test
Unit Test
1.
Make sure area around winch is clear of all
people and objects.
2.
Press the rocker switch in the down position
and hold for 5 seconds.
The motor will reverse
the gear train and the winch is now in free-fall
mode.
3.
Release switch and pull approximately three
feet of rope out of the winch.
4.
Now press rocker switch in the up position
and hold The winch will now reverse direction
and pull rope back into winch.
5. Press light push button switch in once and
the light should illuminate. Press switch in
again and the light should go out.
11


