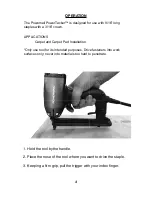
Powernail PowerTacker Скачать руководство пользователя страница 10

10

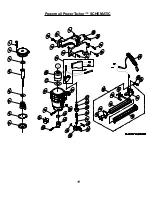
Powernail PowerTacker™ PARTS LIST

KEY: S=Sold Separately, n/a Not available separately, KIT=Sold as part of a Kit

DESCRTIPTION

PART #

1 Screw M5x20

09-54E001

2 Cylinder Cap Assembly

n/a

3 Bumper (Cap)

n/a

4 Plunger Assembly

09-54E004

5 Plunger Disc Retaining Washer

n/a

6 Return Spring

09-54E006

7 C-ring

n/a

8 Plunger Valve

n/a

9 Handle (Right)

09-54E009

10 Handle (Left)

09-54E010

11 Nut M5

09-54E011

12 Screw M4x10

09-54E012

13 Screw M5x22

09-54E013

14 Screw M5x30

09-54E014

15 Switch and Circuit Board Assembly

09-54E015

16 Coil & Washer Assembly

n/a

17 Rubber Washer

09-54E017

18 Tool Body

n/a

19 Screw 10-32x7/8

09-54E019

20 Bumper

09-54E020

21 Clamp

n/a

22 Nose Retainer

n/a

23 Screw M4x12

09-54E023

24 Nut 10-32

09-54E024

25 Sleeve

09-54E025

27 Lock Washer

09-54E027

28 Nut

n/a

DESCRTIPTION

PART #

29 Trigger Nut Seat

n/a

30 Spring

n/a

31 Contact Button

n/a

32 Safety Buckle

n/a

33 Pin

n/a

34 Retainer Ring

n/a

35 Trigger

09-54E035

36 Magazine Assembly

n/a

37 Cord Assembly 14 Gauge

n/a

38 Holder

n/a

39 Screw M4x16

n/a

40 Spring Washer

n/a

41 Screw 5/32x1/2

n/a

42 Screw M4x16

n/a

43 Nose

09-54E043

44 Magazine

n/a

45 Stopper

n/a

46 Screw M4x05

n/a

47 Release Lever Assembly

09-54E047

48 Staple Guide Unit

n/a

Содержание PowerTacker

Страница 1: ...EL D INSTRUCTIONS ET D ENTRETIEN Read this manual before you use this electric Powerstapler Follow all safety warnings and instructions If you are uncertain about the operation of the nailer call us d...

Страница 2: ...d of the warranty period POWERNAIL will perform all repair or replacements itself or through its authorized contractors POWERNAIL is not responsible for shipping labor or other direct or indirect cost...

Страница 3: ...fety keep tools locked up and out of reach of children Use only Powernail replacement parts in the repair or maintenance of this carpet tacker Parts or repair services are available from the manufactu...

Страница 4: ...pet and Carpet Pad Installation Only use tool for its intended purposes Drive fasteners into work surfaces only never into materials too hard to penetrate 4 1 Hold the tool by the handle 2 Place the n...

Страница 5: ...of other fasteners or with tool at too steep of an angle the fasteners may ricochet and injure someone Do not staple too close to the edge of the work surface The work piece is likely to split and the...

Страница 6: ...he power cord to unplug 2 Hold the tool upside down and depress the magazine latch Pull back on the magazine cover 3 Insert a strip of fasteners into the magazine Make sure the crown of the fasteners...

Страница 7: ...catches CAUTION Always unplug the tool power cord before adjusting the tool clearing jams servicing carrying to a new work location or when not in use 7 STAPLER SAFETY LABELS CLEARING JAMS Use a needl...

Страница 8: ...ion cord is properly wired and in good condition c The wire size is large enough to carry the full AMP rating of the tool d CAUTION An undersized cord will cause a drop in tool voltage resulting in lo...

Страница 9: ...ow to cool 2 Use properly rated extension cord 4 Tool will not operate 1 Plug or extension cord not getting power 2 Trigger switch failure 3 Line cord damaged 4 Jammed driver blade plunger 1 Check out...

Страница 10: ...ly 09 54E015 16 Coil Washer Assembly n a 17 Rubber Washer 09 54E017 18 Tool Body n a 19 Screw 10 32x7 8 09 54E019 20 Bumper 09 54E020 21 Clamp n a 22 Nose Retainer n a 23 Screw M4x12 09 54E023 24 Nut...

Страница 11: ...11 Powernail PowerTacker SCHEMATIC...

Страница 12: ...POWERNAIL COMPANY INC 1300 Rose Road Lake Zurich IL 60047 US Phone 1 800 323 1653 or 847 847 3000 www powernail com...

Отзывы: