
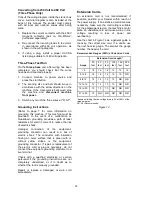


11
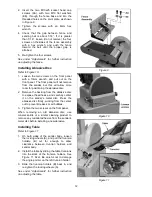
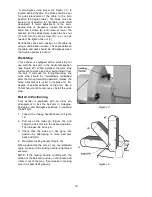
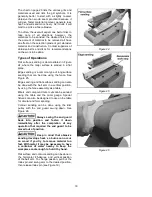
Installing and Tracking Abrasive Belt
To install the abrasive belt, proceed as follows
Refer to Figures 7 and 8:
1. Loosen the knob (A) and swing the belt end
guard (B) out of position.
2. Remove
the
side cover
by unscrewing the
two
knobs
holding it, and sliding the tabs of
the side cover out of the slots of the sander.
3. Loosen the tension knob (C). This will lower
the top drum, providing slack for installing
the abrasive belt.
4. Slide the abrasive belt onto the drums until it
is centered on them.
5. Tighten the tension knob (C).
IMPORTANT:
Do not
over
tension, as this ca n
cause the abrasive belt to stretch and weaken.
The abrasive belt must be properly tracked
before operating. (Tracking refers to the positio n
of the abrasive belt on the drums while they are
in motion.) Proceed as follows:
6. Check
tracking
manually
at first, by moving
the belt downward with your hand while the
machine is off. The abrasive belt should
remain at the center of the drums.
7. If the belt veers to one side or the other,
loosen the locking wheel (D) and rotate the
tracking knob (E) either left or right until the
belt centers itself. When manual tracking
appears successful, turn the machine on for
a moment and confirm that the abrasive belt
will remain centered during operation. If
needed, continue fine-tuning the adjustment
with the tracking screw (E). It may require a
combination of tension knob (C) and
tracking knob (E) adjustment to achieve a
proper setting.
8. When satisfied, tighten the locking wheel
(D) against the belt arm to secure the
setting.
9. Re-install
side cover
and secure with the
knobs
. Swing the end guard (B) back into
position and re-tighten the knob (A).
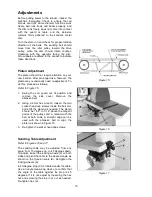
Installing Fence
Refer to Figure 9:
Pinch Point. Before installing
the fence, adjust it to a right angle position
as shown, and tighten the knob to secure.
1. Tilt the belt arm into horizontal position, and
place the fence against the platen in the
position shown.
Figure 7
Figure 8
Содержание 31A
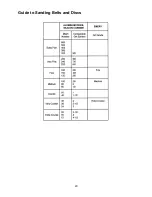
Страница 20: ...20 Guide to Sanding Belts and Discs ...
Страница 23: ...23 31A Stand Assembly 1PH ...
Страница 25: ...25 31A Stand Assembly 3PH ...
Страница 28: ...28 31A Sander Body Assembly ...
Страница 29: ...29 Electrical Connections 1 Phase ...
Страница 31: ...31 ...


