Powermatic 1632 Скачать руководство пользователя страница 4


4

!


SAFETY RULES 


As with all machines, there is a certain amount of hazard involved with the use of this sander. Use the machine with 
the respect and caution demanded where safety precautions are concerned.  When normal safety precautions are 
overlooked or ignored, personal injury to the operator can result. 
 
Read, understand and follow the safety and operating instructions found in this manual.  Know the limitations and 
hazards associated with this machine.   
 
Electrical grounding.  Make certain that the machine frame is electrically grounded and that a ground lead is 
included in the incoming electrical service.  In cases where a cord and plug are used, make certain that the 
grounding plug connects to a suitable ground.  Follow the grounding procedure indicated in the National Electrical 
Code. 
 
Power on. Before connecting power to the sander, make sure the start switch is in the "OFF" position. 
 
Protect yourself. Protect yourself at all times when operating the wide belt sander. Avoid eye injury by wearing 
approved safety shields, goggles or glasses at all times (NOTE: Common eye glasses are only impact-resistant, 
they are not safety glasses). Wear protective footwear. Steel toed shoes are recommended because heavy parts 
can fall off the conveyor table onto feet. 
 
Personal protection.  Before operating the machine, remove tie, rings, watch and other jewelry and roll up sleeves 
above the elbows.  Remove all loose outer clothing and confine long hair. Protective type footwear should be used.  
Where the noise exceeds the level of exposure allowed in Section 1910.95 of the OSHA Regulations, use hearing 
protective devices.  Do not wear gloves. 
 
Guards.  Do not operate the sander with guards off. Keep the guards in place at all times when the machine is 
running. If removed for maintenance purposes or any other reason, use extreme caution and replace the guards 
upon completion of the task and before using the machine again. Injury can result from exposure to the machine's 
internal moving parts. 
 
Check damaged parts. Before continuing use of the machine, a guard or other part that is damaged should be 
carefully checked to ensure that it will operate properly and safely and perform its intended function. Check for 
alignment of moving parts, binding of moving parts, breakage of parts, mounting and any other conditions that could 
effect its operation. A guard or other part that is damaged should be properly repaired or replaced before machine 
operation continues. 
 
Work area.  Keep the floor around the machine clean and free of scrap material, saw dust, oil and other liquids to 
minimize the danger of tripping or slipping.  Be sure the table is free of all scrap, foreign material and tools before 
starting to cut.  Make certain the work area is well lighted and that a proper exhaust system is used to minimize dust.  
Powermatic recommends the use of anti-skid floor strips on the floor area where the operator normally stands and 
that each machine’s work area be marked off.   Provide adequate work space around the machine. 
 
Operator position.  Stand to one side of the conveyor table and make sure no one else is standing in line with the 
table while feeding into the machine. The wide belt sander operates at high speed and should a part slip, it will exit 
the machine at a high rate of speed and may result in injuiries to anyone standing directly in front of the infeed. 
(Keep conveyor belt clean and check pin-roll adjustments.) Maintain a balanced stance and keep your body under 
control at all times. Do not overreach or use excessive force to perform any machine operation.   
 
Hand safety. Keep hands clear while feeding parts onto the conveyor table. The part will be forced down as it 
begins to feed into the machine, causing a pinching action between the part and the table. Use caution! Hands 
should be clear of the stock and the table to avoid pinching. Never reach into a running machine. Turn off electrical 
power and stop machine before attempting to retrieve parts from within the machine. Contact with internal moving 
parts can result in loss or injury to fingers, hands and arms. 
 
Housekeeping.  Before turning on machine, remove all extra equipment such as keys, wrenches, scrap, and 
cleaning rags away from the machine 


Содержание 1632

Страница 1: ...uctions and Parts Manual 16 inch Open End Belt Sander Model 1632 WMH TOOL GROUP 2420 Vantage Drive Elgin Illinois 60123 Part No M 0460219 Ph 800 274 6848 Revision G1 1 06 www wmhtoolgroup com Copyright WMH Tool Group ...

Страница 2: ...ions outside our facilities or to a lack of maintenance WMH TOOL GROUP LIMITS ALL IMPLIED WARRANTIES TO THE PERIOD SPECIFIED ABOVE BEGINNING FROM THE DATE THE PRODUCT WAS PURCHASED AT RETAIL EXCEPT AS STATED HEREIN ANY IMPLIED WARRANTIES OR MERCHANTABILITY AND FITNESS ARE EXCLUDED SOME STATES DO NOT ALLOW LIMITATIONS ON HOW LONG THE IMPLIED WARRANTY LASTS SO THE ABOVE LIMITATION MAY NOT APPLY TO Y...

Страница 3: ...elt Tracking Tension 9 Adjusting Table Parallel to Sanding Surface 9 Feed Speed Adjustment 9 Operation 10 Controls 10 Optional Accessories 11 Trouble shooting 12 Parts Lists Exploded Views Air Control Assembly 13 Electricity Control Upper Adj Roller 14 15 Sanding Drum Assembly 16 18 Base Table Adjust Assembly 19 21 Conveyor Belt Table Reduction Motor 22 25 Electrical Schematics 460V 3 Phase 26 230...

Страница 4: ...s Before continuing use of the machine a guard or other part that is damaged should be carefully checked to ensure that it will operate properly and safely and perform its intended function Check for alignment of moving parts binding of moving parts breakage of parts mounting and any other conditions that could effect its operation A guard or other part that is damaged should be properly repaired ...

Страница 5: ...ull and void Misuse Do not use this Powermatic open end sander for other than its intended use If used for other purposes Powermatic disclaims any real or implied warranty and holds itself harmless for any injury or damage which may result from that use If you are not thoroughly familiar with the operation of wide belt sanders obtain advice from your supervisor instructor or other qualified person...

Страница 6: ...essed air requirements at 5 atm PSI 4 Dust collection minimum CFM required 800 Dust port diameter 4 Overall dimensions 40 L x 29 W x 66 H Main motor 1632 3 7 1 2 HP 3 Ph 230 460V prewired 230V Main motor 1632 1 5 HP 1 Ph 230V only Net weight 996 lbs Shipping weight 1 106 lbs NOTE The above specifications were current at the time this manual was published but because of our policy of continuous imp...

Страница 7: ...hrough the mounting holes located on the four corners of the base Remove the protective coating from the rollers with a soft cloth moistened with a good commercial solvent DO NOT USE acetone gasoline lacquer thinner or any type of flammable solvent Do not use an abrasive pad ELECTRICAL CONNECTIONS WARNING All electrical connections should be made by a qualified electrician Failure to comply may re...

Страница 8: ...unt the side support with two hex cap screws and flat washers 3 Insert the door latches into the slots on the cabinet doors 4 Assemble the sanding belt to the rollers Make sure the arrow on the belt matches the rotation of the rollers ADJUSTMENTS AIR CONTROL Connect the machine to an air hose The air pressure that flows into the filter can be adjusted with the knob A Figure 2 Normal working air pr...

Страница 9: ...f calipers to measure the thickness remaining on both sides Adjust the parallelism using the four hex screws A under the table base See Figure 5 FEED SPEED ADJUSTMENT The Model 1632 has two speeds that feed the workpiece at 15 feet per minute FPM finished surface sanding and 32 5 FPM for faster lighter sanding To change the feed rate 1 Disconnect machine from power source 2 Remove cap screw that h...

Страница 10: ... stop When the bar is pressed the brakes are applied 1 Connect the air line to the sander 2 Adjust the pressure gauge to 75 psi 3 Engage the upper roller by turning the knob A Figure 8 to the upper position 4 Adjust the platen with the lever B and lock it C in the desired position The platen or main rubber roller can act as the sanding contact as well as a combination of both 5 Rotate the main han...

Страница 11: ...ull out the support extension and tighten the wing nuts After the first pass the workpiece can be spun around and fed back through the machine for a maximum sanding width of 32 inches OPTIONAL ACCESSORIES 6293307 Sanding Belt 17 x 54 60 Grit 6293308 Sanding Belt 17 x 54 80 Grit 6293309 Sanding Belt 17 x 54 100 Grit 6293310 Sanding Belt 17 x 54 120 Grit ...

Страница 12: ...or too little pressure from 1 Adjust to proper pressure belt pressure plate 2 Sanding belt clogged with dust 2 Blow out dust with high pressure air 3 Belt worn out 3 Replace belt Straight notch grooves on 1 Dirty pressure roller 1 Clean pressure roller workpiece 2 Rubber roller scratched 2 Replace rubber roller 3 Worn out lining and graphite on platen 3 Replace lining graphite head Snake marks on ...

Страница 13: ...Brake Cylinder 1 4 6293485 Multi Hole Connector 1 5 6293486 Air Valve 1 6 6293487 Air Sensor Assembly 1 7 6293488 Air Sensor 1 8 6293489 Switching Valve 1 9 6293250 Cylinder 1 10 6293252 Oscillator Cylinder 1 11 6293490 Plastic Pipe 1 12 6293491 Plastic Joint PT 1 8 1 13 6293492 Copper Joint 1 14 6293493 T Joint 1 15 6293494 Silencer 1 ...

Страница 14: ...l Bearing 4 20 6293222 Set Screw 1 4 X 3 4 4 21 6293223 Ring 4 22 6293224 Control Plate 1 23 6293225 Gear Washer 3 16 6 24 6293226 Pan Head Screw 3 16 X 3 8 6 25 6293227 Amp Meter 1 26 6293228 Feed Start Switch 1 6293228 Sanding Belt Start Switch 1 27 6293229 Feed Stop Switch 1 6293229 Sanding Belt Stop Switch 1 28 6293230 Stop Switch 1 29 6293231 Power Indicator Light 1 30 6293232 Current Coil 1 ...

Страница 15: ...15 Electricity Control Upper Adj Roller 1632 Sander ...

Страница 16: ...tance 1 23 6293262 Piston 1 24 6293263 Upper Cover 1 25 6293264 Plastic Joint Assembly 1 26 6293265 Membrane 1 27 6293266 Handle Assembly 1 28 6293267 Set Screw 1 4 X 1 4 1 29 6293268 Handle Hub 1 30 6293269 Hex Head Screw 3 8 X 1 1 4 4 31 6293270 Adjust Bolt 3 8 X 1 1 4 2 32 6293271 Spring 2 33 6293272 Shaft 1 34 6293273 Key 5 X 5 X 30 2 35 6293274 Key 8 X 8 X 40 1 36 6293275 Lock Handle 1 37 629...

Страница 17: ...8 6293330 Pan Head Screw 5 32 X 1 2 2 69 6293331 Pan Head Screw 5 32 X 1 2 70 6293332 Hex Head Screw 5 16 X 2 4 71 6293333 Cap Screw M8 X 20 4 72 6293334 Hex Head Screw 1 4 X 2 4 73 6293209 Pan Head Screw 1 4 X 1 2 6 74 6293335 Air Valve 1 75 6293336 Block Connector 1 76 6293337 Knob 1 77 6293338 Cylinder Disk 1 78 6293339 Eccentric Roller 2 79 6293340 Pan Head Screw 3 16 X 5 8 8 80 6293341 Gear W...

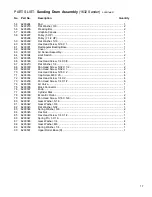
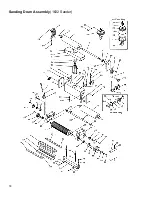
Страница 18: ...18 Sanding Drum Assembly 1632 Sander ...

Страница 19: ...1 22 6293210 Flat Washer 1 4 1 23 6293437 Hex Head Screw 1 4 X 1 1 24 1632 424 Motor Plate 5 HP 1 6293439 Motor Plate 7 1 2 HP 1 25 6293212 Hex Nut 1 2 1 26 6293440 Base 1 27 6293441 Set Screw 5 16 X 1 4 28 6293442 Hex Socket Cap Screw 5 16 X 1 1 2 4 29 6293299 Flat Washer 5 16 1 30 1632 430 Belt A 84 2 31 6293444 Flat Head Screw 1 4 X 1 2 2 32 6293445 Key 19 X 3 8 X 270 1 33 6293446 Base Lifting ...

Страница 20: ... 8 X 1 1 2 8 64 6293342 Gear Washer 3 8 8 65 6293469 Air Cylinder Assembly 1 66 6293300 Hex Head Screw 5 16 X 1 2 67 6293289 Hex Nut 5 16 2 68 6293470 Key 7 1 2 HP 10 X 8 X 60 1 6293471 Key 5 HP 1 69 6293472 Cover 1 70 6293210 Flat Washer 1 4 2 71 6293457 Hex Nut 3 8 1 72 6293473 Solenoid Valve 1 73 6293331 Pan Head Screw 5 32 X 1 2 74 6293474 Filter 1 75 6293475 Pan Head Screw 5 32 X 1 3 8 1 76 6...

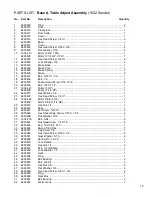
Страница 21: ...21 Base Table Adjust Assembly 1632 Sander ...

Страница 22: ...r C 14T 1 22 6293369 Output Shaft 1 23 6293370 Key 5 X 5 X 10 1 24 6293371 Gear D 46T 1 25 6293372 Washer 1 26 6293373 Ball Bearing 1 27 6293374 Oil Seal 20 35 7 1 28 6293375 Rear Cover 1 29 6293376 Oil Seal 12 22 5 1 30 6293377 Needle Bearing 1012 1 31 6293378 Washer 1 32 6293379 O Ring 1 33 6293380 Fixing Screw 3 34 6293381 Gear A 8T 1 35 6293382 Motor 1 4 HP 1 PH 1 6293220 Motor 1 4 HP 3 PH 1 3...

Страница 23: ...djust Bolt 3 8 X 1 1 2 2 64 6293400 Roller 1 65 6293401 Shaft 1 66 6293402 Roller Base L 1 67 6293403 Roller Base R 1 68 6293404 Roller Frame L 2 69 6293405 Roller Frame R 2 70 6293406 Roller 2 71 6293407 Pan Head Screw 5 32 X 1 3 4 2 72 6293408 Front Plate 1 73 6293409 Limit Switch 1 74 6293330 Pan Head Screw 5 32 X 1 2 1 75 6293410 Bakelite 1 76 6293411 Hex Head Screw 3 8 X 1 2 2 77 6293212 Hex ...

Страница 24: ...24 Conveyor Belt Table 1632 Sander ...

Страница 25: ...25 Reduction Motor 1632 Sander ...

Страница 26: ...26 ELECTRICAL SCHEMATIC 1632 Sander 460V 3 Phase ...

Страница 27: ...27 ELECTRICAL SCHEMATIC 1632 Sander 230V 1 Phase 3 Phase ...

Страница 28: ...28 WMH Tool Group 2420 Vantage Drive Elgin Illinois 60123 Phone 800 274 6848 www wmhtoolgroup com ...

Отзывы: