background image

Llame sin costo al: 1-800-737-2112


 © 2009 MAT Engine Technologies, LLC

PROBLEMA

CAUSAS POSIBLES

SOLUCIONES

Dificultad para arrancar el motor

1. Sin combustible

2. Regulador en la posición Parar

3. No se ha cebado el motor

4. Motor ahogado

5. El cable de la bujía está 

desconectado

6. Palanca o cable defectuoso de 

control del regulador

7. Bujía hollinada

8. Filtro de aire obstruido

9. Filtro de combustible obstruido

10. Carburador sucio

11. Combustible contaminado

1. Agregar combuestible fresco

2. Mover el regulador a la posición Arranque

3. Oprimir el bulbo de cebado 3 veces, 

esperar 2 segundos entre cada pulsación.

4. Esperar varios minutos antes de arrancarla.

5. Conectar a la bujía el cable de la misma.

6. Inspeccionar la palanca y el cable.  

Reemplazarlos si fuera necesario.

7. Retirar la bujía.  Inspeccionarla.  

Reemplazarla si fuera necesario.

8. Retirar y limpiar el filtro de aire.

9. Retirar el filtro de combustible.  

Reemplazarlo si fuera necesario.

10. Llevar la unidad a un centro de servicio 

autorizado para limpieza del carburador.

11. Drenar el tanque de combustible.  

Limpiarlo.  Llenarlo con combustible fresco.

Engine Problems

El motor emite humo 

excesivamente

La marcha del motor es muy 

“irregular”.

Marcha errática del motor

El motor no puede mantener 

velocidad plena.

1. Sin aceite de motor

2. Nivel inadecuado del aceite del 

motor

3. Bujía hollinada

4. Filtro de aire obstruido

5. Filtro de combustible obstruido

6. Carburador desajustado

7. Combustible contaminado

1. Agregar aceite para motor

2. Revisar el aceite del motor.  Agregar o 

drenar aceite para motor si fuera necesario.

3. Retirar la bujía.  Inspeccionarla.  

Reemplazarla si fuera necesario.

4. Retirar y limpiar el filtro de aire.

5. Retirar el filtro de combustible.  

Reemplazarlo si fuera necesario.

6. Llevar la unidad a un centro de servicio 

autorizado para ajuste del carburador.

7. Drenar el tanque de combustible.  

Limpiarlo.  Llenarlo con combustible fresco.

Vibración excesiva / Ruido

1. Piezas flojas

2. Hilos de segadora de longitud 

desigual

3. Los tornillos de fijación del cabezal 

de la segadora están flojos

4. Problemas del motor (arriba)

1. Apretar todos los sujetadores.

2. Reemplazarlos con hilos de igual longitud 

para segadora.

3. Apretar los tornillos de fijación con la llave 

con mango en T.

4. Consultar las soluciones para el motor (arriba).

El motor sobrecalienta

1. Sistema de enfriamiento obstruido

2. Problemas del motor (arriba)

1. Retirar despojos del arrancador de 

retroceso y aletas de enfriamiento.

2. Consultar las soluciones para el motor (arriba).

El motor no para.

Defective throttle control lever or wire Inspeccionar la palanca y el cable.  

Reemplazarlos si fuera necesario.

Rendimiento deficiente de la 

segadora

1. El hilo de la segadora es 

demasiado corto.

2. Motor no está a plena admisión

3. Problemas del motor (arriba)

1. Reemplazar con un hilo de longitud 

correcta (56 cm [22 pulgadas]).

2. Mover la palanca del regulador a la 

posición MARCHA RÁPIDA.

3. Consultar las soluciones para el motor 

(arriba).

El cabezal de la segadora no 

retiene el hilo

1. Hilo de segadora no instalado 

apropiadamente

2. Retenedor de hilo averiado

3. Tamaño incorrecto del hilo

4. El hilo de la segadora es 

demasiado quebradizo

1. Seguir las instrucciones en la sección de 

mantenimiento sobre cómo instalar el hilo.

2. Ordenar el reemplazo de la unidad del 

cabezal de la segadora.

3. Utilizar un hilo de 4 mm (0.155 pulgadas)

4. Utilizar un hilo que ha estado sumergido en 

agua.

Diagnóstico y resolución de problemas

• Conserve todas las instrucciones 


43


Содержание P-WFT-16022

Страница 1: ...r safely operating and maintaining your Trimmer Read and save these instructions Refer to this manual each time before using your Trimmer Record the following for future reference Mfg Date Code ______...

Страница 2: ...entilated area Do NOT trim up and down slopes Trim across slopes Do NOT touch hot muffler or cylinder These parts are extremely hot from operation and may remain hot for a short time after operation R...

Страница 3: ...ing adjusting or making repairs always disconnect spark plug wire and put wire where it cannot contact the spark plug PREPARATION SAFETY WARNING Read understand and follow all instructions on this mac...

Страница 4: ...CARBON MONOXIDE an ODORLESS AND DEADLY GAS Never leave the trimmer unattended when the engine is running Stop the engine and make sure all moving parts have stopped Remove the wire from the spark plu...

Страница 5: ...gine is running except when specifically recommended by the manufacturer Keep the trimmer in safe working condition Check all fasteners at frequent intervals for proper tightness When servicing or rep...

Страница 6: ...1 Trimmer Head Drive Lever Engages the rotation of the trimmer head 2 Start Lever Release to stop the rotation of the trimmer head 3 Throttle Control Lever Controls the engine speed and stops the eng...

Страница 7: ...in 4 mm Trimmer Lines 2 sets Assembly Save all instructions If you need assistance or find any parts missing CALL TOLL FREE 1 800 737 2112 WARNING WARNING 1 Hold the handle with one hand and loosen b...

Страница 8: ...ngine is off and spark plug wire has been disconnected from spark plug 1 Place trimmer on a level surface 2 Remove Dipstick and wipe clean with cloth Refer to Figure 5 for location of Dipstick 3 Repla...

Страница 9: ...engine cool for several minutes before removing the fuel cap or adding fuel Never fill fuel tank indoors Do not smoke while adding fuel 1 Clean surface around fuel tank cap to prevent contaminations...

Страница 10: ...ation and function of all controls Know how to stop the engine quickly Before attempting to start the engine review the following steps 1 Unit has been assembled according to all assembly instructions...

Страница 11: ...ntil you feel tension in the starter rope Then quickly pull the recoil starter handle to completely unwind the starter rope DO NOT allow the starter rope to snap back Let the starter rope slowly re wi...

Страница 12: ...ea and around the muffler Using the unit with excessive debris can risk fire Always use extreme caution when using the trimmer during dry conditions If the trimmer lines become too short it will take...

Страница 13: ...reases in height at approximately 1 7 feet in 10 feet A 15 degree slope is a hill that increases in height at approximately 2 5 feet in 10 feet WARNING Use extreme care at all times and avoid sudden t...

Страница 14: ...dental starting and serious injury Important The warranty on this Trimmer does not cover items that have been subjected to operator abuse or negligence To receive full value from the warranty the oper...

Страница 15: ...drain plug and washer 8 To re fill engine with oil see engine preparation section How to Check Oil and Fill to Proper Level Figure 11 Oil Drain Plug NOTE View is bottom of the unit How to Clean the Ai...

Страница 16: ...rrect length See Figure 14 NOTE Do not allow the length of the lines to vary more than one inch Make sure the trimmer head is balanced and does not vibrate 4 Thread the ends of the new trimmer line th...

Страница 17: ...engine performance and cause damage 1 Stop engine and allow it to cool 2 Remove spark plug wire from spark plug 3 Remove the spark plug with a 13 16 in 21 mm deep well socket 4 Visually inspect the sp...

Страница 18: ...drive belt reverse the above steps 7 The torque specs are 22 40 foot pounds 30 55 Nm for the shield fasteners 27 33 foot pounds 36 6 44 7 Nm for the drive pulley mounting bolt and 18 25 foot pounds 24...

Страница 19: ...inder Slowly pull the recoil start grip so that the oil will protect the cylinder Install a spark plug in the cylinder Pull recoil slowly until resistance is felt This will close the cylinder valves W...

Страница 20: ...gine oil if necessary 3 Remove spark plug Inspect Replace if necessary 4 Remove and clean air filter 5 Remove fuel filter Inspect Replace if necessary 6 Take unit to an authorized service center for c...

Страница 21: ...use accident lack of proper maintenance tampering or alteration Travel handling transportation and in cidental costs associated with warranty repairs are not reimbursable under this warranty and are t...

Страница 22: ...ded there has been no abuse neglect or improper maintenance of your power equipment engine Where a warrantable condition exists METL will repair your power equipment engine at no cost to you including...

Страница 23: ...epair of your engine or product may be disallowed METL shall not be held liable hereunder for failures of any warranted parts caused by the use of such an unapproved add on modified counterfeit and or...

Страница 24: ...Exhaust System Catalytic muffler assembly if so equipped muffler gasket ex haust manifold Crankcase Breather Assembly Breather connection tube Miscellaneous Parts Used in Above Systems Hoses belts co...

Страница 25: ...al le ofrece las instrucciones completas para operar y mantener seguramente la segadora Lea y conserve estas instrucciones Refi rase a este manual cada vez antes de utilizar la segadora Anote lo sigui...

Страница 26: ...en la direcci n de las mismas Segar transversalmente a la pendiente NO tocar el silenciador caliente ni el cilindro Estas piezas est n extrema damente calientes durante el funciona miento y podr an p...

Страница 27: ...tar el cable de la buj a y colocarlo donde no pueda entrar en contacto con sta Seguridad durante la preparaci n ADVERTENCIA Leer entender y acatar todas las instrucciones en la m quina y en los manual...

Страница 28: ...adora desatendida mientras el motor est en marcha Parar el motor y asegurarse que todas las piezas m viles hayan parado Desconectar el cable de la buj a Si la segadora comenzara a vibrar anormalmente...

Страница 29: ...entras el motor est en marcha excepto cuando as lo recomiende el fabricante espec ficamente Mantener la segadora en condiciones de funcionamiento seguro Revisar todos los sujetadores a intervalos frec...

Страница 30: ...e la segadora 2 Barra de control de arranque paro Soltarla para parar la rotaci n del cabezal de la segadora 3 Palanca de control del regulador Controla la velocidad o para el motor 4 Empu adura de ar...

Страница 31: ...retroceso en la gu a del cord n enhebrar el cord n mediante torsi n en la gu a montada en el lado derecho del asidero C mo montar el asidero Asidero Empu adura de arranque de retroceso Gu a del cord n...

Страница 32: ...llenado de aceite varilla de aforar y enjugarla con un pa o 2 Retirar la tapa de llenado de aceite varilla de aforar y enjugarla con un pa o Consultar la figura 5 para determinar la ubicaci n de la v...

Страница 33: ...ombustible Jam s llenar el tanque de combustible en espacios interiores No fumar durante el abastecimiento de combustible 1 Limpiar la superficie alrededor de la tapa de combustible para evitar contam...

Страница 34: ...tiro del supresor de chispas viola la secci n 442 del California Public Resources Code C digo de Recursos P blicos de California as como tambi n otras leyes estatales y federales pertinentes Jam s hac...

Страница 35: ...oda pieza m vil No tocar el silenciador y las reas circundantes las temperaturas podr an ser superi ores a 65 6 C 150 F Mantener todos los dispositivos y pantallas de seguridad en posici n ADVERTENCIA...

Страница 36: ...o a la gu a de altura Para obtener resultados ptimos y la mayor duraci n del hilo remojar el hilo de la segadora en una cubeta de agua durante 24 horas antes de usarlo Un hilo h medo es m s flexible q...

Страница 37: ...en 0 5 m 1 7 pies por cada 3 m 10 pies Una pendiente de 15 grados es una cima que aumenta en altura a aproxima damente 0 8 m 2 5 pies por cada 3 m 10 pies ADVERTENCIA Tener sumo cuidado en todo moment...

Страница 38: ...a garant a de esta segadora no cubre elementos que se hayan visto sujetos a uso indebido o negligencia por parte del usuario Para recibir el monto completo de la garant a el usuario ha de dar mantenim...

Страница 39: ...ap n del drenaje de aceite y la arandela 8 Para rellenar el motor con aceite ver la secci n de preparaci n del motor C mo revisar el aceite y llenar hasta el nivel apropiado Figura 11 NOTA Vista desde...

Страница 40: ...V ase la Figura 14 No permitir que la longitud de los hilos var e m s de una pulgada Cerciorarse de que el cabezal de la segadora est equilibrado y no vibre 4 Enhebrar los extremos del hilo nuevo a tr...

Страница 41: ...y dejarlo enfriar 2 Retirar de la buj a el cable de la buj a 3 Retirar la buj a con un cubo de 21 mm 13 16 de pulgada de profundidad 4 Inspeccionar visualmente la buj a para determinar si tiene grieta...

Страница 42: ...es del par de torsi n son 30 55 Nm 22 40 pie libra para los sujetadores de la pantalla 36 6 44 7 Nm 27 33 pie libra para el perno de montaje de la polea de impulsi n y 24 4 34 Nm 18 25 pie libra para...

Страница 43: ...mente tirar de la empu adura de retroceso para que el aceite proteja al cilindro Instalar una buj a nueva en el cilindro Tirar del arrancador de retroceso lentamente hasta sentir tensi n en la cuerda...

Страница 44: ...ario 4 Retirar y limpiar el filtro de aire 5 Retirar el filtro de combustible Reemplazarlo si fuera necesario 6 Llevar la unidad a un centro de servicio autorizado para ajuste del carburador 7 Drenar...

Страница 45: ...indebido accidente falta de mantenimiento apropiado manipulaci n imprudente y peligrosa o alteraci n Los costos de viaje manipulaci n transporte e incidentales asociados con reparaciones bajo garant a...

Страница 46: ...figuran a continuaci n siempre y cuando no haya habido uso indebido descuido o mantenimiento inadecuado del motor para equipo mec nico Cuando exista una condici n garantizable METL reparar el motor pa...

Страница 47: ...Garant a del sistema pro control de emisiones contaminantes la reclamaci n para reparaci n del motor o producto podr a declararse nula y sin efecto METL no asumir responsabili dad alguna bajo la prese...

Страница 48: ...obina de encendido Sistema de escape Unidad de silenciador catal tico si est provisto empaque del silenciador m ltiple de escape Unidad del respirador del c rter del cig e al Tubo de conexi n de respi...

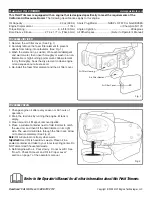
Страница 49: ...ke 2 76 x 1 77 in 70x45 mm Spark Plug Model NHSP LD F6TC or NGK BP6ES or Champion N11YC Angle of Ignition 20 degrees All Other Specs Refer to Operator s Manual TO CHANGE AIR FILTER TO CHANGE THE OIL 1...

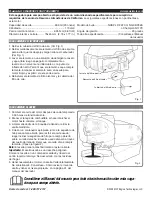
Страница 50: ...N11YC ngulo de ignici n 20 grados Toda otra especificaci n Cons ltese el Manual del usuario PARA CAMBIAR EL FILTRO DE AIRE PARA CAMBIAR EL ACEITE 1 Cambiar el aceite del motor despu s de cada tempora...

Отзывы: