background image

Llame sin costo al: 1-800-737-2112 


 Copyright © 2009 MAT Engine Technologies, LLC

Uso 

(la siguiente)

• Conserve todas las instrucciones  

Cómo parar el soplador

C

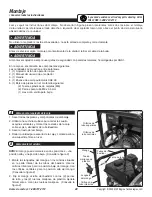
Mueva el interruptor de encendido/apagado a la posición apagada “OFF”.  (Consulte la figura 6)

Cómo ajustar el ángulo de caudal vertical

D

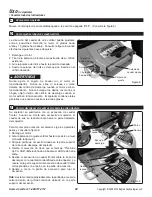
La  dirección  del  caudal  de  aire  vertical  puede  ajustarse 

entre  3  posiciones:  Derecho  (a  nivel),  15  grados  hacia 

arriba y 15 grados hacia abajo.  Consulte la figura 8 cuando 

efectúe los siguientes pasos de ajuste: 

1. Detenga el motor.

2. Tire de la palanca de índice para extraerla de su orificio  

  existente.

3. Gire la palanca de índice hasta la posición deseada.

4. Suelte la palanca de índice y deje que se inserte en el  

  orificio deseado.

ADVERTENCIA


Nunca  ajuste  el  ángulo  de  caudal  con  el  motor  en 

funcionamiento!    Nunca  se  sitúe  ni  coloque  su  mano 

delante  del  orificio  de  descarga  cuando  el  motor  esté  en 

funcionamiento.    Nunca  coloque  los  dedos,  las  manos  ni 

ningún  objeto  dentro  del  orificio  de  descarga  cuando  el 

motor está en funcionamiento.  El soplador contiene aletas 

giratorias que pueden ocasionar lesiones graves.

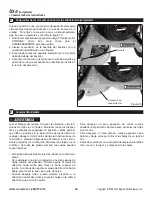
Cómo redireccionar el caudal de aire hacia la parte delantera

E

Su  soplador  se  suministra  con  un  accesorio  de  caudal 

frontal.    Cuando  se  monta  este  accesorio  al  soplador,  el 

caudal  de  aire  se  redireccionará  hacia  la  parte  delantera 

del soplador.


32


Para montar este accesorio al soplador, siga los siguientes 

pasos y consulte la figura 9:

1. Detenga el motor.

2. Gire la palanca de ajuste vertical hasta la posición a nivel  

  (consulte la figura 8)

3. Afloje la perilla de accesorio situada en la parte superior  

  de la boca de descarga del soplador.

4. Oriente  el  accesorio  de  modo  que  el  mensaje  “This  Side  

  Up For USE” (Este lado hacia arriba para el USO) esté hacia  

  arriba.

5. Deslice el accesorio de caudal frontal sobre la boca de  

  descarga con la orientación identificada en la etiqueta.  La  

  ranura en la parte superior del accesorio de caudal frontal  

  corresponderá con el perno en la perilla de accesorio.

6. Apriete  a  mano  la  perilla  de  accesorio  para  fijar  el  

  accesorio.

Nota: 

si está montado apropiadamente, la perilla de accesorio 

calzará  dentro  del  gofrado  redondo  ubicado  en  la  parte 

superior del accesorio.

Boca de 

descarga 

Perno

Gofrado 

redondo

Ranura

Perilla de 

accesorio

Accesorio de 

caudal frontal

Figura 9

Palanca de 

ajuste

A nivel 

15 grados 

hacia arriba 

Celosía de 

caudal de aire

15 grados 

hacia abajo 

Figura 8

Содержание CYCLONE P-WB-163150

Страница 1: ...complete instructions for safely operating and maintaining your Blower Read and save these instructions Refer to this manual each time before using your Blower Record the following for future referen...

Страница 2: ...uable property Do NOT touch hot muffler or cylinder These parts are extremely hot from operation and may remain hot for a short time after operation There are rotating blades inside the blower which c...

Страница 3: ...se of the blower before starting Know how to stop the engine quickly Familiarize yourself with all the safety and operating decals on this equipment CAUTION Blower will propel debris at high speed and...

Страница 4: ...plug If the blower should start to vibrate abnormally stop the engine disconnect the spark plug wire and prevent it from touching the spark plug Check immediately for the cause Vibration is generally...

Страница 5: ...this Manual Service and repair procedures can be done with the blower in an upright position Some procedures will be easier if the machine is lifted on a raised platform or working surface Use only or...

Страница 6: ...t Can be removed and stored under the frame when not in use 7 Attachment Knob Secures attachments to the dis charge chute 8 Front Swivel Wheel 360 degree swiveling wheel to allow for maneuverability 9...

Страница 7: ...rectly assembled WARNING Before doing any assembly or maintenance to the unit remove the wire from the spark plug WARNING Always wear ANSI compliant safety glasses with side shields while assembling t...

Страница 8: ...fill cap dipstick and wipe clean with cloth See Figure 3 3 Insert dipstick into fill spout but do NOT screw in Remove dipstick and check oil level 4 When oil level is full the oil will be at upper li...

Страница 9: ...rs can explode if ignited Handle with care Use fresh clean regular unleaded gasoline with a minimum of 88 Octane Do NOT use leaded gasoline gasohol methanol or diesel fuel Do NOT mix oil with gasoline...

Страница 10: ...ENGINE section 2 Make sure the ON OFF switch is in the ON Position See Figure 6 3 Push the primer bulb 3 times waiting 2 seconds between each push See Figure 5 NOTE Not required when re starting a war...

Страница 11: ...es inside which can cause serious injury How to Redirect Air Flow toward the Front E A Front Flow Attachment is included with your blower Assembling this attachment to the blower will cause the air fl...

Страница 12: ...or s manual Know location and functions of all controls Keep all safety devices and shields in place Never allow children or uninstructed adults to operate the blower Keep bystanders away from machine...

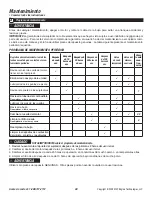
Страница 13: ...initial use 2 Change engine oil after first 5 8 hours of initial use 3 Change oil every 25 hours if operating in dusty conditions or in high temperatures 4 Clean air filter every 10 hours if operatin...

Страница 14: ...ure 12 when following steps below 1 Remove the outer wing nut washer and air filter cover 2 Remove the inner wing nut and the air filter IMPORTANT Use care when removing the air filter so dirt and deb...

Страница 15: ...ht as on a furnace water heater or clothes dryer Allow engine to cool before storing unit WARNING Do not remove gasoline while inside a building near a fire or while you smoke Gasoline fumes can cause...

Страница 16: ...737 2112 English only You may also write to METL Corporate Office CORRESPONDENCE ONLY ATTN Technical Service METL 6700 Wildlife Way Long Grove IL 60047 Technical Service When contacting the Technical...

Страница 17: ...in fuel tank Clean fuel tank Fill with fresh fuel Engine Problems Engine smokes excessively Engine runs very rough Engine runs erratically Engine cannot maintain full speed 1 No Engine Oil 2 Engine oi...

Страница 18: ...ccident lack of proper maintenance tampering or alteration Travel handling transportation and incidental costs associated with warranty repairs are not reimbursable under this warranty and are the res...

Страница 19: ...w provided there has been no abuse neglect or improper maintenance of your power equipment engine Where a warrantable condition exists METL will repair your power equipment engine at no cost to you in...

Страница 20: ...epair of your engine or product may be disallowed METL shall not be held liable hereunder for failures of any warranted parts caused by the use of such an unapproved add on modified counterfeit and or...

Страница 21: ...oil Exhaust System Catalytic muffler assembly if so equipped muffler gasket ex haust manifold Crankcase Breather Assembly Breather connection tube Miscellaneous Parts Used in Above Systems Hoses belts...

Страница 22: ...Questions Call Toll Free at 1 800 737 2112 Copyright 2009 MAT Engine Technologies LLC 21...

Страница 23: ...al le ofrece las instrucciones completas para operar y mantener seguramente el soplador Lea y conserve estas instrucciones Refi rase a este manual cada vez antes de utilizar el soplador Anote lo sigui...

Страница 24: ...apunte hacia personas mascotas u objetos de valor NO tocar el silenciador caliente ni el cilindro Estas piezas est n extremadamente calientes durante el funcionamiento y podr an permanecer calientes...

Страница 25: ...raci n Leer entender y acatar todas las instrucciones en la m quina y en los manuales Familiarizarse completamente con los controles y el uso apropiado de el soplador antes del arranque S pase c mo pa...

Страница 26: ...s y tener cuidado al retroceder Jam s utilizar el soplador sin buena visibilidad o luz PELIGRO No poner en marcha el motor en espacios interiores o dentro de un rea cerrada Los gases del escape son pe...

Страница 27: ...condiciones de funcionamiento seguro Revisar todos los sujetadores a intervalos frecuentes para una sujeci n apropiada Al dar mantenimiento a el sopladoro repararla no inclinar la m quina lateral o l...

Страница 28: ...elantera de la unidad Puede retirarse y almacenarse debajo del bastidor cuando no se usa 7 Perilla de accesorio Fija los accesorios a la boca de descarga 8 Rueda giratoria delantera Rueda que gira 360...

Страница 29: ...tes de efectuar alg n montaje o mantenimiento de la unidad retirar el cable de la buj a ADVERTENCIA Al montar el soplador siempre usar gafas de seguridad con pantallas laterales homologadas por ANSI E...

Страница 30: ...adora en una superficie a nivel y asegu rarsequelasruedasajustablesest nconfiguradasdeman era tal que el marco principal de la bordeadora est a nivel 2 Retirar la tapa de llenado de aceite varilla de...

Страница 31: ...nimo NO usar gasolina con plomo gasohol metanol ni combustible di sel No mezclar el aceite con gasolina NO permitir que la gasolina se contamine con polvo agua o despojos CUIDADO El uso de un tipo inc...

Страница 32: ...de la buj a est conectado a la buj a 2 Mover la palanca de control de la profundidad a la posici n de arranque V ase la figura 6 3 Oprimir el bulbo del cebador 3 veces esperar 2 segundos entre cada o...

Страница 33: ...redireccionar el caudal de aire hacia la parte delantera E Su soplador se suministra con un accesorio de caudal frontal Cuando se monta este accesorio al soplador el caudal de aire se redireccionar ha...

Страница 34: ...tivos y pantallas de seguridad en posici n Jam s permitir que ni os o adultos sin la instrucci n adecuada utilicen el soplador Apagar el motor antes de limpiar obstrucciones de la cuchilla o efectuar...

Страница 35: ...sitos de combusti n del cilindro el pist n y las v lvulas 34 NOTAS IMPORTANTES sobre el programa de mantenimiento 1 Revisar nuevamente al apriete del sujetador despu s de las primeras 2 horas del uso...

Страница 36: ...eguir los pasos siguientes 1 Retirar la tuerca de aletas exterior la arandela y la cubierta del filtro de aire 2 Retirar la tuerca de aletas interior y el filtro de aire IMPORTANTE Retirar el filtro d...

Страница 37: ...a suciedad hojas despojos grasa etc de el soplador incluyendo las aletas de enfriamiento del cilindro agujeros de la cubierta del arrancador de retroceso bajo el tanque de combustible y bajo el silenc...

Страница 38: ...2 solo ingl s Puede tambi n escribir a Sede social METL SOLAMENTE CORRESPONDENCIA ATTN Servicio t cnico METL 6700 Wildlife Way Long Grove IL 60047 Servicio t cnico Al ponerse en contacto con Departame...

Страница 39: ...ustible fresco Problemas del motor El motor emite humo excesivamente La marcha del motor es muy irregular Marcha err tica del motor El motor no puede mantener velocidad plena 1 Sin aceite de motor 2 N...

Страница 40: ...uso indebido accidente falta de mantenimiento apropiado manipulaci n imprudente y peligrosa o alteraci n Los costos de viaje manipulaci n transporte e incidentales asociados con reparaciones bajo gara...

Страница 41: ...mpo que figuran a continuaci n siempre y cuando no haya habido uso indebido descuido o mantenimiento inadecuado del motor para equipo mec nico Cuando exista una condici n garantizable METL reparar el...

Страница 42: ...a por la Garant a del sistema pro control de emisiones contaminantes la reclamaci n para reparaci n del motor o producto podr a declararse nula y sin efecto METL no asumir responsabili dad alguna bajo...

Страница 43: ...m dulo bobina de encendido Sistema de escape Unidad de silenciador catal tico si est provisto empaque del silenciador m ltiple de escape Unidad del respirador del c rter del cig e al Tubo de conexi n...

Страница 44: ...Llame sin costo al 1 800 737 2112 Copyright 2009 MAT Engine Technologies LLC 43...

Отзывы: