background image

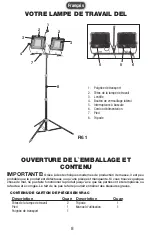
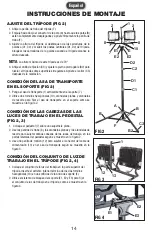
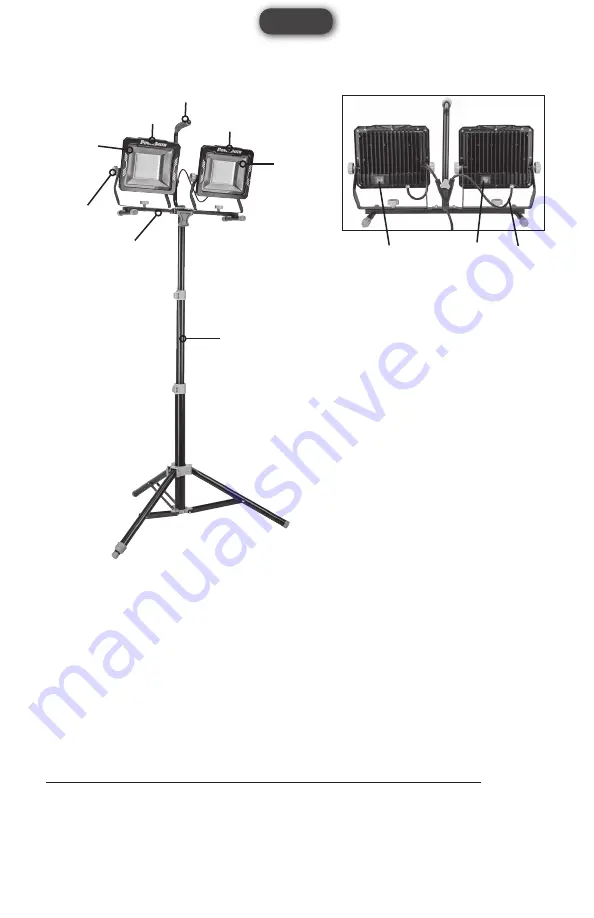
1.  Poignée de transport
2.  Têtes de la lampe de travail
3.   Lentille
4.   Bouton de verrouillage latéral
5.   Interrupteurs à bascule
6.   Cordon d’alimentation
7.   Pied
8.   Tripode

FIG 1

5

5

6

3

2

2

3

1

8

7

4

Têtes de la lampe de travail 


2

Pied      


1

Poignée de transport   


1

Tripode   


1

Manuel d'utilisation   

1

8

Français

VOTRE LAMPE DE TRAVAIL DEL 

OUVERTURE DE L`EMBALLAGE ET 

CONTENU

IMPORTANTE

!


Grâce à des techniques modernes de production de masse, il est peu 

probable que la produit est défectueux ou qu'une pièce est manquante. Si vous trouvez quelque 
chose de mal, ne pas faire fonctionner la produit jusqu'à ce que les parties ont été remplacés ou 
la faute a été corrigée. Le fait de ne pas le faire pourrait entraîner des blessures graves.

CONTENU DE CARTON DE PIÈCES EN VRAC

   Description   


Quan  Description 

         Quan

Содержание PWLD300T

Страница 1: ... WITH TRIPOD Operator s Manual SAVE THIS MANUAL FOR FUTURE REFERENCE WARNING To reduce the risk of injury user must read and understand this operator s manual before operating this product 888 552 8665 Toll Free Help Line www powersmithPRODUCTs com ...

Страница 2: ...on cord of cord type SW SW A SOW SOW A STW STW A STOW STOW A SJW SJW A SJOW SJOW A SJTW SJTW A or SJTOW SJTOW A Do not look directly at the lighted lamps to avoid eye injuries Always keep the work light away from any flammable surface or materials Always check for damaged or worn out parts before using the work light Broken parts will affect the operation of the work light Replace or repair damage...

Страница 3: ...anual 1 3 English KNOWING YOUR WORK LIGHT UNPACKING AND CONTENT IMPORTANT Due to modern mass production techniques it is unlikely the product is faulty or that a part is missing If you find anything wrong do not operate the product until the parts have been replaced or the fault has been rectified Failure to do so could result in serious personal injury CONTENTS IN PACKAGE Description Q TY Descrip...

Страница 4: ...ling ATTACH THE CARRYING HANDLE TO THE STAND FIG 2 1 Place the carrying handle 1 vertically on the stand 7 2 Use two hex screws 10 flat washers and spring washers to secure the carrying handle on the stand as shown in FIG 2 ATTACH THE WORK LIGHT HEADS TO THE STAND FIG 2 3 1 Place the stand 7 on a flat surface 2 Use the locking knobs 8 flat washers and spring washers to secure both work light heads...

Страница 5: ...maintenance Simply clean the lens regularly with a non abrasive cleaner Use the similar care for the stand and tripod WARNING Always make sure the work light is unplugged and completely cool before attempting to clean it WARRANTY This product is warranted free from defects in material and workmanship for 5 FIve years after date of purchase This limited warranty does not cover normal wear and tear ...

Страница 6: ...t doit comprendre ce manuel de l opérateur avant de fonctionner cet produit CONSERVER CE MANUEL POUR FUTURE RÉFÉRENCE PWLD300T LAMPE DE TRAVAIL DEL DOUBLE DE 30 000 LUMENS AVEC TRÉPIED Manuel d utilisation 888 552 8665 LIGNE D ASSISTANCE SANS FRAIS www powersmithPRODUCTs com ...

Страница 7: ...SOW A STW STW A STOW STOW A SJW SJW A SJOW SJOW A SJTW SJTW A ou SJTOW SJTOW A Ne pas regarder directement une lampe allumée pour éviter des lésions oculaires Garder toujours la lampe de travail à l écart de toute surface ou tout matériel inflammable Avant d utiliser la lampe de travail vérifier toujours qu il n y a pas de pièces endommagées ou usées Les pièces brisées compromettront le bon foncti...

Страница 8: ...çais VOTRE LAMPE DE TRAVAIL DEL OUVERTURE DE L EMBALLAGE ET CONTENU IMPORTANTE Grâce à des techniques modernes de production de masse il est peu probable que la produit est défectueux ou qu une pièce est manquante Si vous trouvez quelque chose de mal ne pas faire fonctionner la produit jusqu à ce que les parties ont été remplacés ou la faute a été corrigée Le fait de ne pas le faire pourrait entra...

Страница 9: ... FIG 2 1 Placer la poignée de transport 1 à la verticale sur le pied 7 2 Utilisez deux vis à tête hexagonale 10 des rondelles plates et des rondelles grower pour fixer la poignée sur le pied comme montré à la figure 2 FIXATION DES TÊTES DE LA LAMPE DE TRAVAIL AU PIED FIG 2 3 1 Placer le pied 7 sur une surface plane 2 Se servir des boutons de verrouillage 8 de rondelles plates et à ressort pour fix...

Страница 10: ...pe de travail avant de la débrancher ENTRETIEN Votre lampe de travail exige très peu de soin et d entretien Nettoyer simplement les lentilles régulièrement avec un nettoyant non abrasif Entretenir le pied et le tripode de la même manière AVERTISSEMENT S assurer toujours que la lampe de travail est débranchée et qu elle a complètement refroidi avant de tenter de la nettoyer GARANTIE Ce produit est ...

Страница 11: ...el Operario ADVERTENCIA Para reducir el riesgo de la herida el usuario debe leer y deber comprender el manual de este operario antes de operar este instrumento GUARDE ESTE MANUAL PARA FUTURAS CONSULTAS PWLD300T 888 552 8665 LÍNEA DE AYUDA GRATUITA www powersmithproducts com ...

Страница 12: ...guientes tipos SW SW A SOW SOW A STW STW A STOW STOW A SJW SJW A SJOW SJOW A SJTW SJTW A ó SJTOW SJTOW A No mire directamente a las luces encendidas para impedir lesiones en los ojos Mantenga apartada siempre la luz de trabajo de cualquier superficie o material inflamable Compruebe siempre si hay piezas dañadas o desgastadas antes de usar la luz de trabajo Las piezas rotas afectarán la operación d...

Страница 13: ...1 Manual del operario 1 13 Español SU LUZ DE TRABAJO DE LED DESEMPAQUETADO Y CONTENIDO IMPORTANTE Debido a las modernas técnicas de producción en masa es poco probable que la producto está defectuoso o que una parte se pierde Si encuentra algo incorrecto no opere la producto hasta que las partes han sido sustituidos o la falla ha sido corregida El no hacerlo podría resultar en lesiones graves PIEZ...

Страница 14: ... 1 verticalmente en el soporte 7 2 Utilice dos tornillos hexagonales 10 arandelas planas y arandelas de resorte para fijar el asa de transporte en el soporte como se muestra en la figura 2 CONEXIÓN DE LAS CABEZAS DE LAS LUCES DE TRABAJO EN EL PEDESTAL FIG 2 3 1 Coloque el pedestal 7 sobre una superficie plana 2 Use las perillas de traba 8 las arandelas planas y las arandelas de resorte para sujeta...

Страница 15: ...empre apague la luz de trabajo antes de desenchufarla ANTENIMIENTO Su luz de trabajo requiere muy poco cuidado y mantenimiento Simplemente limpie la lente con regularidad con un limpiador que no sea abrasivo Use cuidados similares para el soporte y el trípode ADVERTENCIA Asegúrese siempre de que la luz de trabajo esté desenchufada y completamente enfriada antes de intentar limpiarla GARANTÍA Este ...

Страница 16: ...Richpower Industries Inc 736 Hampton Road Williamston SC USA www richpowerinc com 2021 05 v01 ...

Отзывы: