background image

10 


control the forward motion. 


Steer the machine by moving the handle sideways to the right or left


ALWAYS maintain good footing so that you do not slip and lose control when starting or operating 

the machine. 


Prior to operation 


Make sure that all dirt, mud, etc. are thoroughly removed from the unit prior to operation

Special 

effort should be given to the bottom face of the vibrating plate and those areas adjacent to the cooling 

air inlet of engine, carburetor, and air cleaner


Check all bolts and screws for tightness and make sure all bolts and screws are securely 

tightened

Loose bolts and screws may cause damage to the Unit


Check the V-belt for tightness

The normal slack should be approximately 10-15mm (1/2") when the 

belts are forcibly depressed in the middle position between the two sheaves

If there is excess belt 

play, there could be a decrease in the impact force or erratic vibration, causing machine damage


Check the engine oil level and if the engine oil level is low, it should be refilled


Remove the oil plug to check the oil level

Make sure the compactor is level when checking

The oil 

level should be up to the oil plug

Every month or every 200 hours of operation

replace the oil


Use the motor oil SAE When changing the oil, the old oil can be drained by tipping the unit

The oil 

will drain easily while it is hot. 


A regular grade gasoline should be used in the engine. When filling the fuel tank. Make sure the fuel 

filter is used


Be careful with the operating place and ventilation. Avoid operating the machine in a closed room, 

tunnel, or other badly ventilated places


Be careful with the hot members

Mufflers and other hot members are dangerous

Do not touch them. 


Observe with the following cautions when transporting

Clamp fuel tank cap securely

And turn the 

fuel valve OFF at the source during. Drain gasoline from fuel tank before transporting over a long 

distance or on rough roads


Stop engine without fail before replenishing fuel tank. Never replenish gasoline while the engine is 

running or remains hot otherwise spilled or evaporated fuel is liable to catch fire from engine sparks 

or muffler heat

Wipe off spilled fuel. 


Keep inflammable away from the vicinity of the exhaust port

Be careful with gasoline match, straw 

and other inflammable, since the exhaust port is subjected to a high temperature. 


1.


Start the engine.   

2.


As the engine warms up, gradually move the choke lever to the OPEN position. 

3.


Move the speed control lever from the MIN to the MAX position


Содержание PS8810

Страница 1: ...MANUAL 196CC Plate Compactor Model PS8810 Have product questions or need technical support Please feel free to contact us Website www Amerisuninc com Toll free 1 800 791 9458 M F 9 5 EST Email support amerisuninc com ...

Страница 2: ...2 ...

Страница 3: ...Package dimensions L x W x H 27 6x18 9x28 3 inches Weight 243 lb Thank you for purchasing Power Smart products Please register online at www Amerisuninc com The information will allow us to track your warranty and update on your unit Important Our company does not provide email or personal information to any third party for any reason For any questions check our website or call customer service at...

Страница 4: ...ndoors CAN KILL YOU IN MINUTES Engine exhaust contains carbon monoxide CO This is a poison gas you cannot see or smell If you can smell the engine exhaust you are breathing CO But even if you cannot smell the exhaust you could be breathing CO NEVER use a plate compactor inside homes garages crawl spaces or other partially fully enclosed areas Deadly levels of carbon monoxide can build up in these ...

Страница 5: ...ill Always check the machine for loosened threads or bolts before starting Always wear proper respiratory hearing and eye protection during operation Manufacturer does not assume responsibility for any accident due to equipment modifications and will also void the warranty Never use accessories or attachments that are not recommended for this model of plate compactor DO NOT add fuel to the plate c...

Страница 6: ...6 Knowing your plate compactor 1 Throttle level 2 Handle 3 Frame 4 Belt cover 5 Engine supporter plate 6 Bottom plate 7 Exciter 8 Engine ...

Страница 7: ... using a multi viscosity check the oil level more frequently than you would otherwise STEP 1 FILL OIL The plate compactor is shipped without oil User must add the proper amount of oil before operating the plate compactor for the first time The oil capacity of the engine crankcase is 20 fl oz Select good quality detergent oil bearing the American Petroleum Institute API service classifications SJ S...

Страница 8: ...STEP 3 CHECK FOR LOOSE PARTS Before using the plate compactor always check for broken or loose parts Any screw bolt or nut runs the risk of loosening due to the vibratory nature of this machine Always make sure to properly tighten these types of parts prior to operation to best prevent injury Remove dirt and dust particularly around the area of the recoil starter and the foot of the machine Operat...

Страница 9: ...xcessive moisture may cause soil particles to stick together and prevent good compaction If soil is extremely wet allow it to dry somewhat before compacting WARNING DO NOT operate the plate on concrete or on extremely hard dry compacted surfaces The plate will jump rather than vibrate and could damage both the plate and the engine IMPORTANT The plate compactor should not be used for more than two ...

Страница 10: ...ry month or every 200 hours of operation replace the oil Use the motor oil SAE When changing the oil the old oil can be drained by tipping the unit The oil will drain easily while it is hot A regular grade gasoline should be used in the engine When filling the fuel tank Make sure the fuel filter is used Be careful with the operating place and ventilation Avoid operating the machine in a closed roo...

Страница 11: ... drainage Change oil more often if operating under heavy load or high ambient temperatures It is also necessary to drain the oil from the crankcase if it has become contaminated with water or dirt The oil capacity of the engine in this plate compactor is 20 fl oz Add oil when the oil level is low DRAINING THE OIL FROM THE ENGINE 1 Place a container underneath the engine to catch oil as it drains 2...

Страница 12: ... The gap should be 0 7 0 8 mm 0 028 0 031 in 5 If you are re using the spark plug use a wire brush to clean any dirt from around the spark plug base and then re gap the spark plug 6 Screw the spark plug back into its place on the plate compactor using the spark plug wrench Do not over tighten spark plug Recommended tightening of spark plug is to of a turn after spark plug gasket contacts spark plu...

Страница 13: ...d fuel stabilizer in the proper ratio to the tank until the tank is full NOTE Filling the tank reduces the amount of air in the tank and helps reduce deterioration of fuel Run the engine for 5 10 minutes allowing stabilized fuel mixture to circulate through the carburetor When storing the plate compactor for extended periods of time Drain the fuel tank and the carburetor Change oil Do not obstruct...

Страница 14: ...Operating speed of throttle incorrectly set Set throttle lever to correct position Excess oil Drain the excess oil Clutch has slipped Replace or adjust the clutch Spring failure Replace spiral spring Incorrect Engine Speed Adjust the engine speed to meet the task at hand Not enough power behind plate compactor Air cleaner clogged Clean or replace the air cleaner element Air in fuel line Bleed air ...

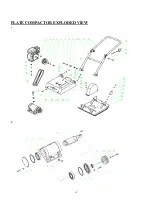
Страница 15: ...15 PLATE COMPACTOR EXPLODED VIEW 1 2 ...

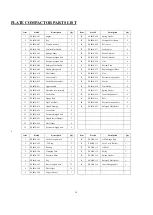
Страница 16: ...36 PS8810 036 Flat Gasket 6 14 PS8810 014 Throttle Line Assembly 1 37 PS8810 037 Spring Gasket 6 15 PS8810 015 Locked Nut 2 38 PS8810 038 Inner Hexagon bolt 6 16 PS8810 016 Flange Bolt 2 39 PS8810 039 Belt 2 17 PS8810 017 Flat Cross Bolt 4 40 PS8810 040 External hexagon bolt 4 18 PS8810 018 Handle Damper 2 41 PS8810 041 Enlarged Flat Gasket 4 19 PS8810 019 Locked Nut 8 20 PS8810 020 External hexag...

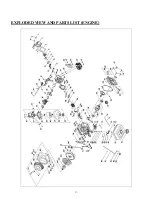
Страница 17: ...17 EXPLODED VIEW AND PARTS LIST ENGINE ...

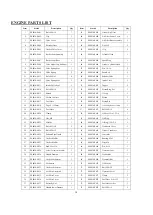
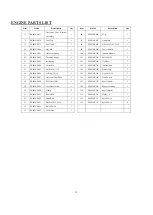
Страница 18: ...Pin 1 18 PS8810 E018 Tape L 150mm 1 56 PS8810 E056 Connecting Rod Assembly 1 19 PS8810 E019 Fuel Hose 1 57 PS8810 E057 Bolt M8 32 6 20 PS8810 E020 Clamp 1 58 PS8810 E058 Oil Seal 25 41 25 6 1 21 PS8810 E021 Nut M8 2 59 PS8810 E059 Oil Plug 1 22 PS8810 E022 Muffler 1 60 PS8810 E060 O Ring 15 8 2 5 2 23 PS8810 E023 Bolt M5 10 2 61 PS8810 E061 Crankcase Cover 1 24 PS8810 E024 Bolt M6 12 2 62 PS8810 E...

Страница 19: ...0 E102 Flywheel 1 84 PS8810 E084 Cotter Pin 1 103 PS8810 E103 Cooling Fan 1 85 PS8810 E085 Oil Seal 6 11 4 1 104 PS8810 E104 Starter Cup 1 86 PS8810 E086 O Ring 5 2 1 9 1 105 PS8810 E105 Nut M14 1 5 1 87 PS8810 E087 Governor Gear Shaft 1 106 PS8810 E106 Stop Switch 1 88 PS8810 E088 Roll Over Valve 1 107 PS8810 E107 Recoil Starter 1 89 PS8810 E089 Fuel Hose Jacket 1 108 PS8810 E108 Blower Housing 1...

Страница 20: ...he original receipt which lists the date of purchase month and year and the name of the company purchased from THIS LIMITED WARRANTY DOES NOT APPLY TO ANY ACCESSORY ITEMS INCLUDED WITH THE TOOL SUCH AS CIRCULAR SAW BLADES OTHER RELATED ITEMS OR TO ANY REPLACEMENT PARTS LISTED UNDER MAINTENANCE ANY IMPLIED WARRANTIES SHALL BE LIMITED IN DURATION TO TWO 2 YEARS FROM DATE OF PURCHASE SOME STATES IN T...

Страница 21: ...21 ...
Отзывы: