


01.4IB.51809
Powered by Safety
®
12
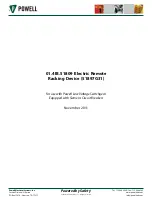
Installation & Operation
Electric Remote Racking Device for
Powell LV Switchgear w/ Siemens Circuit Breakers
2) Inserting the Circuit Breaker Into the
Compartment
Refer to the specific circuit breaker
instruction bulletin for instructions to insert
the circuit breaker into the compartment.
3) Racking the Circuit Breaker Into the
Compartment
a. Verify the breaker is discharged
(tripped).
b. Release the racking handle from the
breaker and pull the handle half way
out, not to the fully extended position
(Figure 5). Refer to breaker I.B. for
detailed instructions.
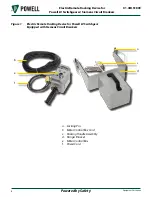
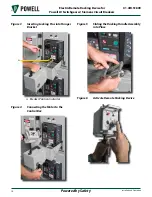
c. Position the racking arm assembly on
the electric racking device to match the
position of the breaker racking handle
prior to installing the device
(Figure 3, a). The racking arm assembly
can be positioned by hand.
d. Prior to lifting the device in place,
depress the pins and lift the ball detent
in the barrel of the hinge and release.
This will hold the pin up and out of the
way and make for easier installation.
e. Lift the racking device by the handle
(Figure 3, a). Position the device in
place and insert the pin in the other
half of the hinge mounted on the door
(Figure 3, a & b).
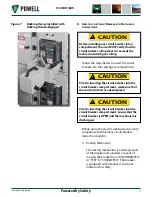
f. With the racking device secured to
the door, position the racking handle
through the racking handle assembly
on the racking device (Figure 7). Make
sure the breaker racking handle is
extended fully and locks in place.
g. Verify the door is closed and latched
and the breaker is tripped.
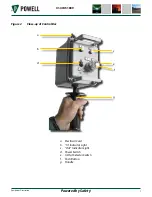
h. Insert the cylindrical plug into the
remote racking device motor (Figure 4).
Lock the plug by turning it clockwise.
i. Ensure the motor control box power
switch is in the “OFF” position
(Figure 2, d).
j. Physically move the motor control box
to a remote area and connect the power
cord (Figure 1, f) to a 120VAC power
source.
k. When racking “IN” turn the IN/OUT
selector switch (Figure 2, e) on the
motor control box to the “IN” position.
l. Move the power switch to the “ON”
position (Figure 2, d).
Note:
The housing on the push button is a
switch, and can be rotated to either
the “IN” or “OUT” positions.
m. To begin racking the circuit breaker into
the compartment, depress the push
button on the motor control box
(Figure 6).
Note:
If the push button is released during
operation the motor will stop.
n. When the push button is depressed, the
“IN” indicator light (Figure 2, b) will be
energized and illuminated.
o. When the breaker is fully racked “IN”
the remote racking device torque
limiter will begin to slip and there will
be a clear clicking sound along with a
vibration of the racking device. At this
point, release the push button. The
breaker position indicator will read
“CONNECTED” (Figure 3, a).
Note:
If the remote location that was
selected is in a location where the
breaker can not be seen and the
torque limiter can not be heard it
is suggested to perform a racking
operation on dead bus and time the
operation. Document the time and
rack the breaker in and out using the
documented time.
p. Disconnect the 120VAC power source
and remove the remote racking device.


