Poulan Pro 199338 Скачать руководство пользователя страница 14

14

GENERAL REC OM MEN DA TIONS

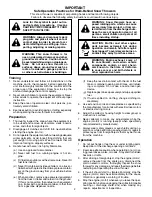
The warranty on this snow thrower does not cover items that 
have been sub ject ed to operator abuse or negligence.  To 
receive full value from the warranty, operator must maintain 
snow thrower as in struct ed in this manual.  Some ad just -
ments will need to be made periodically to properly maintain 
your snow thrower.  All adjustments in the Service and 
Ad just ments section of this manual should be checked at 
least once each season.

•     Once a year, you should replace the spark plug and 

check belts for wear.  A new spark plug will help your 
engine run better and last longer.

•      Follow the maintenance schedule in this manual.

NOTE:

 Use only Original Equipment Manufacturer (OEM) 

parts to service this unit.  Failure to do so can cause the unit 
to malfunction and pose a risk of injury to the operator.

BEFORE EACH USE

1.    Check engine oil level.

2.    Check for loose fasteners.

3.      Check controls to be sure they are functioning properly.

LUBRICATION

Keep your snow thrower well lubricated
(See “LU BRI CA TION CHART”).

MAINTENANCE

LUBRICATION CHART


SAE 30 Motor Oil


See “ENGINE” in

Maintenance section

Engine 

oil

➀ 

Pivot points

SNOW THROWER

Always observe the safety rules when performing any 
main te nance.

TIRES

•         Maintain proper air pressure in both tires (See “PROD-

 UCT SPECIFICATIONS” section in this manual).

•         Keep tires free of gasoline and oil, which can harm rubber.

NOTE:

 To seal tire punctures and prevent fl at tires due to 

slow leaks, tire sealant may be purchased from your local 
parts dealer. Tire sealant also prevents tire dry rot and 
cor ro sion.

V-BELTS

Check V-belts for deterioration and wear after every 50 
hours of operation and replace if necessary. The belts 
are not ad just able. Replace belts if they begin to slip from 
wear. (See “TO REMOVE BELT COVER” in the Service 
and Adjustments section of this manual).

The V-belts on your snow thrower are of special con struc tion 
and should be replaced by original equipment man u fac tur er 
(OEM) belts avail able from your nearest dealer. Using other 
than OEM belts can cause personal injury or damage to 
the snow thrower.

Содержание 199338

Страница 1: ...ROWER Always Wear Eye Protection During Operation IMPORTANT MANUAL Do Not Throw Away WARNING Read the Owner s Manual and follow all Warnings and Safety Instructions Failure to do so can result in serious injury 199338 07 05 05 BY Printed in U S A ...

Страница 2: ...own from the machine Operation 1 Do not put hands or feet near or under rotating parts Keep clear of the discharge opening at all times 2 Exercise extreme caution when operating on or cross ing gravel drives walks or roads Stay alert for hidden hazards or traffic 3 After striking a foreign object stop the engine motor remove the wire from the spark plug disconnect the cord on electric motors thoro...

Страница 3: ...igh transport speeds on slippery surfaces Look behind and use care when operating in reverse 13 Disengage power to the collector impeller when snow thrower is transported or not in use 14 Use only attachments and accessories approved by the manufacturer of the snow thrower such as wheel weights counterweights or cabs 15 Never operate the snow thrower without good visibility or light Always be sure...

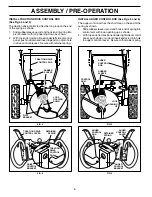
Страница 4: ...4 PARTS PACKED SEPARATELY IN CARTON ...

Страница 5: ...c tie holding speed control rod to lower handle 4 Remove snow thrower from carton and check carton thoroughly for additional loose parts HOW TO SET UP YOUR SNOW THROWER TOOL BOX See Fig 11 A toolbox is provided on your snow thrower The toolbox is located on top of the belt cover Store the extra shear bolts nuts and multi wrench provided in parts bag in the toolbox NOTE The multi wrench may be used...

Страница 6: ...ONTROL BRACKET RETAINER SPRING TRACTION DRIVE CONTROL LEVER FIG 4 AUGER CONTROL LEVER AUGER CONTROL ROD AUGER CONTROL BRACKET RETAINER SPRING FIG 6 AUGER CONTROL ROD CONTROL ARM RUBBER SLEEVE LOOP OPENING UP FIG 5 INSTALL AUGER CONTROL ROD See Figs 5 and 6 The auger control rod has the short loop on the end of the spring as shown 1 Slide rubber sleeve up rod and hook end of spring into control arm...

Страница 7: ... and threaded stud of mounting bracket 4 Install 3 8 washer and locknut on threaded stud and tighten securely CHUTE ROTATER HEAD 3 8 WASHER 3 8 LOCKNUT THREADED STUD PIN ROTATER HEAD MOUNTING BRACKET CHUTE BRACKET FIG 7 INSTALL CHUTE DEFLECTOR REMOTE CONTROL See Figs 8 and 9 1 Install remote cable bracket to discharge chute with 5 16 18 carriage bolt flat washer and 5 16 18 locknut as shown Tighte...

Страница 8: ... Save this manual for future reference These symbols may appear on your snow thrower or in literature supplied with the product Learn and understand their meaning FORWARD PRIMER IGNITION KEY INSERT TO START AND RUN PULL OUT TO STOP READ AND FOLLOW ALL SAFETY INFORMATION AND INSTRUCTIONS BEFORE USE OF THIS PRODUCT KEEP THESE INSTRUCTIONS FOR FUTURE REFERENCE DANGER OR WARNING REVERSE SNOW DISCHARGE...

Страница 9: ...d to cut through deep snowdrifts Primer pumps additional fuel from the carburetor to the cylinder for use when starting a cold engine Choke control used for starting a cold engine LH and RH turn triggers used to steer the snow thrower MEETS A N S I SAFETY REQUIREMENTS Our snow throwers conform to the standards of the American National Standards Institute RECOIL AUXILIARY STARTER HANDLE THROTTLE EN...

Страница 10: ...orward or reverse movement of the snow thrower AUGER Release the auger control lever to stop throwing snow ENGINE 1 Move throttle control to STOP position 2 Remove do not turn safety ignition key to prevent unauthorized use NOTE Never use choke to stop engine TO USE FUEL SHUT OFF VALVE See Fig 12 The fuel shut off valve is located beneath the fuel tank on the engine Always operate the snow thrower...

Страница 11: ...he handle and adjust the discharge chute direction without interrupting the snow throwing process USING THE CLEAN OUT TOOL See Fig 17 In certain snow conditions the discharge chute may be come clogged with ice and snow Use the clean out tool to dislodge this blockage When cleaning repairing or inspecting make certain all controls are disengaged and the auger impeller and all moving parts have stop...

Страница 12: ... and screw tight wait for a few seconds remove and read oil level If necessary add oil until FULL mark on dipstick is reached Do not overfill To change engine oil see TO CHANGE ENGINE OIL in the Maintenance section of this manual ADD GASOLINE See Fig 21 Fill fuel tank to bottom of tank filler neck Do not over fill Use fresh clean regular unleaded gasoline with a minimum of 87 octane Do not mix oil...

Страница 13: ...mois ture on the engine To avoid possible freeze up of the starter proceed as fol lows ELECTRIC STARTER 1 Connect the power cord to the engine 2 Plug the other end of the power cord into a three hole grounded 120 Volt A C receptacle 3 While the engine is running push starter button and spin the starter for several seconds NOTE The unusual sound made while starter is spinning will not harm the engi...

Страница 14: ...ningproperly LUBRICATION Keep your snow thrower well lubricated See LUBRICATION CHART MAINTENANCE LUBRICATION CHART SAE 30 Motor Oil See ENGINE in Maintenance section Engine oil Pivot points SNOW THROWER Always observe the safety rules when performing any maintenance TIRES Maintain proper air pressure in both tires See PROD UCT SPECIFICATIONS section in this manual Keeptiresfreeofgasolineandoil wh...

Страница 15: ...l cap dipstick Be careful not to allow dirt to enter the engine 8 Refill engine with oil through oil dipstick tube Pour slowly Do not overfill For approximate capacity see PRODUCTSPECIFICATIONS sectionofthismanual 9 Use gauge on oil fill cap dipstick for checking level Be sure dipstick cap is tightened securely for accurate reading Keep oil at FULL line on dipstick 10 Wipe off any spilled oil MUFF...

Страница 16: ... install a new 1 4 20 x 2 shoulder shear bolt Install 1 4 20 lock nut and tighten securely CAUTION Do not substitute Use only original equipment shear bolts as supplied with your snow thrower 4 Connect spark plug wire to spark plug IMPELLER SHEAR BOLTS The impeller is secured to the impeller shaft with two 2 capscrew shear bolts and hex nuts Should a foreign object or ice become lodged in the impe...

Страница 17: ... the auger belt and squeeze sides together above pulley so belt is fully seated in groove of pulley 11 Bring snow thrower completely together and check carefully for proper routing of belts If auger belt has becomedislodgedfromthepulley bycatchingtheidler arm bracket while bringing snow thrower together separate the snow thrower and repeat step 10 Belt must be fully seated in pulley groove when br...

Страница 18: ...hrower to a qualified service center Empty the fuel tank by starting the engine and letting it run until the fuel lines and carburetor are empty Never use engine or carburetor cleaner products in the fuel tank or permanent damage may occur Use fresh fuel next season NOTE Fuel stabilizer is an acceptable alternative in min imizing the formation of fuel gum deposits during storage Add stabilizer to ...

Страница 19: ... FULL position 1 Move choke to OFF position runs roughly 2 Blockage in fuel line 2 Clean fuel line 3 Stale fuel 3 Drain tank and refill with fresh clean fuel 4 Water in fuel 4 Drain fuel tank and carburetor refill tank with fresh gasoline 5 Carburetor is in need of 5 Contact a qualified service centre adjustment or overhaul Excessive 1 Loose parts or damaged 1 Tighten all fasteners Replace damaged...

Страница 20: ...y does not apply to any product which has been sub jected to alteration misuse abuse improper assembly or installation delivery damage or to normal wear of the product 5 Exclusions Excluded from this Warranty are belts shear pins normal wear normal adjustments standard hard ware and normal maintenance 6 In the event you have a claim under this Warranty you must return the product to an authorized ...

Отзывы: